Does the “C drive access denied” error message pop up when you try to launch a program or open the C drive? Here this post on MiniTool studies this issue in depth and proposes several useful solutions to help you get rid of the problem. Also, you can learn how to extract inaccessible files from the C drive by using professional data recovery software.
Problem: C Drive Is Not Accessible Access Denied
The C drive usually stores Windows system as well as application data. It is very maddening if you receive an error message saying “C drive access denied” when you try to open the C drive. When this problem occurs, you will not be able to access the files stored on the system drive and will not be able to run the applications it keeps.
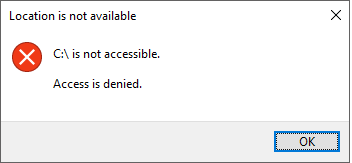
There are two main reasons why you might be denied access to the C drive.
- You do not have sufficient permission to access the C drive.
- There are file system errors or bad sectors on your disk, preventing you from accessing the partition.
Faced with the C drive access denied error, the top priority is to transfer your files since the hard drive may fail at any time, causing the files to be lost permanently. In the next part, we will describe three ways to help you extract your files from the C drive.
How to Extract Files From the Inaccessible C Drive
Note that for any of the methods below, you will need a USB drive with enough available storage space inserted into your computer.
Way 1. Transfer the Files Using CMD
Here you can see how to run the Command Prompt tool and transfer your files to an external USB disk.
Step 1. Open your computer, and press the Windows + I key combination to go to Settings.
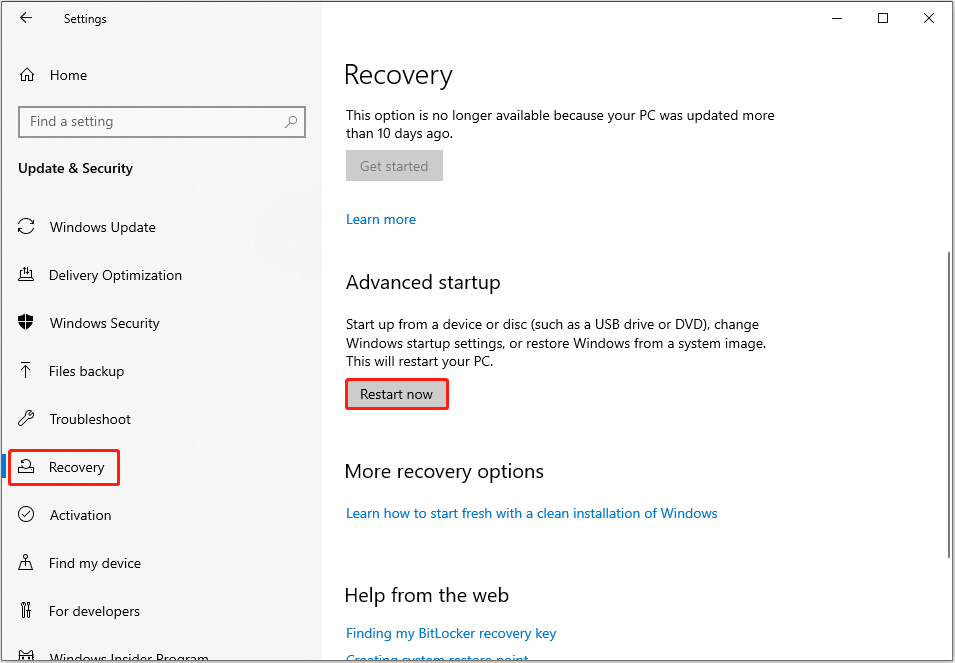
Step 2. Choose Update & Security > Recovery. Then click Restart now under the Advanced startup section.
Step 3. When you see the WinRE window, select Troubleshoot > Advanced options > Command Prompt.
Step 4. In the Command Prompt window, type notepad.exe and press Enter.
Step 5. Once the Notepad window appears, click File > Open. Now you can locate the files you want to transfer. Right-click the files you want to transfer, and choose Send to > select the USB drive.
No progress bar will appear during the file copy process and the PC will appear to be frozen. This process can take anywhere from a few minutes to a few hours to complete, depending on the amount of data and disk performance. It is recommended that you do not shut down the computer until the data transfer is complete.
Way 2. Extract Files From Safe Mode
According to user experience, booting Windows into the Safe Mode and transferring the files to a USB drive works. So, you can try this way and check if it applies to you. If you are not sure how to enter the Safe Mode, this post may help you: How to Start Windows 10 in Safe Mode.
Way 3. Use MiniTool Power Data Recovery to Extract Files
If the methods above fail to rescue your files, you may consider using professional and free data recovery software to extract the files. Which file restore tool should you choose among a large number of secure data recovery software? MiniTool Power Data Recovery is worth a try.
MiniTool Power Data Recovery excels at recovering deleted or lost files from your computer hard drives and is also adept at transferring existing files to prevent data loss. As long as the hard drive is not BitLocker encrypted and can be recognized by this software, it can deeply scan the partition for files.
Supported file types to retrieve include documents, pictures, videos, audio files, emails, archives, and so on. MiniTool has released a free edition of this file restore tool, enabling you to recover 1 GB of files without any cost. Now, download it and follow the guidance below to start secure data recovery.
MiniTool Power Data Recovery FreeClick to Download100%Clean & Safe
Step 1. Launch MiniTool Power Data Recovery and you will see its main interface. Stay at the Logical Drives section, then move your mouse cursor to the C drive and click the Scan button. Once you click it, the software will start scanning the partition for your files.
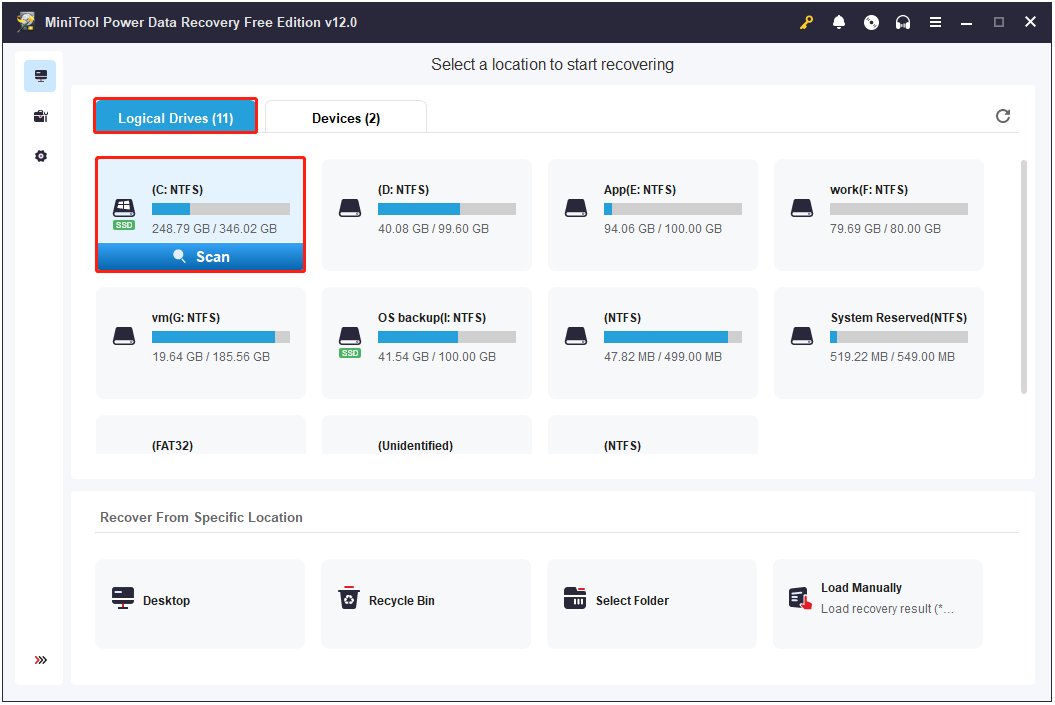
The scan duration varies depending on the amount of data and disk status. To guarantee the best scanning effects, it is strongly recommended to wait patiently until the full scan is completed.
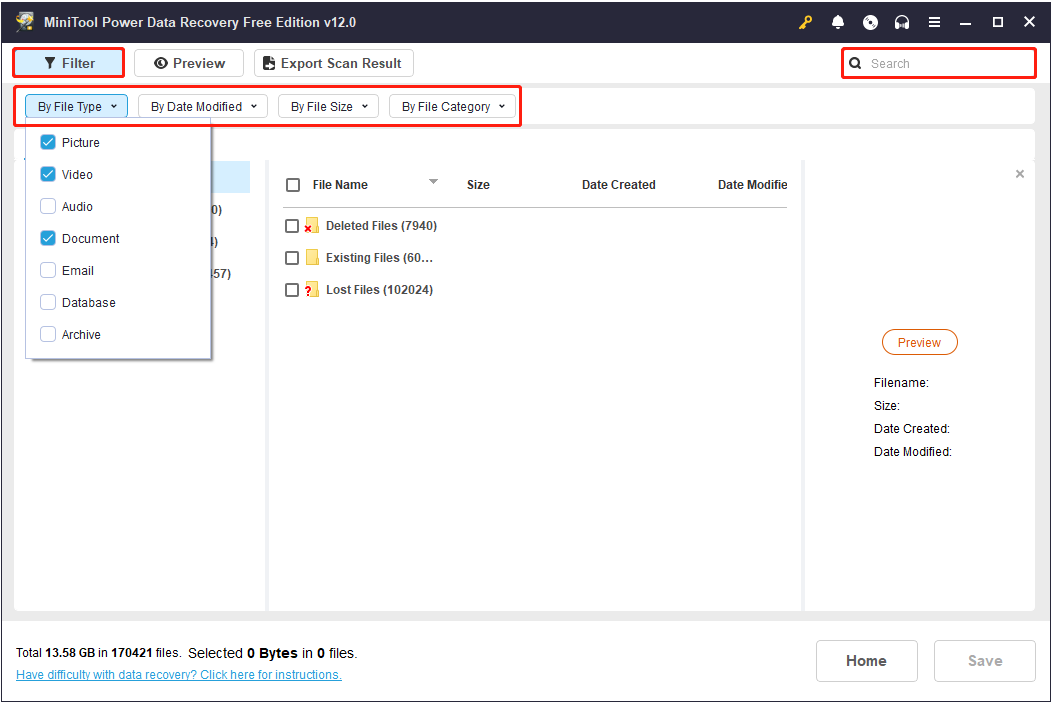
Step 2. After scanning, there are usually three folders displayed: Deleted Files, Lost Files, and Existing Files. You can double-click on the Existing Files folder to expand it, then continue to unfold each subfolder until you locate the desired files.
Moreover, you can make use of the Filter and Search features to simplify the file discovery process.
- Filter: This feature is designed to filter listed files by file type, file modification date, file size, and file category. Simply click the Filter button, and then you will have the option to set up the specific filtering rules from the pop-up window.
- Search: This feature enables you to search for a certain file or folder by file name. Type the keywords of the file name into the search box and press Enter, and then the search result will be displayed.
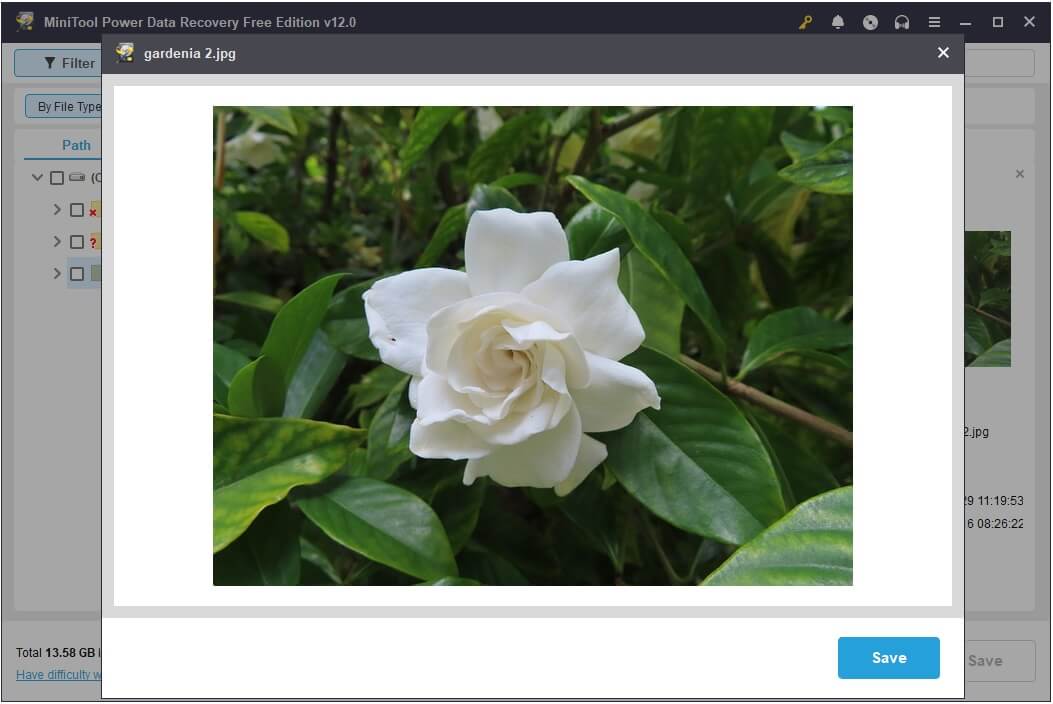
More exciting still, you have the ability to preview the listed items for confirmation. File types that can be previewed include documents, pictures, videos, audio files, emails, and so on. Note that only files not larger than 2 GB are supported to preview.
Previewing files is easy. Just double-click the target item, or select it and click the Preview button.
Step 3. Make sure you have selected all required files, and then click the Save button. In the pop-up small window, browse and select a suitable location, and click OK. When the recovery process completes, you can click the View Recovered button to view and use the recovered items.
Files beyond the first 1 GB capacity won’t be recovered and you are required to upgrade the free edition to an advanced edition for unlimited recovery.
How to Fix C Drive Access Denied Windows 10/11
Apart from file recovery, we also delve into solutions for the C drive access denied error. You can implement the approaches mentioned below one by one until you resolve this problem.
Fix 1. Assign Full Permission to the C Drive
If you are unable to access C drive, there may be permission restrictions. To resolve it, you need to take ownership of the C drive. Follow the steps below to gain full permissions.
In File Explorer, right-click the C drive and choose Properties. Under the Security tab, click the Edit button. Select your user name and make sure it has full control permission.
If a suitable user name is not available, you can click the Add button in the Security window, type your user name in the Enter the object names to select section, and then click OK. Return to the Security window and ensure that your user name has full control permissions.
Now you can try to open the C drive and check if the issue has been resolved.
Fix 2. Change Account Type to Administrator
Switching the account type from Standard to Administrator is also a proven solution to address the C drive access denied error. Here is how to do that.
Step 1. Open the Control Panel by using the Windows search box.
Step 2. Select the Change account type option.
Step 3. Click your account, and then several new options will show up. Click the Change the account type option.
Step 4. In the new window, make sure the Administrator option is selected.
Fix 3. Check the C Drive for File System Errors
File system errors or bad sectors in the hard drive may also lead to the C drive access denied issue. To resolve this problem, you can run the built-in error-checking tool from File Explorer.
First, open File Explorer by pressing Windows + E. Second, right-click the C drive and choose Properties. Move on to the Tools tab, and hit the Check button. The error-checking tool will start to scan your hard drive for file system failures automatically, and you need to wait for the repair process to end.
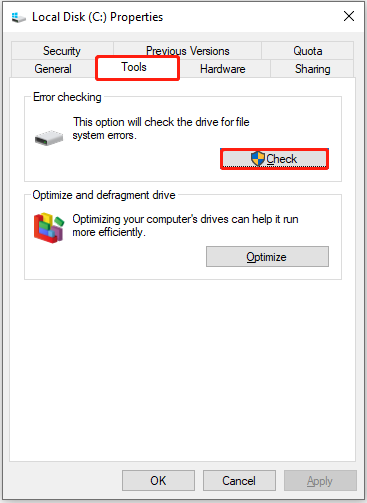
Occasionally, the error-checking process may get stuck or crash. In this case, you can use some alternatives to check for file system errors, such as the CHKDSK command, MiniTool Partition Wizard, etc.
MiniTool Partition Wizard FreeClick to Download100%Clean & Safe
See details in these tutorials:
- Use CHKDSK to Check for File System Errors
- Use MiniTool Partition Wizard to Check for File System Issues
Fix 4. Perform a Fresh Install
Many forum users have stated that a clean install of Windows can successfully resolve the C drive access denied issue. So, you can give it a try.
To perform a clean install, you need to prepare:
- Stable internet connection.
- A USB flash drive, SD card, or external hard drive with at least 8 GB of free storage space. Note that all files on the prepared drive will be deleted during the clean install process, so you need to ensure that the drive is empty or you have backed up your data.
Here we take Windows 10 for example:
Step 1. Go to this page, and click the Download Now button under Create Windows 10 installation media.
Step 2. Launch the downloaded Windows Media Creation tool and accept the license terms.
Step 3. Select Create installation media (USB flash drive, DVD, or ISO file) from another PC, and click Next.
Step 4. Follow the instructions on your screen to complete the process. Once the installation media is created, click Finish.
Step 5. Enter BIOS and let your computer boot from the created installation USB drive, and then complete the installation process according to the prompts on your screen.
For more detailed information about the fresh install process, please refer to the official tutorial: How to Reinstall Windows.
Bonus Tip: Back up Windows System or Files Regularly
When working with your computer, it’s not unusual to encounter issues like C drive access denied. Such disk or system issues can often lead to system failures or the loss of data. Consequently, it’s critical to regularly back up your system and data to safeguard against these potential problems.
If you are not familiar with system or data backup, you can try MiniTool ShadowMaker, the best PC backup software. It is equipped with various robust features, enabling you to carry out PC backup and restore efficiently and easily. It is worth mentioning that this software allows you to set automatic backups at different time intervals, which helps avoid the hassle of performing manual backups repeatedly.
A trial edition of this backup software is available, so, you can download it and use it for free within 30 days.
MiniTool ShadowMaker TrialClick to Download100%Clean & Safe
Related posts:
To Sum Up
In a nutshell, “C drive is not accessible access denied” is not an unsolvable problem. Usually, assigning full control permissions or reinstalling Windows can solve it. Of course, before performing any operation that may result in data loss, you should make sure you have recovered your files.
Please contact the MiniTool technical support team via [email protected] if you encounter any issues while using MiniTool software.
