People always delete what they don’t need on their computers. But they will find some files or folders can’t be deleted as they often do, for example, the WindowsApps folder. Some Windows users don’t even know the existence of the WindowsApps folder since it is usually hidden by Windows. Is it safe to delete the WindowsApps folder? How can you delete this folder? MiniTool will give you answers in the following content.
Is It Safe to Delete WindowsApps Folder
Some users would like to know whether it is safe to remove the WindowsApps folder from their computers. There are two situations:
- If the WindowsApps folder is located in C drive (the system drive), you’d better not delete it.
- If the WindowsApps folder is contained in another drive, you can remove it anytime you want.
As a result, it is completely safe to delete the WindowsApps folder from any drive on your PC except the system drive. However, if you need to delete the WindowsApps folder included in your C drive, you must make sure the apps contained in it are no longer useful and other programs will not use it. Otherwise, your computer may encounter problems after the WindowsApps folder cleanup.
Part 1: Delete WindowsApps Folder
How to Delete WindowsApps Folder
When you’re trying to delete the WindowsApps folder, you may find you can’t access the WindowsApps folder. In this case, it requires you to have administrative rights to delete this folder. You can follow the next steps to take control of this folder.
Method 1: Delete WindowsApps Folder with File Explorer
Step 1: Press Win + E to open File Explorer.
Step 2: Look for the WindowsApps folder on your computer.
Some folders are hidden by your computer automatically. If you can’t find the folder, please switch to the View section and check Hidden items to show the hidden folders.
Step 3: Right-click on the folder and select Properties.
Step 4: Turn to the Security section and click on Advanced.
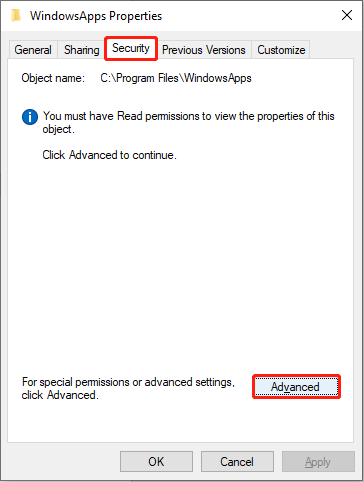
Step 5: Click on Change in the pop-up window.
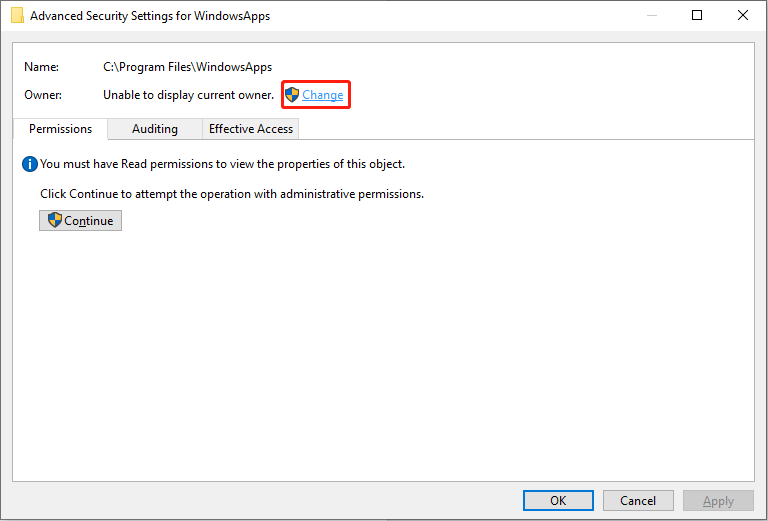
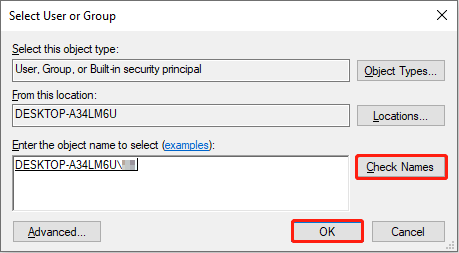
Step 6: Specify your account name or the full email associated with your account.
Step 7: Click on the Check Names button, then click OK.
Step 8: Check Replace owner on subcontainers and objects in the pop-up window.
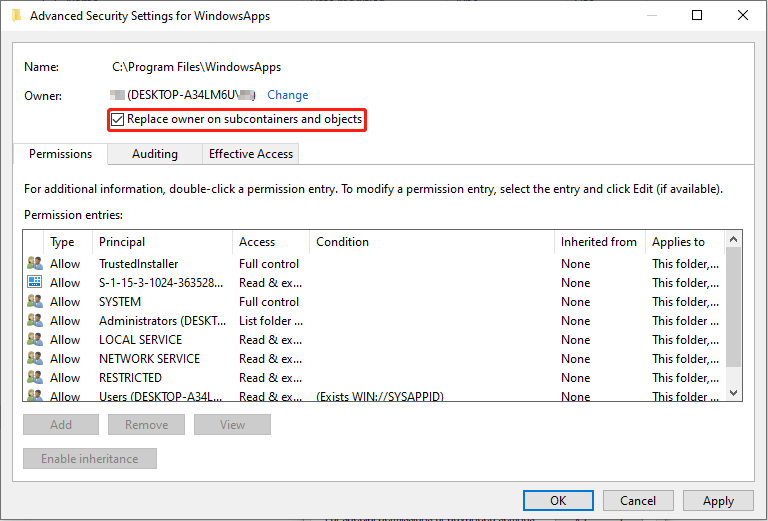
Step 9: Click on Apply and OK buttons.
Step 10: Back to the WindowsApps Properties window and click on the Advanced button.
Step 11: Click the Change permissions button.
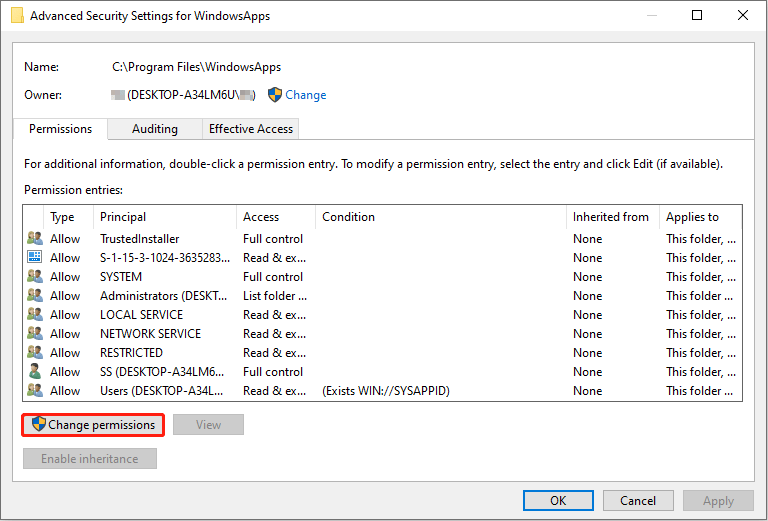
Step 12: Click Add, then click Select a principal in the following window.
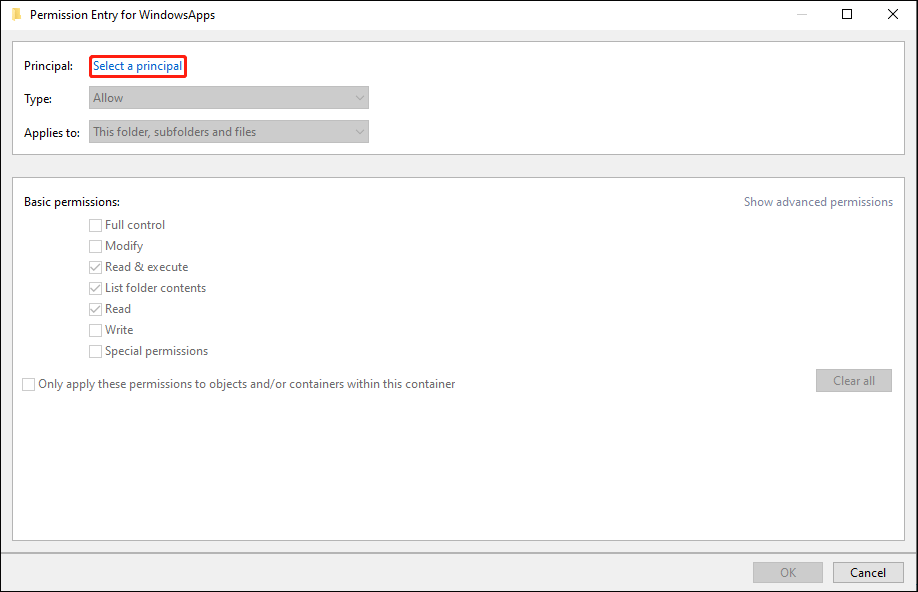
Step 13: Specify your account name or the full email associated with your account.
Step 14: Click the OK button.
Step 15: Check the Full control choice and click OK.
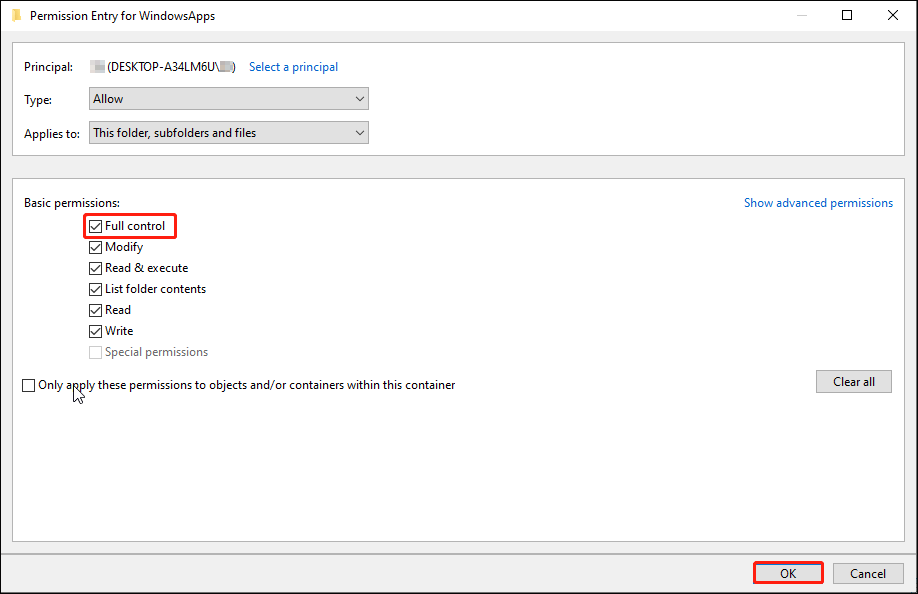
Step 16: Click on Apply.
Step 17: Wait for the process to finish, then click OK to close the window.
Step 18: Right-click on the WindowsApps folder, then you can delete it directly.
If you want to access the WindowsApps folder, this method also works. (Ignore the last step.)
Method 2: Delete WindowsApps Folder by Formatting
If you save the WindowsApps folder on your external hard drive or other non-system drives, you can also try this method. But before you start, you are supposed to back up your data on the external hard drive or the drive.
Part 1: Back Up Data
To find reliable backup software, MiniTool ShadowMaker should be the first choice. This freeware can back up your files, folders, partitions, disks, and operating systems. As a functional backup software, it prevents duplicated backups with differential and incremental backup functions. Besides, if you want to back up your data regularly, MiniTool ShadowMaker allows you to set time points to back up automatically.
You can download the trial edition to have a try.
MiniTool ShadowMaker TrialClick to Download100%Clean & Safe
For specific information about how to back up your vital data, please refer to this post: How to Backup Files on Windows 10? Try These Top 4 Ways
Part 2: Format via Disk Management
Step 1: Press Win + X and select Disk Management on the context menu.
Step 2: Choose the drive you need to format and right-click on it.
Step 3: Select Format.
Step 4: Set the Volume label and File system according to your requirements and click OK.
Part 2: Recover Lost/Deleted Data
How to Recover Deleted/Lost Data
If you format your external hard drive without backing up data, it is extremely needed to recover files. MiniTool Power Data Recovery is heartily recommended. As the best free data recovery software, it supports all Windows systems and allows you to recover files from external and internal hard drives.
Additionally, it is powerful in different recovery situations like recovering files from formatted, unidentified, or RAW drives. MiniTool Power Data Recovery will cause no damage to your data in the recovery process. Isn’t it a worthy choice?
Step 1: Download and install MiniTool Power Data Recovery by clicking the button below. Please do not save it to the drive you need to recover data from.
MiniTool Power Data Recovery FreeClick to Download100%Clean & Safe
Step 2: Connect your external hard drive and run the software.
Step 3: Select a partition to scan. If you want to recover files on the whole drive, you can turn to the Devices tab to scan the entire drive.
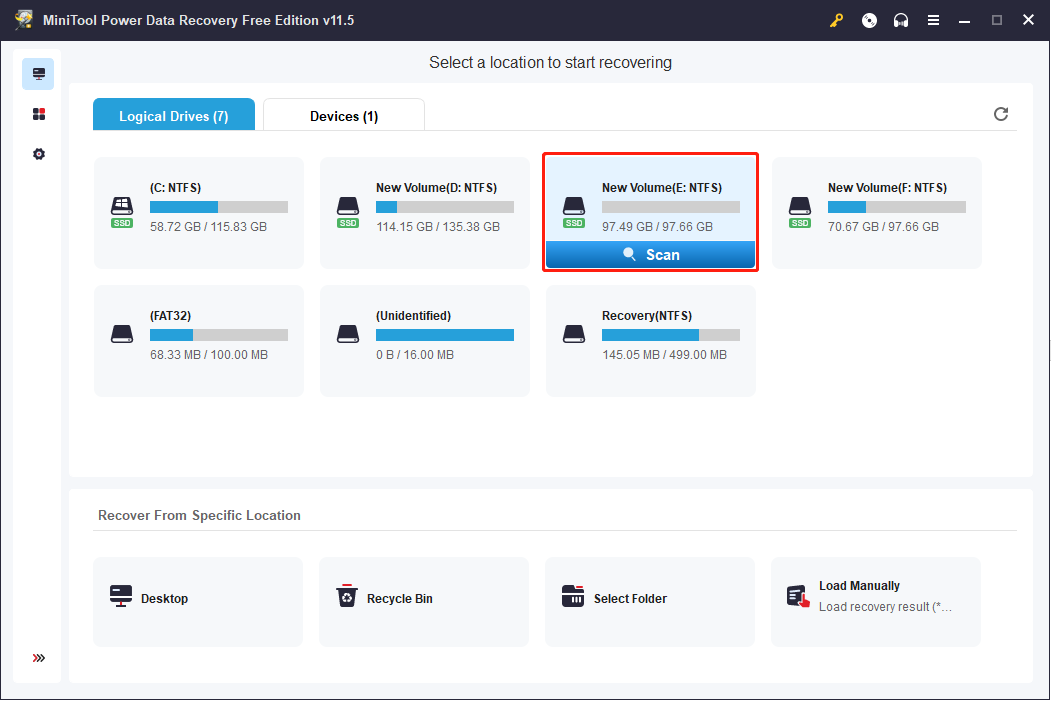
Step 4: Please wait for a few minutes patiently. After the scan process is completed, you can look through the result page to find your desired files.
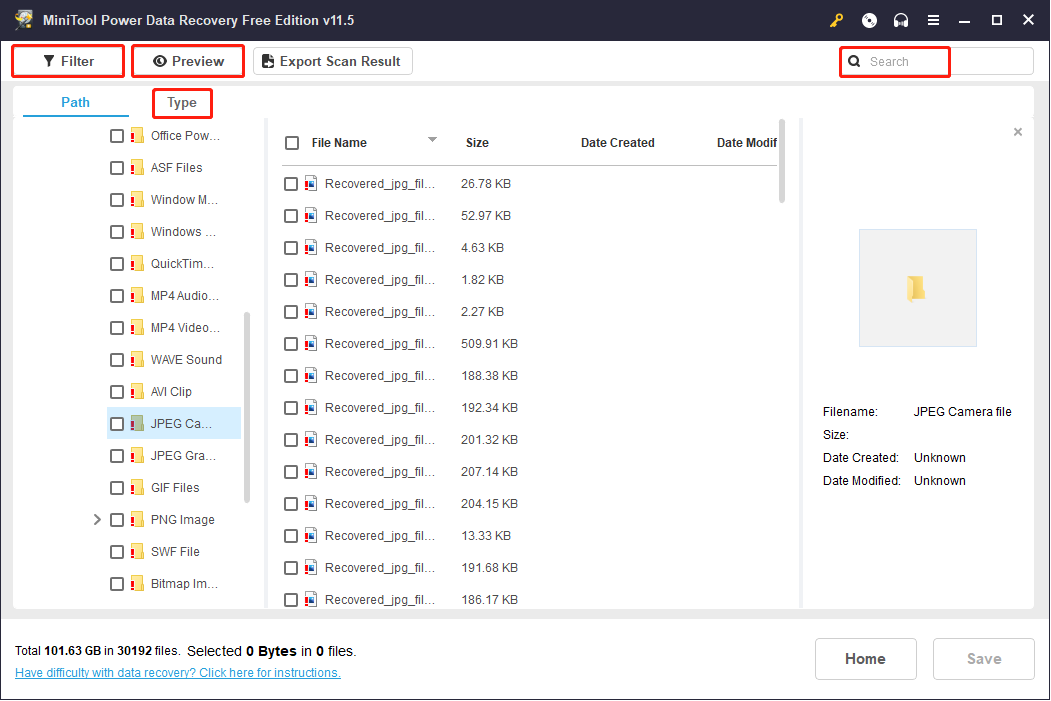
Some utilized functions can be used in this interface:
- Filter: This function works well in reducing unnecessary options. You can filter files by file size, file type, file category, and date modified.
- Search: This function helps you locate your wanted files quickly if you remember their names.
- Type: This function mainly classifies files according to their types, such as documents, photos, videos, audio, etc.
- Preview: This function is practical in confirming whether the files you choose are what you want.
Step 5: Check the files and click the Save button.
Step 6: Choose an appropriate path to save the restored data and click OK.
Do not save your data to the external hard drive. Otherwise, the recovery may be failed due to overwriting.
How to Recover Data When Your PC Won’t Boot
As we said above, deleting the WindowsApps folder may cause many problems. Some people fail to boot into their PCs after deleting the folder. How to help them retrieve files from the unbootable computer? MiniTool Power Data Recovery can make it.
MiniTool Power Data Recovery is equipped with a snap-in WinPE Bootable Builder, which is used to create a bootable disc. Then you can boot your computer with this created Bootable Media to restore your data successfully. You can get a suitable edition with a snap-in WinPE Bootable Builder through this page.
Step 1: Create a Bootable Media
1. Download and install MiniTool Power Data Recovery on a well-performing computer.
MiniTool Power Data Recovery FreeClick to Download100%Clean & Safe
2. Launch the software and turn to the Utilities interface.
3. Click on the Download button in the Power Data Recovery Bootable section to get the full edition. Please choose an edition with a snap-in WinPE Bootable Builder.
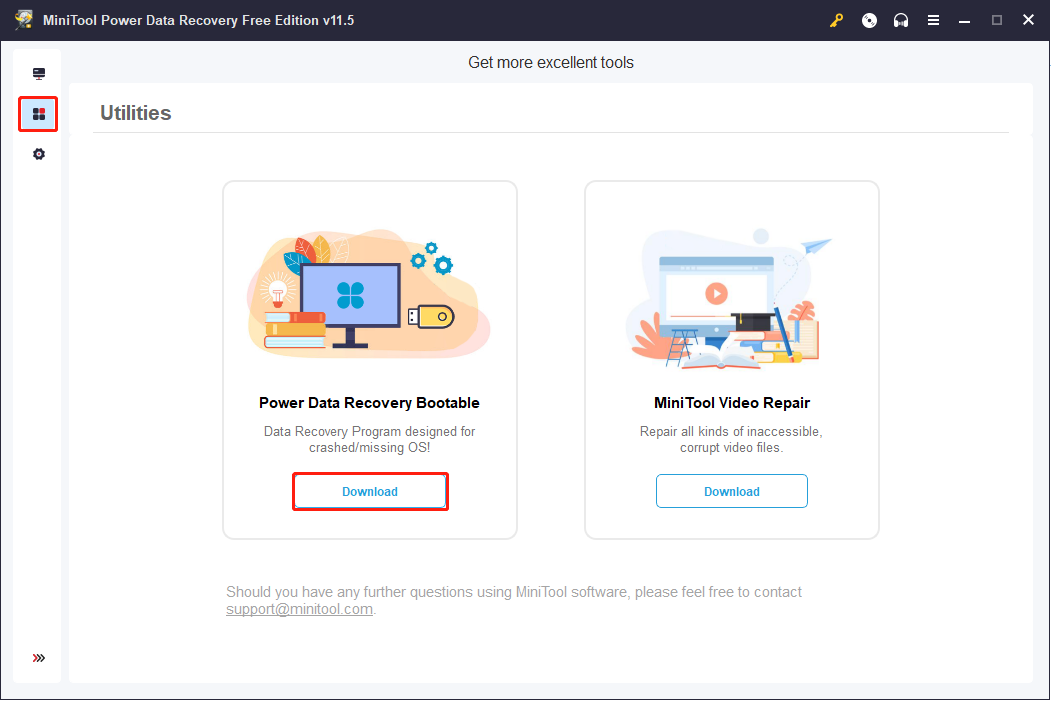
4. Register the software with your license key by clicking the key icon on the top right of This PC interface.
5. Connect a USB flash drive and click the Bootable Builder on the top right. The recommended size of the connected USB flash drive is 4GB to 64GB.
6. Follow the instructions to create a bootable drive.
7. Wait until the process is completed and click Finish.
Step 2: Recover Data from Unbootable Computer
1. Connect the USB drive to the unbootable computer, then you’re suggested to connect an external hard drive or another USB drive to the computer to save your files.
2. Restart your PC to enter the BIOS.
3. Adjust the boot sequence to make your PC boot from the disk you created.
4. Wait patiently and your computer will open MiniTool Power Data Recovery automatically.
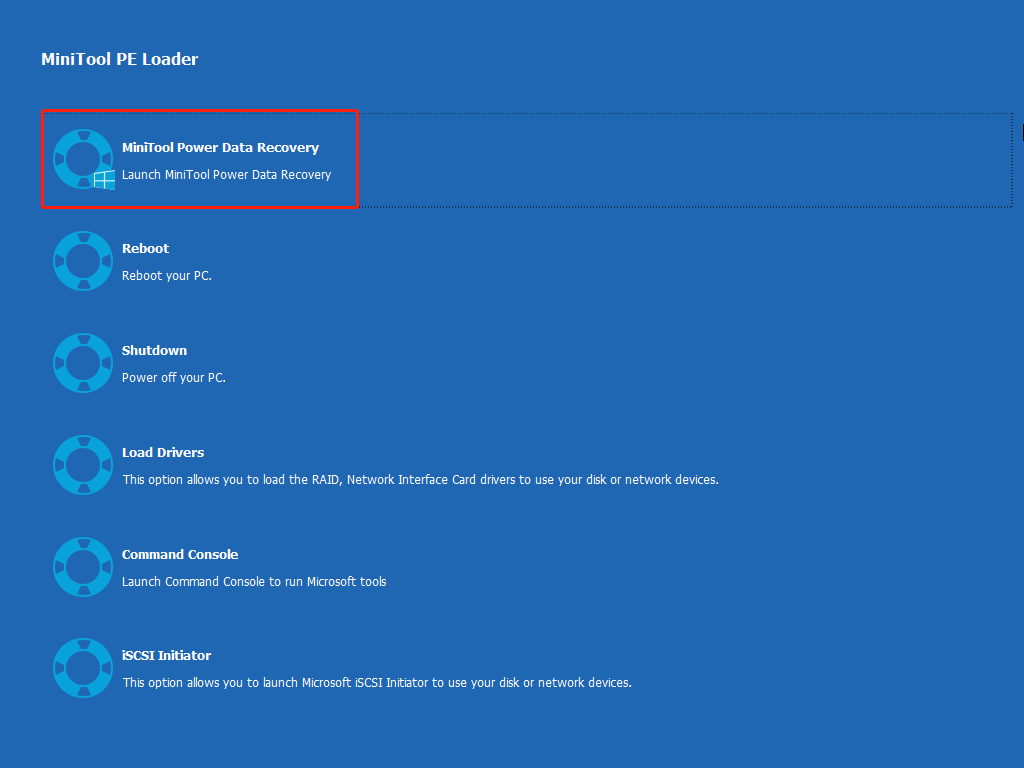
5. After entering the software, you can select a partition to scan.
6. Check your wanted files on the result page and click the Save.
7. Choose the connected drive to save your data and click OK.
Part 3: Verdict
If you try to delete the WindowsApps folder on the system drive, please be careful enough. Follow the steps one by one in this post. If you find the WindowsApps folder missing or other important files lost, please rescue them immediately with MiniTool Power Data Recovery.
MiniTool Power Data Recovery FreeClick to Download100%Clean & Safe
Welcome to share your puzzles about MiniTool Power Data Recovery with us via [email protected].
