Cannot open hard drive? Cannot access the drive because of the “The device Is not ready” error message? This post from MiniTool recovery software lists 5 solutions for this error as well as 7 solutions to the "This device cannot start (Code 10)" issue.
Error Message – The Device Is Not Ready
Have you ever encountered the “The device is not ready” error message as shown in the picture below?
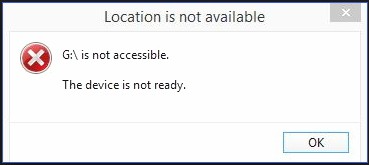
Let’s have a look at a real case of the issue from the Microsoft Community.
I have connected numerous 2.5" and 3" external drives to my PC via USB, and for every drive, I receive the "the device is not ready" error message.
I have looked at every post I can find relating to this problem and have tried all the recommended tips/answers - all to no avail.
Has anyone found a definitive answer to this problem?
answers.microsoft.com
Now, I guess you might be wondering:
“What could be the cause of this error? Is it possible to recover data from inaccessible drives? How to fix the device is not ready in Windows 10?”
Top recommendation: You can read our previous post: 7 Situations Where There Is the “Location Is Not Available” Error to know more information about inaccessible hard drives.
Why Do You Get the Device Is Not Ready Error Message on USB/HHD?
This error message often pops out due to many reasons, including:
- The storage device is not well connected.
- The storage device is damaged.
- The storage device is incompatible with your computer.
After knowing the reasons, I am going to show you how to recover data from inaccessible hard drives as well as how to fix the “Device is not ready in internal HDD/external HDD”.
CHAPTER 1. Recover Data From the Drive With “The Device Is Not Ready” Error
Tip: If you don't care about data loss, you can directly move on to chapter 2.
When you cannot access your hard drive, external hard drive, USB drive, and other drives because of the “The device is not ready” error, you are suggested to restore lost data from the drives before dealing with this error because any mistake during the repair could lead to data loss permanently.
However, how to recover lost data? Is it possible to effectively recover lost data without affecting the original data? MiniTool Power Data Recovery, a piece of professional, read-only, and easy-to-use file recovery software developed by MiniTool Solution Ltd., is recommended here.
This professional data recovery software can help you effectively recover lost data without bringing any damage to the original data. Besides, this professional data recovery software is compatible with popular Windows operating systems including Windows 11, Windows 10, Windows 8, Windows 7, and more.
Now, let’s see the detailed steps to recover lost data from the drive which prompts “the device is not ready”.
1. Download MiniTool Power Data Recovery by clicking the following button, and then install it on the computer according to the prompts (Do not install it on the drive containing lost data).
MiniTool Power Data Recovery FreeClick to Download100%Clean & Safe
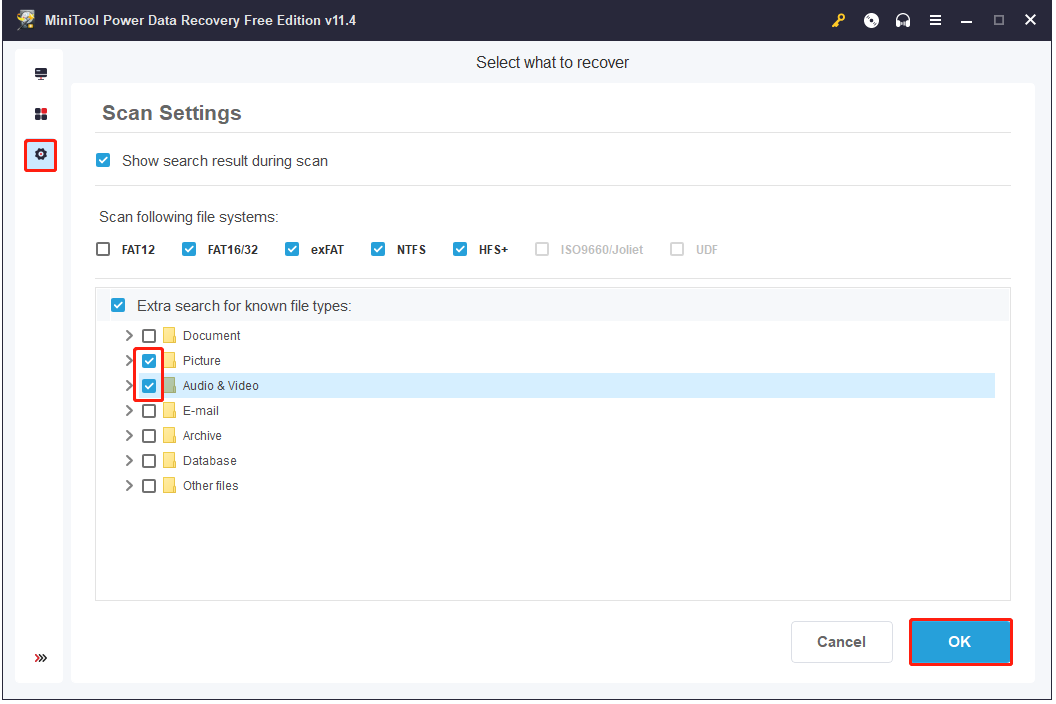
2. Launch MiniTool Power Data Recovery to enter its main interface. In this window, if you only want to recover certain types of files, you can click the Scan Settings icon in the left panel.
For example, if you only want to recover precious photos as well as videos, you just need to select Picture and Audio & Video, and then click the OK button.
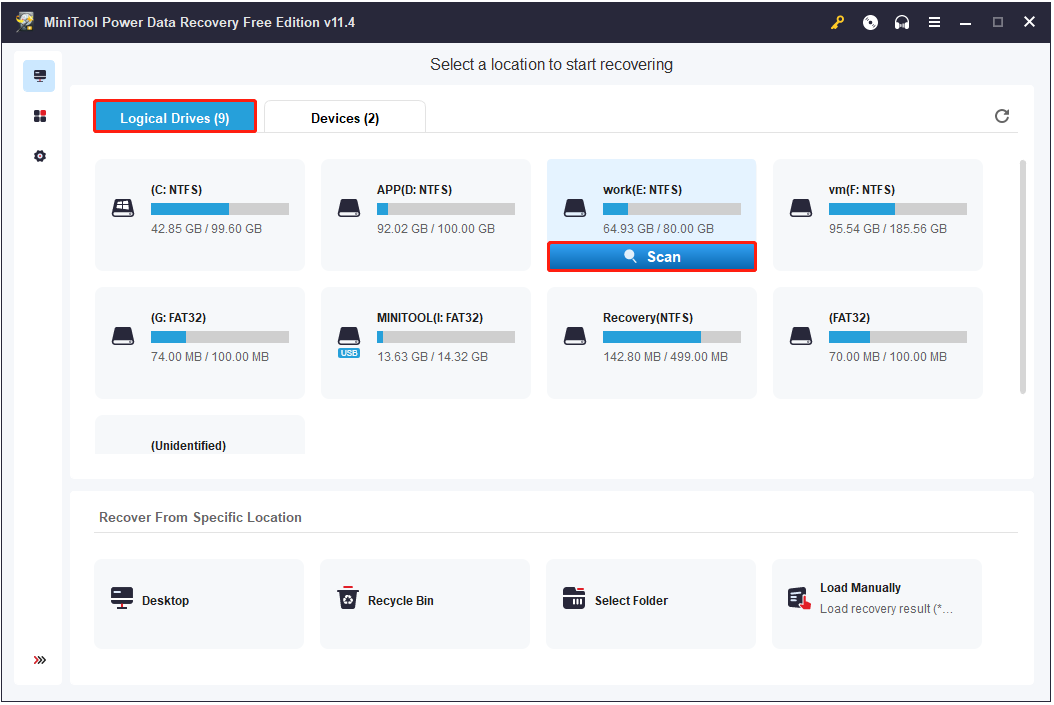
3. Select the target drive under the Logical Drives tab and click Scan. Or, you can click the Devices tab, and select the target disk. Then click Scan.
4. It is recommended to wait until the full scan finishes to get the best recovery result. Then select all needed files and click Save to save them in a safe place.
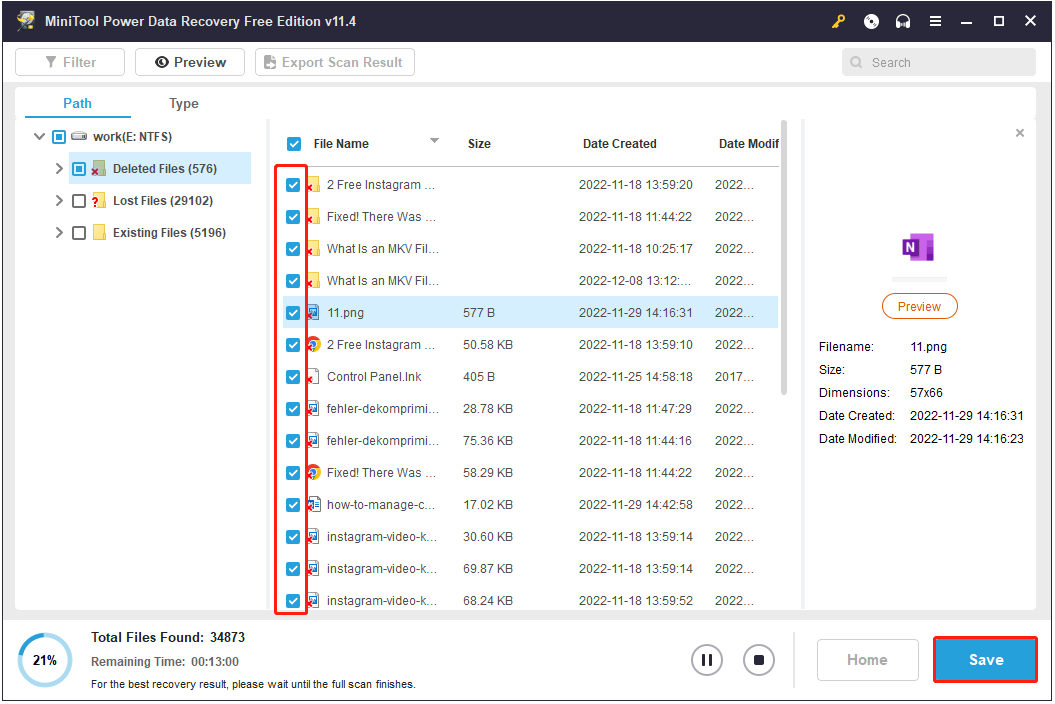
The free edition of this software only supports recovering files no more than 1 GB. To save all found files, you had better choose its advanced edition. The Personal Ultimate version is a good choice. It not only can recover unlimited data but also can help to recover data when PC won’t boot because of its Snap-in WinPE Bootable Builder feature. More importantly, it offers a free lifetime upgrade service.
Within only four steps, you can easily and quickly recover lost data from inaccessible drives. Now, let’s see how to fix the “Device is not ready” error.
CHAPTER 2. 5 Solutions – The Device Is Not Ready in Windows 7/8/10
Solution 1. Check the Drive Connection
To verify whether the error is caused by loose connections or damaged computer USB ports, you can do the following steps.
Step 1. Disconnect the storage device and insert it into your PC through the same USB ports to check if the device was loosely connected. If the error disappears, you can make sure that neither your inserted device nor the related USB port is damaged. But, if the error still exists, move on to try the next step.
Step 2. Disconnect the device and plug it into your PC by using a different USB port. If this device can be accessed without trouble, it is the damaged USB port that caused the problem. If this method doesn’t work, you’d better go to the next step.
Step 3. Connect your hard drive to another computer that reads USB drives properly to check whether the problem is caused by the computer or the operating system.
If all the solutions mentioned above cannot solve the “Device is not ready in external hard drives” issue, you can try solution 2.
Solution 2. Uninstall and Reinstall the USB Controller Driver
Some users reported that they successfully solved the device is not ready in Windows 10 issue by following the below steps.
Step 1. Right-click the Windows key button and select Device Manager.
Step 2. Expand and navigate devices on the right pane to find out the device that is not ready.
Step 3. Right-click on the name of your device and choose Uninstall device.
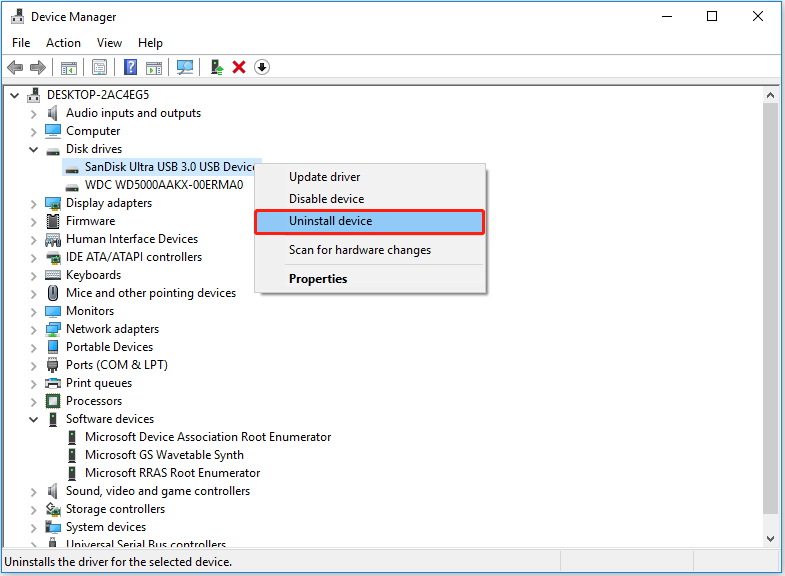
Step 4. Unplug the drive.
Step 5. Restart your PC, and then reconnect your drive to check whether the “The device is not ready in external hard drives” error has been solved.
If you still receive the error after trying the above 2 solutions, you can go to the next solution to open the Disk Management interface and see how it is displayed there.
Solution 3. Check How the Device Shows in Disk Management
Case 1. The drive shows not initialized
If your drive shows not been initialized, it means that the drive is not recognized and you will receive this error message: Virtual Disk Manager “The Device is not ready”.
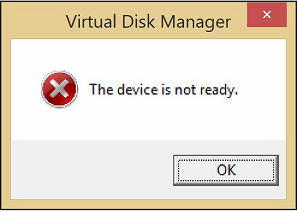
Now, you can try the following steps to solve this issue.
a) Press Windows + R to call out the run box.
b) Type diskmgmt.msc in the run box and then press the Enter key to open Disk Management.
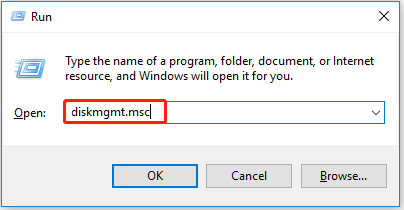
c) Right-click the disk which shows as Not Initialized and choose Initialize Disk.
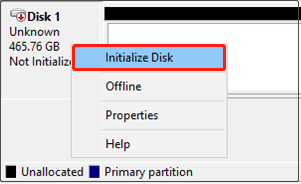
d) After that, you will be given detailed operating prompts. Just do as told.
Case 2. Drive shows unallocated
Sometimes, you may find your drive shows unallocated space in Disk Management. In this case, you can try the following 2 simple ways to solve this issue.
1. Recover lost partitions as well as data from the unallocated space
If your drive used to contain massive important data before it became unallocated space, you can try to use a partition recovery tool to deal with the “The device is not ready” error message on the internal HDD/external hard drive/USB.
Here is a video tutorial:
2. Create a new partition on the unallocated space
Right-click the unallocated space, choose New Simple Volume and then follow the wizards to complete this task.
Case 3. Drive shows RAW
Sometimes, when you encounter the “The drive is not ready” error message, you may find your drive shows as the RAW file system. Now, to successfully solve the device is not ready internal HDD issue, you can format your RAW drive to NTFS/FAT32.
Useful article: Top 3 Ways to Convert RAW to NTFS in Windows 7/8/10 with Ease
Warning: Formatting a disk will delete all original data on your hard drive. Therefore, it is recommended to recover all data from the RAW drive before formatting. MiniTool Power Data Recovery is a good solution for you to effectively recover lost data from a RAW hard drive without damaging the original data.
Solution 4. Check the Disk for Errors
As we know, the “The device is not ready” error is a very likely a result of file system errors or bad sectors on the drive. Therefore, you can run the CHKDSK utility to check your disk for errors.
The steps are as follows:
1) Type cmd in the Windows search box and right-click Command Prompt under the Best match tab.
2) Choose Run as administrator, and click the Yes button in the pop-up window.
3) Type this command chkdsk drive letter: /f and press the Enter button (Replace the drive letter with the actual letter of your hard drive partition, such as D, E, F, etc.).
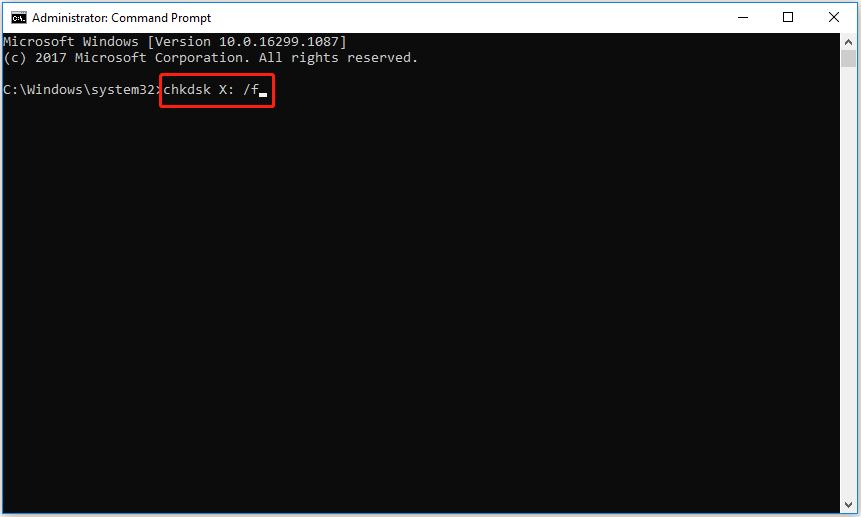
4) Wait for the command to finish. Then type exit and press Enter.
Solution 5. Replace Your Drive
If none of the solutions above works on your device, your drive is probably damaged seriously. Now, you had better replace the old drive with a new one and try your best to recover lost data from the old drive.
CHAPTER 3. Bonus Tip – This Device Cannot Start (Code 10)
Last but not least, we’d like to share knowledge about another similar issue – This device cannot start (Code 10).
What Does This Device Cannot Start Code 10 Mean
The Device Manager error Code 10 is generated when Device Manager can’t start the hardware device which is a situation that is usually caused by outdated or corrupted drivers. Besides, if the driver generates an error that Device Manager doesn’t understand, this device may also receive a Code 10 error.
How to Fix Error: This Device Cannot Start (Code 10)
There are several methods to help you fix a code 10 error.
Fix 1. Restart computer.
Oftentimes, a temporary problem in Device Manager or with the hardware may cause the error Code 10. Therefore, try restarting your PC to fix the device cannot start code 10.
Fix 2. Delete the UpperFilters and LowerFilters values.
Both UpperFilters and LowerFilters values in the Windows Registry could be corrupted, causing the Code 10 error. So, you need to delete them in the registry.
Fix 3. Update the drivers.
An outdated driver may cause the “The device cannot start code 10” error. Try updating drivers to correct the Code 10 error.
Fix 4. Uninstall the driver.
If the updating driver cannot solve the Code 10 error, you can try uninstalling and reinstalling it.
1. Right-click the Windows key button and click Device Manager.
2. Right-click the device that is causing the code 10 error, and select Uninstall Device on the context menu.
3. Select Delete the driver software for this device and click the OK button.
4. Restart the computer and reinstall the device to see if the device cannot start code 10 is solved.
Fix 5. Install the latest Windows service pack.
Microsoft often releases service packs and other patches for Windows, of which one way contain a fix for the Code 10 error. It is recommended to install the latest Windows service pack.
Fix 6. Replace the hardware.
Sometimes, a Code 10 error may be caused by a problem with the hardware device. And, if the device is not compatible with your Windows version, you can also encounter the code. It is recommended to replace the hardware to fix this issue.
Fix 7. Reinstall Windows.
If the problem persists, you can try reinstalling Windows.
Bottom Line
Are you still worrying about the device is not ready error? Now, you can try the above solutions to deal with the device that is not ready for Windows 10/8/7 issue. If you have any other good solutions for this error, please share them with us by writing them in the following comment zone.
If you have any questions about recovering lost data from inaccessible hard drives by using MiniTool Power Data Recovery, you can directly send us emails via [email protected]. We will solve it as soon as possible.
