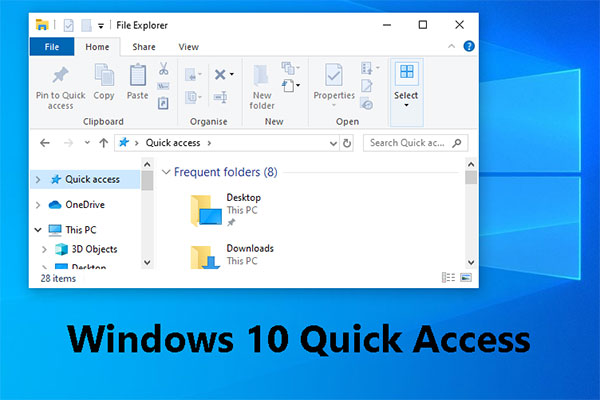
Quick Access is a prominent feature in Windows 10. To be specific, the Quick Access Toolbar includes a set of commands (they are independent of the tab on the ribbon, which is displayed currently) and it can be customized.
Obviously, you are able to access a file/folder in a very short time with the help of Quick Access. As a matter of fact, the items (including files & folders) you have worked on or opened lately will be displayed in Quick Access. These items will be divided into two groups: “Frequent folders” and “Recent files” and they will be kept here for a certain period of time (about a couple of days or so). How would you feel if all of a sudden, the problem – files in Windows 10 Quick Access missing – happens to you?
Would you freak out or get into a panic? Don’t worry when folders or files missing from Windows 10 Quick Access occurs. Here are easy but effective ways to help you out of the woods.
Files missing from Quick Access in Windows 10:
- The items that disappeared from Quick Access are just gone from the list.
- In other cases, the files or folders are permanently deleted/lost from a Windows 10 computer.
Either way, files recovery in Windows 10 can be done and I will give my suggestions on how to do it: do a Windows 10 troubleshooting or use MiniTool Power Data Recovery to recover data in Windows 10.
Well, how to recover permanently deleted files in Windows 10/8/7? As for how to recover data exactly when Quick Access not showing recent files problem occurs and how to restore files to Windows 10 Quick Access again, I will give detailed tutorials for you to refer to.
Part 1: Files in Windows 10 Quick Access Are Missing
You might wonder where those permanently deleted/lost files go in your computer. Actually, these files do not erase from the computer at once. Although you lost entries of these files, they still exist in your computer until their space is covered by new data.
If you want to recover permanently deleted/lost data, you are suggested to take action immediately. Once these files are overwritten, it is almost impossible to recover them with any data recovery software.
How Do You Finish Windows 10 Data Recovery
To recover lost data, you need the help of third-party data recovery software. Providing a safe and green data recovery environment, MiniTool Power Data Recovery guarantees your data and computer safety. You can try the MiniTool Power Data Recovery free edition first to scan your data and recover up to 1GB of files.
MiniTool Power Data Recovery FreeClick to Download100%Clean & Safe
MiniTool Power Data Recovery supports every Windows system and allows you to recover files from various data storage devices. If you are a Mac user, you can use Stellar Data Recovery for Mac to rescue your files. You can use MiniTool Power Data Recovery to retrieve many types of files, such as photos, videos, archives, documents, and so on.
You can follow the next steps to recover files.
Step 1: Download and install MiniTool Power Data Recovery by clicking the button below.
MiniTool Power Data Recovery FreeClick to Download100%Clean & Safe
Step 2: Launch the software and choose a partition that contains the deleted/lost files to scan. If you want to recover files from certain locations, you can choose to scan Desktop, Recycle Bin, or a selected folder. On the contrary, if you don’t know where the wanted files were , you can shift to the Devices tab and scan the whole disk.
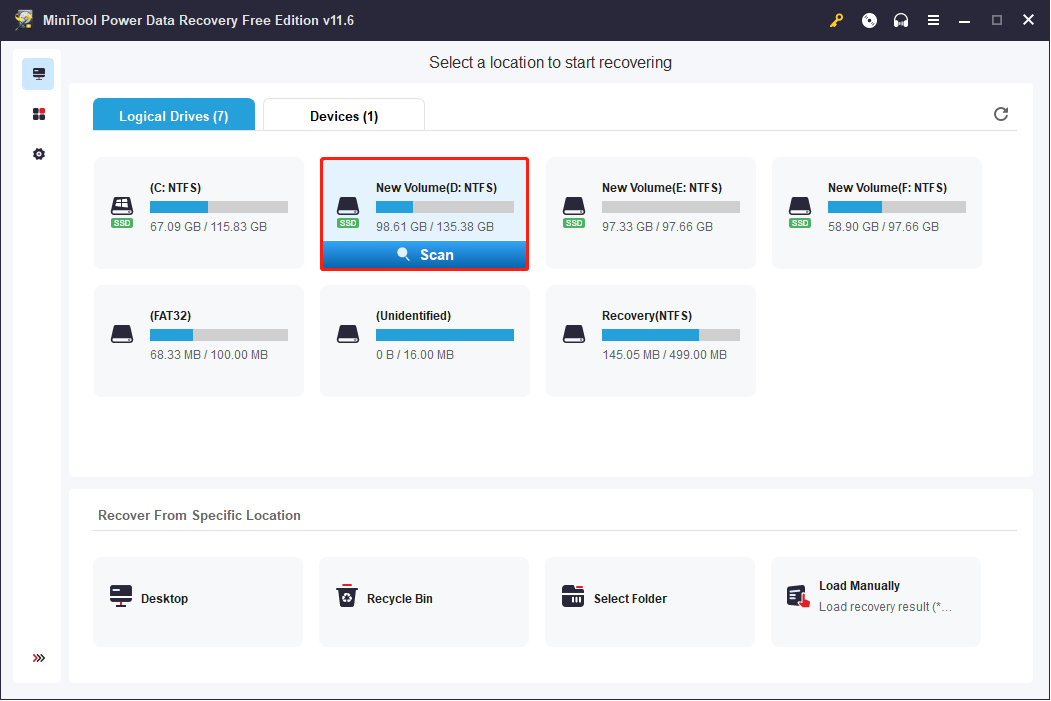
Step 3: The scan process will take a few minutes. You can look through the scan result during the process. But for the best data recovery result, do not interrupt the scan process.
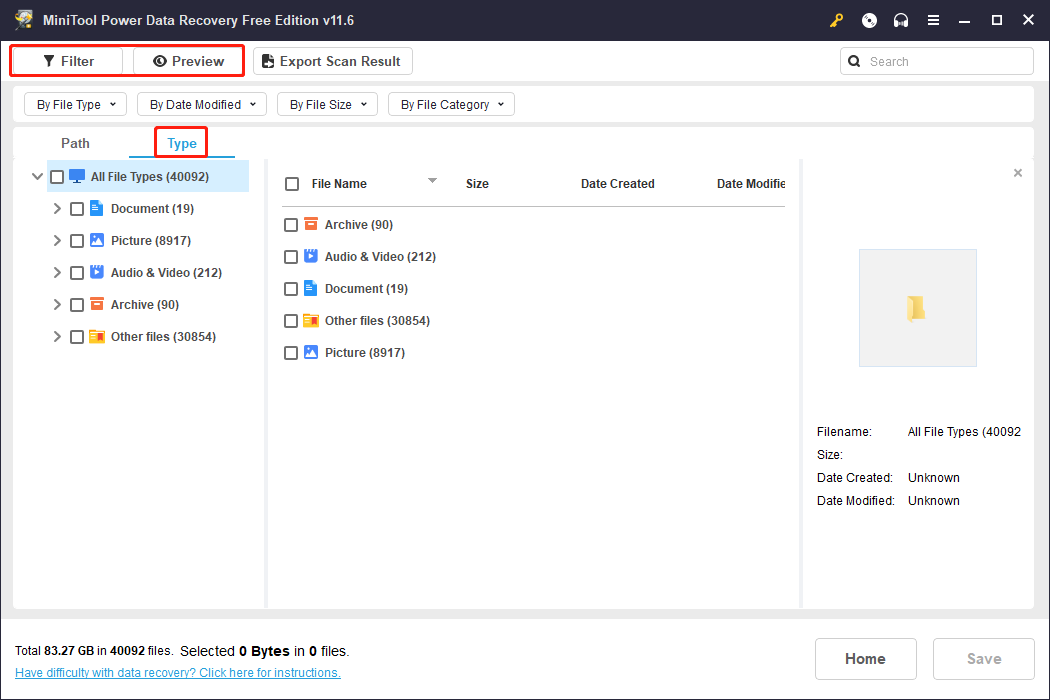
Step 4: When the process is finished, you can browse to find your desired files. You can use Filter and Type features to set conditions based on your requirements. This can narrow down the files list to help you locate your wanted files. Before you recover the chosen files, use the Preview function to verify their correction.
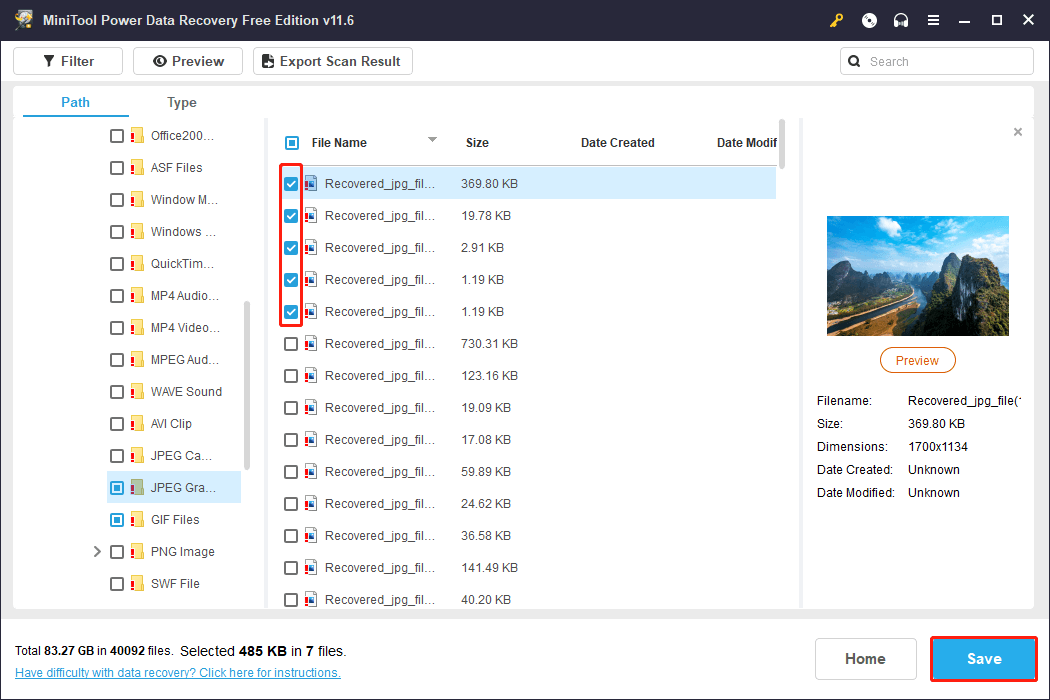
Step 5: Check all the needed files and click the Save button.
Step 6: Choose a proper storage path in the following window and click OK to start the recovery process. Please do not save your data to the original drive because the recovery might be failed due to data being overwritten.
When all the selected files have been saved to the appointed place, a prompt window will appear in the software automatically. This indicates that you can put an end to the recovery process and close the software.
Part 2: Fix Quick Access Pins Are Missing from the List
Acquiring recently used/opened files or folders through Quick Access, the new function in Windows 10 File Explorer (Windows Explorer) navigation pane, is convenient. But you may be upset when you find that Windows 10 Quick Access is broken or not working. This indicates that the entries of the files are missing from Quick Access.
In this case, you only need to retrieve the entries of these files and folders in Quick Access. Please follow the steps below to show recently used files in Quick Access when it’s not working.
Method 1: Set Quick Access Settings
You can check the settings of Quick Access when finding your folders missing from this sector. If the Quick Access sets correctly, you can reset its settings. If you find the Privacy settings are unchecked, you can choose them directly, then save the change and close the window.
You can follow the next steps to finish operations.
Step 1: Press Win + E to open File Explorer. Please make sure that you are chosen Quick access instead of other choices in this interface.
Step 2: Select the View tab from the toolbar.
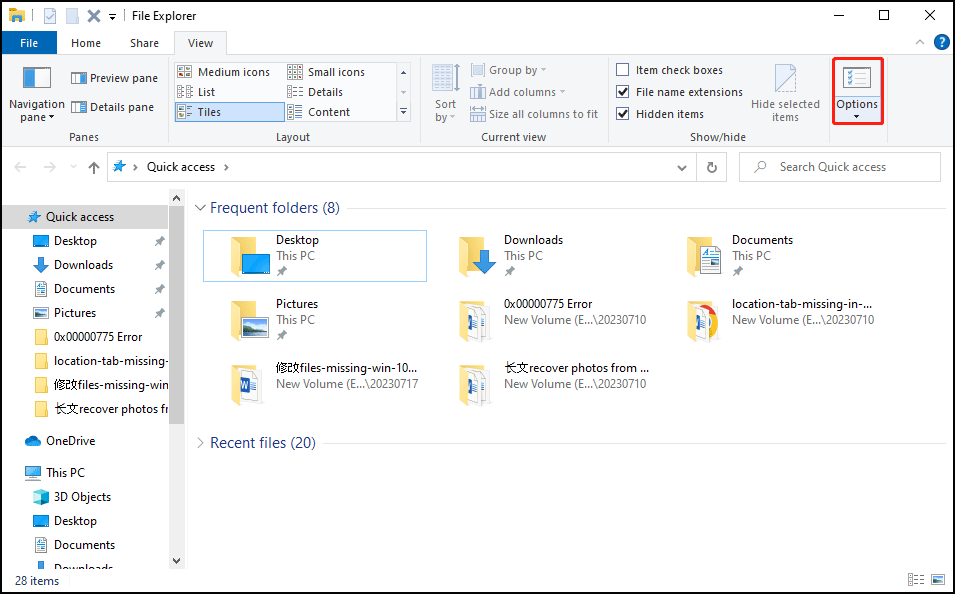
Step 3: Choose Change folder and search options from the Options drop-down menu.
Step 4: Uncheck Show recently used files in Quick access and Show frequently used folders in Quick access under the Privacy section.
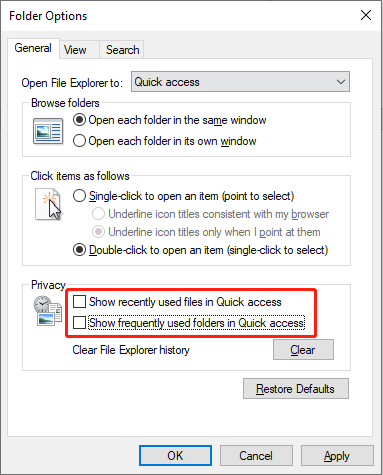
Step 5: Click Apply and then click OK to close the window.
Step 6: Then, you can open the Folder Options window again with the instruction of steps 1-3.
Step 7: Check all the options under the Privacy section and then click Apply.
Step 8: Click OK to close the window.
After this, you can open File Explorer to see whether it works normally.
Method 2: Display the Recent Folders in Quick Access
This method can show you all the recently used folders at once. You can directly pin the recent folders to Quick Access.
Step 1: Press Win + E to open File Explorer in Windows 10.
Step 2: You can copy and paste the following path to the address bar then hit Enter.
Shell:::{22877a6d-37a1-461a-91b0-dbda5aaebc99}
Step 3: All the recently used folders will be shown in this window.
Step 4: Click on the Pin to Quick access choice on the toolbar.
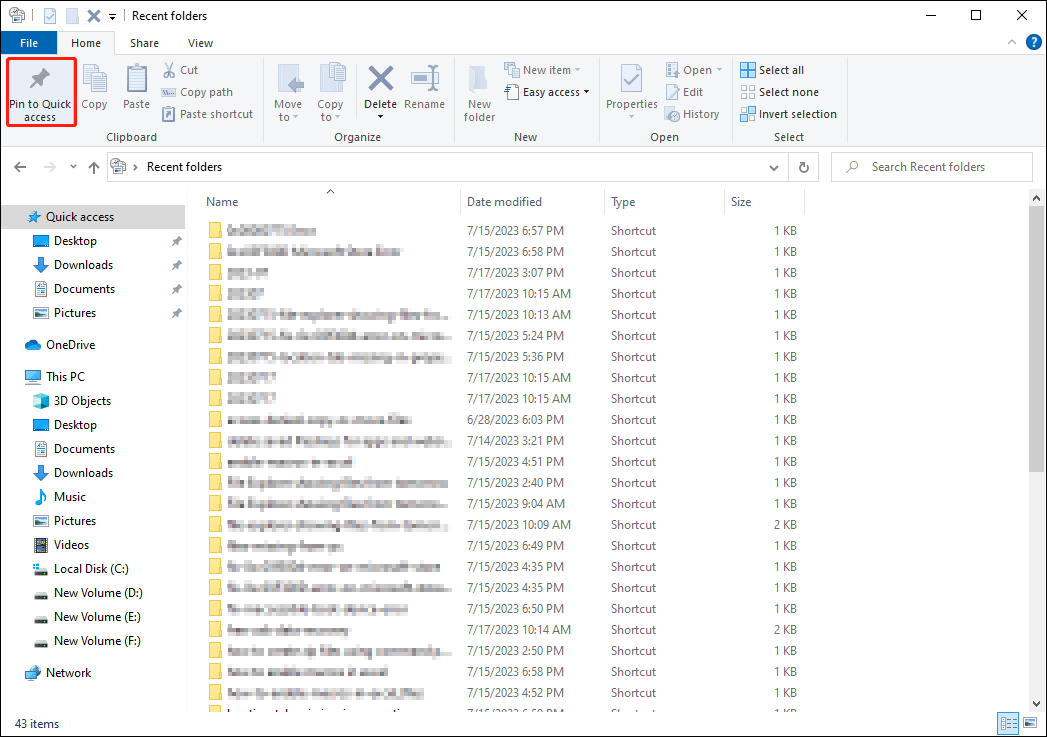
Then, you can find the Recent folders choice on the left pane directly.
Method 3: Reset Quick Access
Please make sure that you have closed all File Explorer windows before starting the following operations.
Way 1: Reset Quick Access via File Explorer
Step 1: Press Win + E to open File Explorer.
Step 2: Right-click on Quick access and choose Options from the menu.
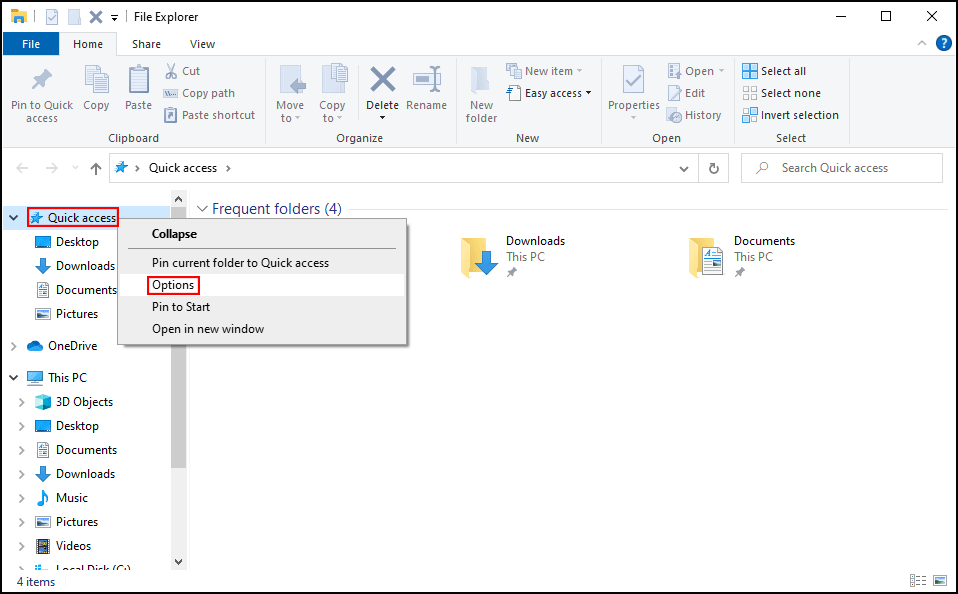
Step 3: Shift to the View tab and choose Reset Folders.
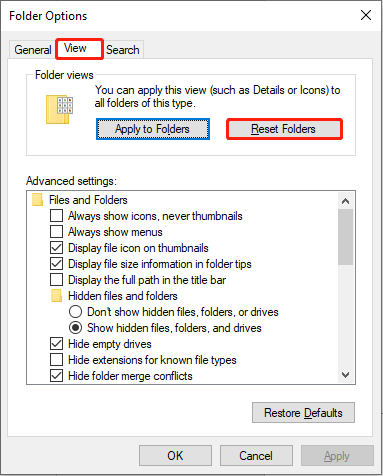
Step 4: Click on the Yes button in the popup window.
Step 5: Click OK on the Folder Options windows.
Way 2: Reset with Command Prompt
Step 1: Press Win + R to open the Run window.
Step 2: Type cmd into the text box and press Shift + Ctrl + Enter to run Command Prompt as administrator.
Step 3: You can copy and paste the following command and then hit Enter:
del /F /Q%APPDATA%\Microsoft\Windows\Resent\AutomaticDestinations\*
Step 4: Wait for the process to finish. Then, you can close the Command Prompt window and open File Explorer to examine.
Way 3: Reset via Windows Registry
Step 1: Press Win + R to open the Run window.
Step 2: Type regedit into the text box and hit Enter to open Registry Editor.
Step 3: Navigate to HKEY_CURRENT_USER > Software > Microsoft > Windows > CurrentVersion > Explorer > Ribbon.
Step 4: Right-click on the Qatltems on the right pane.
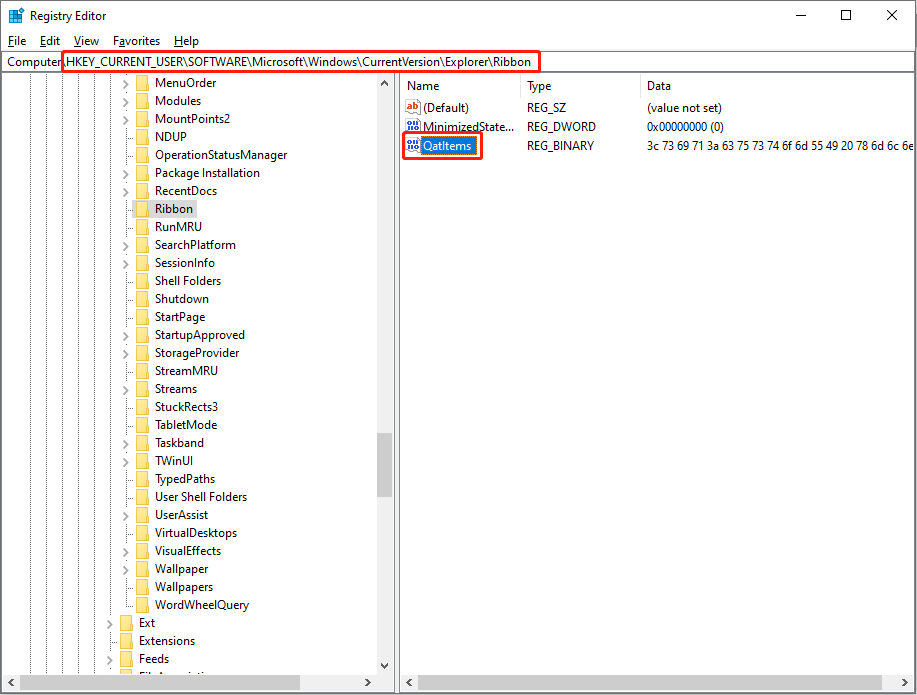
Step 5: Select Delete from the context menu, then click on Yes in the popup window.
You don’t need to worry about any bad results. The Qatltems subregistry will be created the next time you open File Explorer.
All these three methods can help you troubleshoot this problem by clearing the previous settings in Quick Access. You can reopen File Explorer after finishing the steps to check whether the problem is solved.
Windows 10 Quick Access Settings
How to pin folders to Quick Access in Windows 10?
Step 1: Press Win + S and type File Explorer into the Search box.
Step 2: Look for the folder you want to add to Quick Access from the right pane.
Step 3: Right-click on the folder and choose the Pin to Quick access choice from the menu.
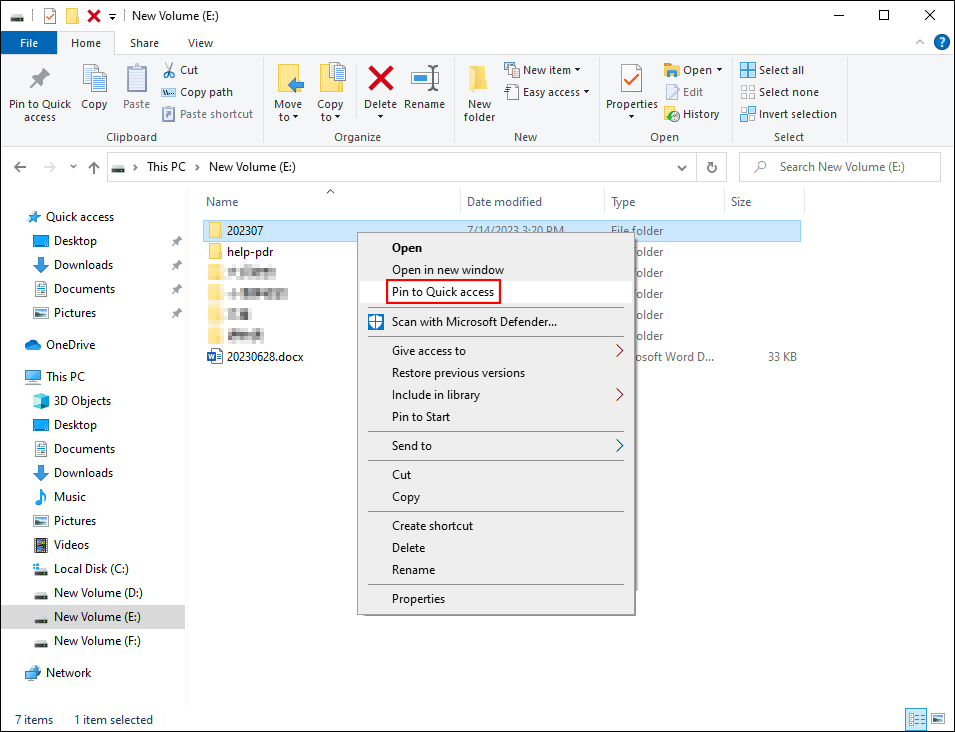
You can also drag the folder you want to pin and drop it into the Quick Access section when you see the tip message Pin to Quick access appeared.
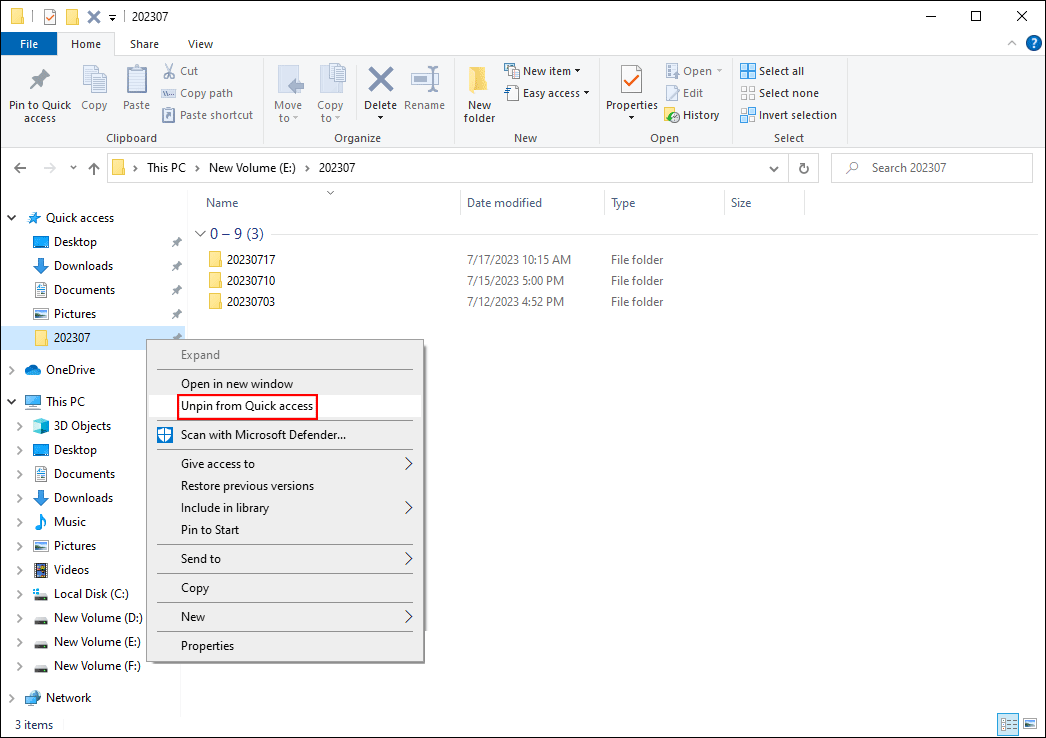
How to unpin folders from Quick Access?
Step 1: Press Win + E to open File Explorer.
Step 2: Right-click on the folder you want to unpin from the Quick access section.
Step 3: Choose Unpin from Quick access.
How to remove files from Quick Access?
Step 1: Press Win + E to open the File Explorer.
Step 2: Right-click on the file you want to remove.
Step 3: Choose Remove from Quick access.
Part 3: Bottom Line
The files in Windows 10 Quick Access missing problem often come up without giving any indications at first. So, you don’t have a chance or time to be well prepared for it. But the good news is that you can actually complete file recovery in Windows 10 by yourself.
When the files missing from the Quick Access list are lost/deleted from a Windows 10 computer, you should turn to MiniTool Power Data Recovery to get help.
MiniTool Power Data Recovery FreeClick to Download100%Clean & Safe
If you encounter any problems, feel free to connect with us via [email protected].
