Hard drive shows up in BIOS but not Windows? Struggling with this situation, you will lose control over managing your hard drive files and free space. Here this post on MiniTool Software explores the potential reasons and corresponding solutions for this problem.
Issue: HDD/SSD Shows up in BIOS but Not Windows
The hard disk is an important component in the computer for storing data, providing the computer with a physical virtual space for data storage. You can manage and organize disk files and disk status through File Explorer and Disk Management. However, some users reported that their HDD/SSD only shows up in BIOS but not in Windows.
“BIOS recognizes HDD but Windows doesn't. I have a Toshiba 4 TB HDD and just installed it earlier today. However, the HDD does not appear in File Explorer, however, it does appear when checking my BIOS. I have tried: rescanning my disks, messing with my plug-in options, plugging the SATA cable into different ports, checking my storage spaces, and configuring different options within my BIOS setup. I am unsure what to do at this point, any help would be very much appreciated.”reddit.com
If you are also struggling with this problem, continue reading to learn the triggers of the issue. A comprehensive understanding of the causes is of great help in resolving the problem in a targeted manner.
Why Windows Not Detecting Hard Drive but BIOS Does
Here are the common reasons why hard drive shows up in BIOS but not Windows.
- The drive letter of the disk is missing.
- The disk driver is outdated or corrupted.
- The disk is not initialized.
- The hard drive is not partitioned.
- The file system is not compatible with Windows.
Before implementing measures to make the disk show up in Windows, it is essential to recover files first. This reduces the possibility of file loss/corruption during the disk repair process.
How to Recover Data From Unrecognized HDD/SSD
Regarding hard drive data recovery, MiniTool Power Data Recovery is the ideal solution. It not only helps recover deleted/lost files but also supports extracting existing files on inaccessible drives. Supported file types to restore include Word documents, Excel files, PowerPoints, PDFs, images, videos, audio, emails, and other types of files.
Apart from internal/external HDD, this green file recovery service also helps perform SSD data recovery, unrecognized USB drive recovery, undetected SD card recovery, etc.
To avoid failed file recovery and any financial losses, you can first try MiniTool Power Data Recovery Free. The free edition provides you with multiple free services including free file scanning, free file preview, and 1 GB free data recovery.
MiniTool Power Data Recovery FreeClick to Download100%Clean & Safe
Major steps to recover files from unrecognized hard drive:
If you need to recover files from unrecognized external hard drives, you are required to connect the disk to your computer first.
Step 1. Double-click the downloaded MiniTool Power Data Recovery to run it. On its main interface, all detected partitions will be displayed under Logical Drives, including the partitions that are not showing up in File Explorer. You need to find the target drive based on the drive letter or volume size, then double-click the partition to scan it.
Alternatively, if you are not sure where the needed files are stored, it is suggested to move on to the Devices tab and opt to scan the entire disk by clicking the Scan button.
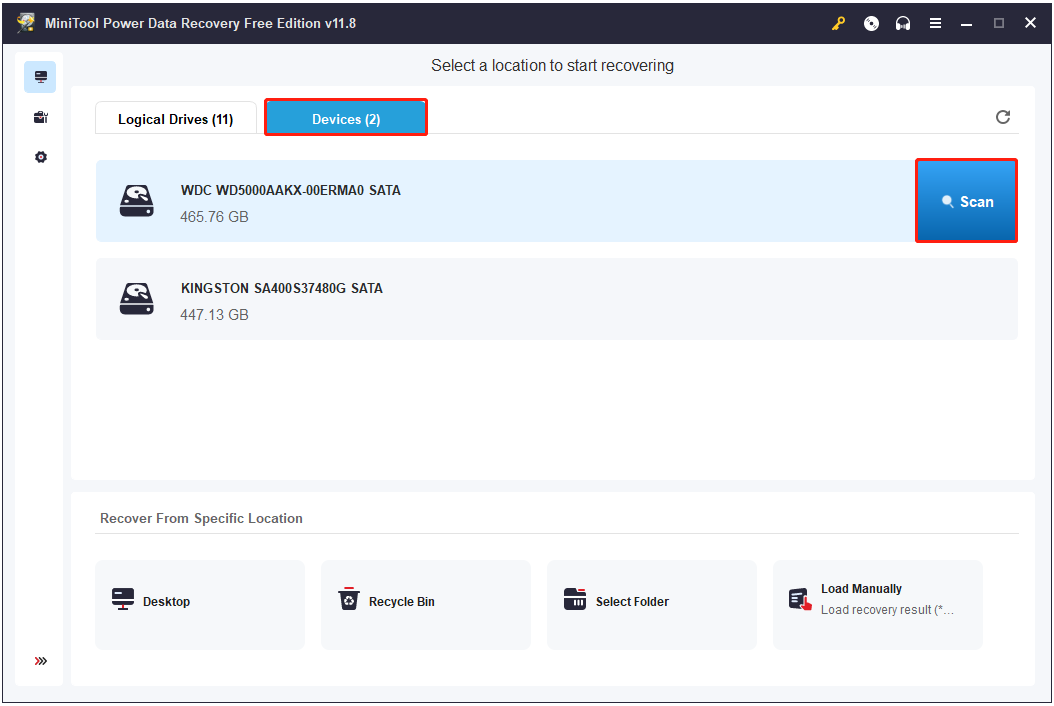
The scan duration may be longer if you choose to scan the whole disk. To guarantee the file scan efficacy and quality, it’s recommended to wait until the entire scanning operation finishes.
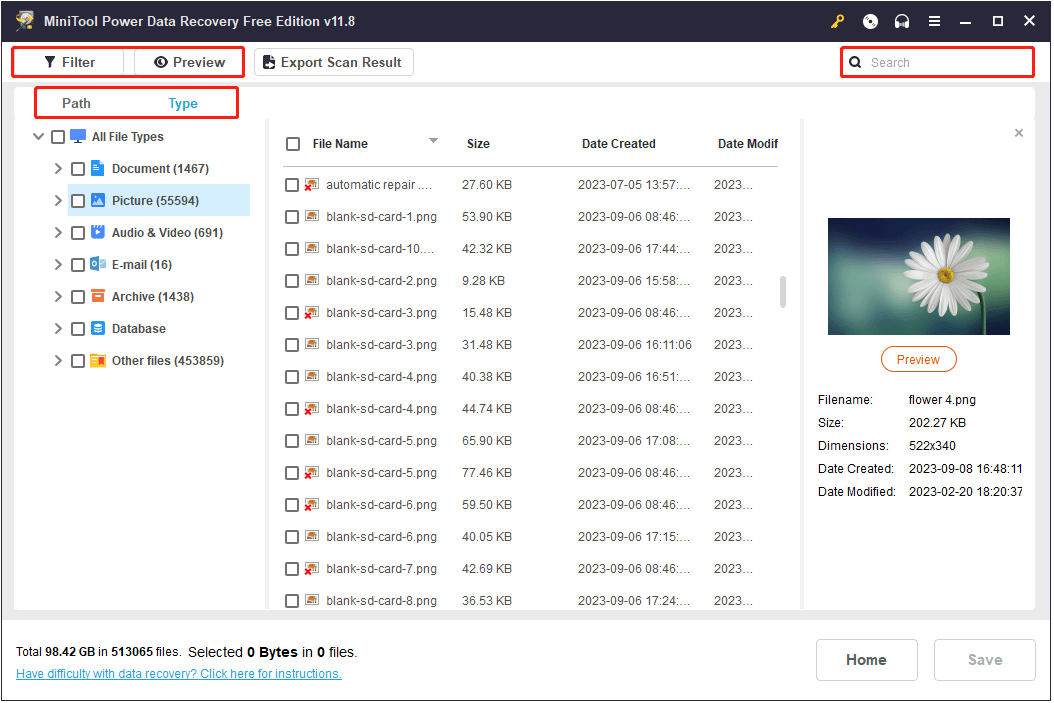
Step 2. After scanning, you can make use of the following small utilities to shorten the file discovery process.
- Path: On the scan result page, found files are categorized in a tree structure under the Path category list by default. Typically, there are three branches of the tree structure: Deleted Files, Lost Files, and Existing Files. You can find the required items based on their status.
- Type: By switching to the Type tab, you can view found files according to file types, including Document, Picture, Audio & Video, E-mail, Archive, Database, and Other files.
- Filter: It enables you to filter out unwanted data by file type, file size, file modification date, and file category.
- Preview: To improve data recovery accuracy and reliability, you are allowed to preview found files before recovering them. Note that the file supported to preview should not exceed 2 GB.
- Search: This feature makes it possible to search for a specific file/folder with its file/folder name. Both partial or complete file names are supported.
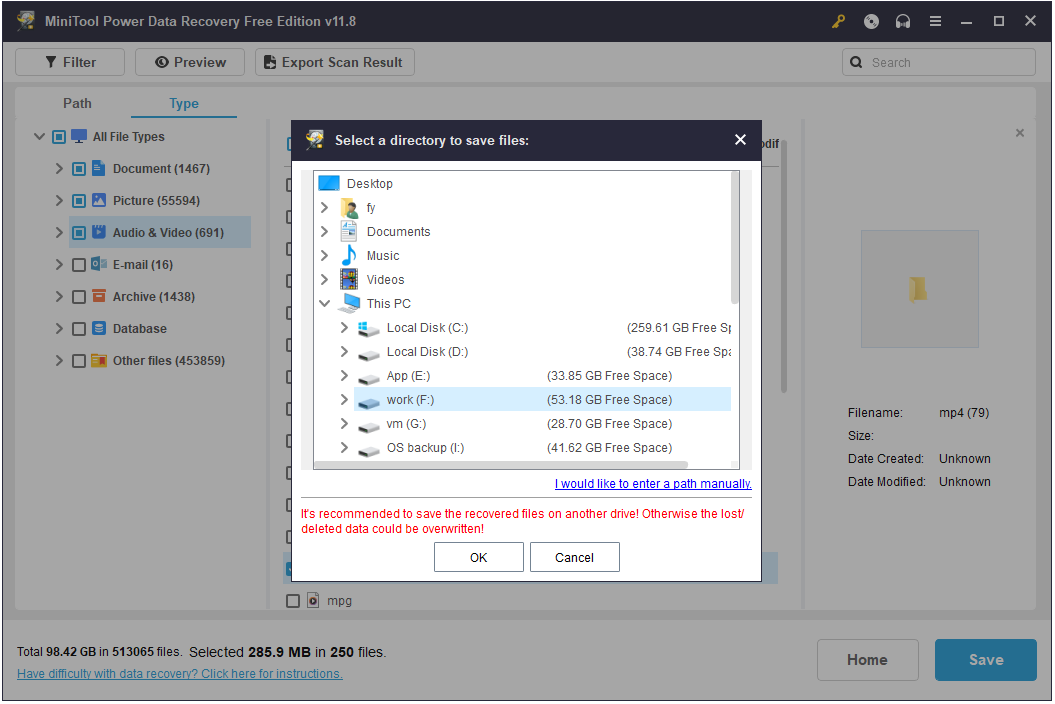
Step 3. Finally, tick the checkboxes next to the required items, then click the Save button. Once you see a pop-up small window, select a desired location to store the recovered data.
MiniTool Power Data Recovery FreeClick to Download100%Clean & Safe
How to Fix if Hard Drive Shows up in BIOS but Not Windows
Once you get your files out of the unrecognized hard drive, it is time to make the disk show up in File Explorer for further use. Listed below are several collected methods to help you complete this task.
Fix 1. Assign a Drive Letter to the Unrecognized Drive
A disk that lacks a drive letter won’t be displayed in Windows Explorer. So, first, you need to check if the target drive has a drive letter from Disk Management. If not, you should assign a letter to it manually.
Step 1. On your taskbar, right-click the Windows logo button and choose Disk Management.
Step 2. Check if the hard disk has a drive letter. If not, right-click the hard drive and opt for the Change Drive Letter and Paths option.
Step 3. Next, click Add.
Step 4. In the new window, choose an available drive letter from the drop-down list and click OK.
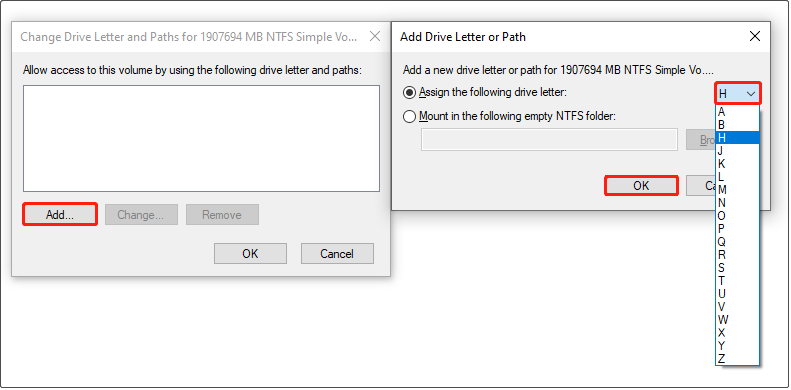
Now you can go to Windows Explorer and check if the disk shows up and allows access.
Fix 2. Update the Disk Driver
If the disk driver is outdated or corrupted, the disk won’t function properly. In this case, you can update the disk driver manually from Device Manager.
Step 1. Right-click the Start button to select the Device Manager option.
Step 2. Expand the Disk drives category, then right-click the unrecognized disk and choose the Update driver option from the context menu.
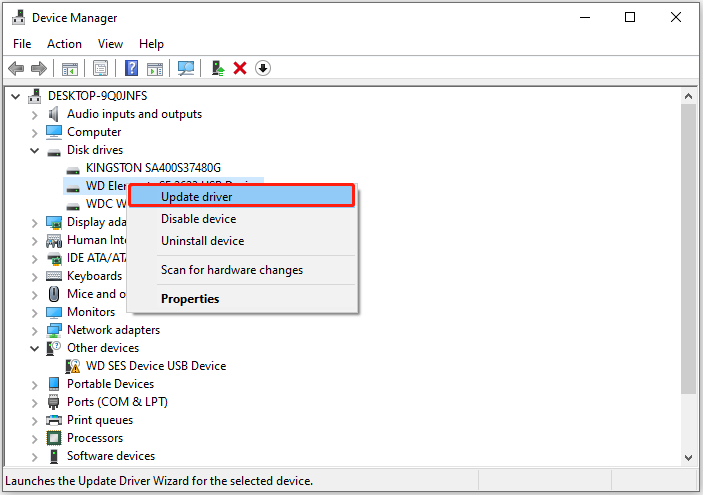
Step 3. You can choose to let Windows search automatically for the best available drivers or download the latest driver from the disk manufacturer’s official site and install it manually.
If other disk-related devices are marked with a yellow warning icon, you will need to repeat the above steps to update their drivers as well.
See Also: WD SES Device USB Device Download and Installation
Fix 3. Initialize the Disk and Partition It
Another common situation where a hard drive shows up in BIOS but not Windows is when the disk is displayed as uninitialized/unknown, and all space is unallocated. In this situation, you need to initialize the disk first, then partition it for use.
To initialize the disk:
In Disk Management, right-click on the uninitialized/unknown disk, and choose the Initialize Disk option.
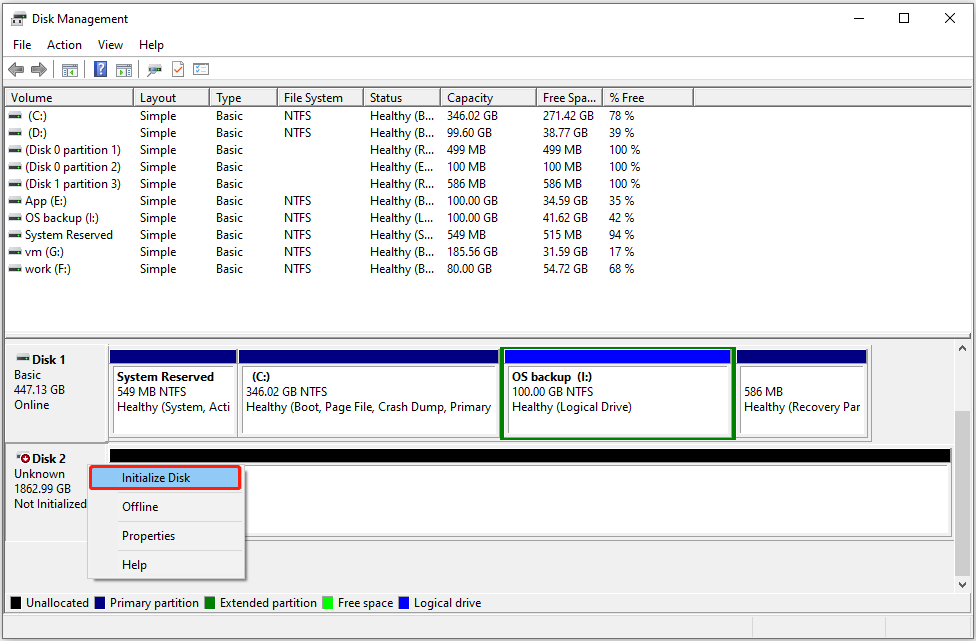
In the new window, choose a partition style from MBR and GPT according to your needs, then click the OK button.
To partition the disk:
After initializing the hard drive, now you can create new partitions from the unallocated space. In Disk Management, right-click on the unallocated space and choose New Simple Volume. Then follow the on-screen instructions to specify the volume size, drive letter, file system, and other required information.
Fix 4. Turn off RAID in BIOS
According to user experience, turning off the RAID feature from BIOS works great on resolving the “hard drive showing up in BIOS but not Windows” issue. However, this method may not be suitable if you have low computer familiarity.
The exact steps to turn off RAID in the BIOS depend on your motherboard model and manufacturer. The following steps are for reference only:
- Start the computer and press the F2 key during the boot process to enter the BIOS setup page.
- In the BIOS setup page, press F7 to enter Advanced Mode.
- Select Intel Rapid Storage Technology and press Enter.
- Select the RAID array to delete and press Enter.
- Select Delete and press Enter.
- After confirming the deletion of the RAID disk array, select Yes to complete the operation.
Related post: AHCI VS RAID
Fix 5. Format the Disk
Incompatibility between the disk file system and Windows may also cause disk recognition and data reading problems. In this case, you can format the disk to common Windows file systems such as NTFS, FAT32, and FAT16.
In Disk Management, right-click the disk and choose Format. Next, type a volume label, choose a file system, and click OK.
If you encounter any issues during the disk formatting process like Disk Management formatting stuck, you can use the professional partition management tool – MiniTool Partition Wizard to format the disk. The Format Partition feature is free to use.
MiniTool Partition Wizard FreeClick to Download100%Clean & Safe
Useful Tip: Always Back up Your Disk
To prevent disk data from being inaccessible, lost, or damaged due to various reasons, it is recommended that you back up data regularly. To reduce the tediousness of data backup, you can use professional data backup software, MiniTool ShadowMaker, to create automatic backups.
This powerful file backup tool allows you to make a backup daily, weekly, monthly, or when on an event, greatly reducing the difficulty of data backup. Besides, the software offers you three backup schemes: Full, Incremental & Differential Backup, aiming to meet different needs.
Major steps to back up an entire hard disk or specific disk partitions:
Step 1. Download, install, and launch MiniTool ShadowMaker.
MiniTool ShadowMaker TrialClick to Download100%Clean & Safe
Step 2. Click Keep Trial to continue.
Step 3. In the Backup section, click SOURCE > Disk and Partitions to choose the drive you want to back up.
Step 4. Click DESTINATION to choose where to store the backup images.
Step 5. Click the Options button to set up the backup schemes and schedule settings.
Step 6. Hit the Back Up Now button to start the backup process.
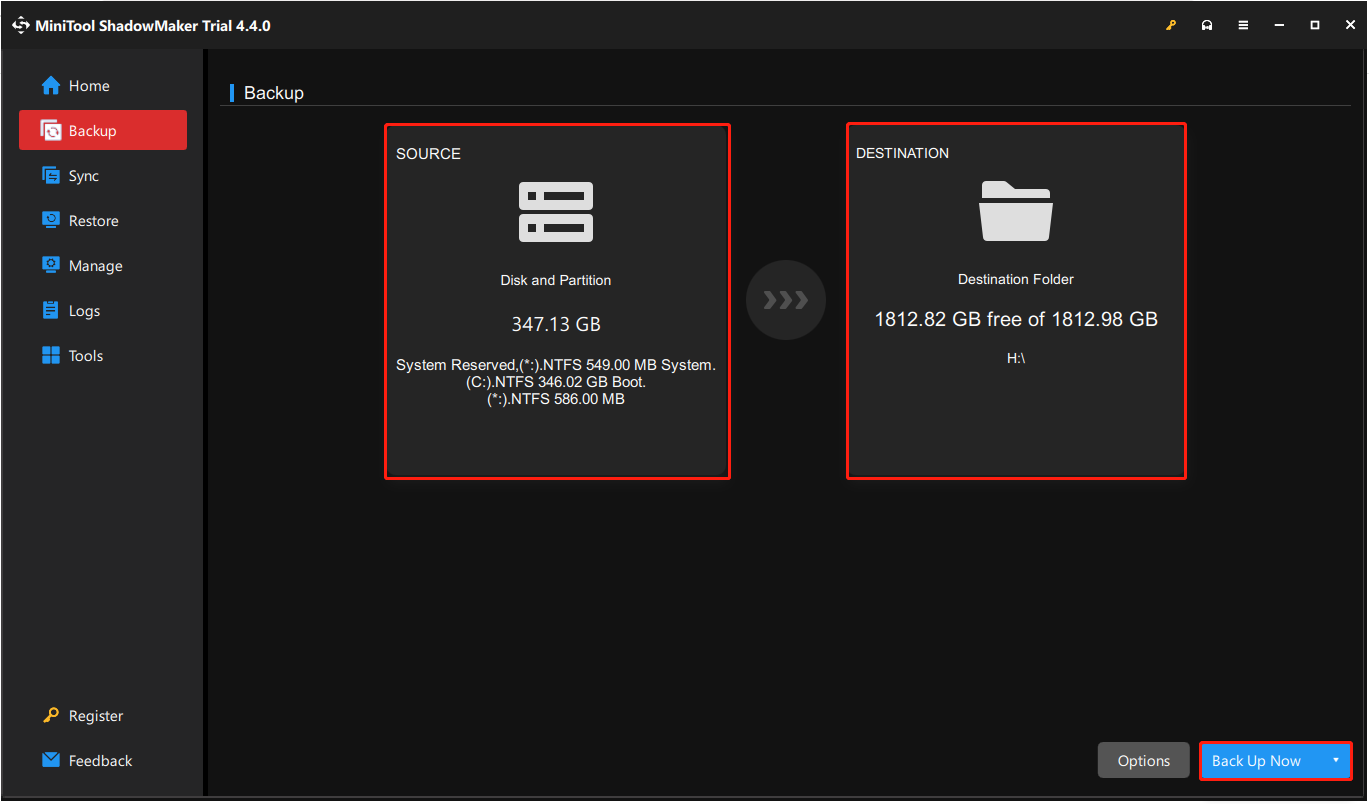
Step 7. Once the backup task is completed, you can go to the Manage tab to edit or restore the backup image.
Wrapping Things Up
In conclusion, when your hard drive shows up in BIOS but not Windows, you should rescue your files immediately to avoid permanent file loss, then apply useful methods to get the issue resolved.
Besides, data backup is also a measure that is always worth emphasizing to protect disk data.
Should you encounter any issues while using MiniTool Power Data Recovery, MiniTool Partition Wizard, or MiniTool ShadowMaker, please feel free to send an email to [email protected]. We will provide you with technical support as soon as possible.
