Losing crucial files can be an incredibly distressing situation. If you've unintentionally deleted your files, this guide from MiniTool will provide a detailed explanation of how to use PhotoRec to recover files and the best PhotoRec alternative.
With the appropriate tools and expertise, you can recover lost or deleted files from your computer. By downloading and installing PhotoRec on your PC, you might find the command-line interface somewhat perplexing when attempting to recover files and may wonder how to use PhotoRec to recover files. What a bummer the situation is!
This guide is designed to assist you in navigating the process of how to recover deleted or lost files via PhotoRec. Additionally, to enhance your data recovery experience, the best alternative to PhotoRec will also be discussed in this guide. Continue reading for more in-depth details.
The Overview of PhotoRec
PhotoRec, created by CGSecurity, is a powerful data recovery program commonly used to retrieve lost or deleted files from various storage media such as hard drives, CD-ROMs, and memory cards from digital cameras. It works with several operating systems, including Windows, macOS, and Linux, and supports various file systems like FAT, NTFS, exFAT, and HFS+. Additionally, PhotoRec enables users to recover various file types, including documents, multimedia files, and archives.
Common Scenarios of Data Loss
Data recovery is not feasible due to file damage or overwriting. However, in the majority of cases, it is still possible to recover the lost data. You can gather some clues from this section.
- Human Error: Accidental deletion of important files can happen when using your computer or other storage devices.
- Viruses & Malware: Clicking on unknown links or downloading unauthorized software can introduce viruses or malware that may crash your computer or steal your information.
- Drive Damage: Dropping your laptop or storage device might cause physical damage. When the hard disk is severely damaged, the data may be unrecoverable, but if only the external parts are damaged, the data can be rescued from the device.
- Power Outages: Sudden power outages can lead to document loss when data hasn’t been saved or when data is being transferred from your data storage device to a computer.
- Storage Drive Formatting: If you encounter error messages asking you to format a drive, remember that formatting will delete all data on it.
- OS Crash: Issues like operating system not found or corrupted system partitions can prevent your Windows OS from booting normally.
- Software Corruption: Software disruptions may cause freezes, unresponsiveness, or unexpected shutdowns, potentially leading to data loss.
PhotoRec Tutorial: How to Install and Use This Software
In this part, we will introduce how to install PhotoRec on your Windows PC and the process of using it to recover your deleted files with ease.
How to Install PhotoRec on a Windows PC
Here’s a comprehensive guide on how to install PhotoRec on a Windows computer.
1. Visit the official site for PhotoRec, which is included in the TestDisk software suite.
2. Navigate to the Download section and click on the link for the Windows version of the application. This will initiate the download of a ZIP file that contains the software.
3. Unzip the contents of the ZIP file into a folder on your machine. You can accomplish this by right-clicking on the ZIP file, selecting Extract All, and then following the on-screen instructions to extract the files.
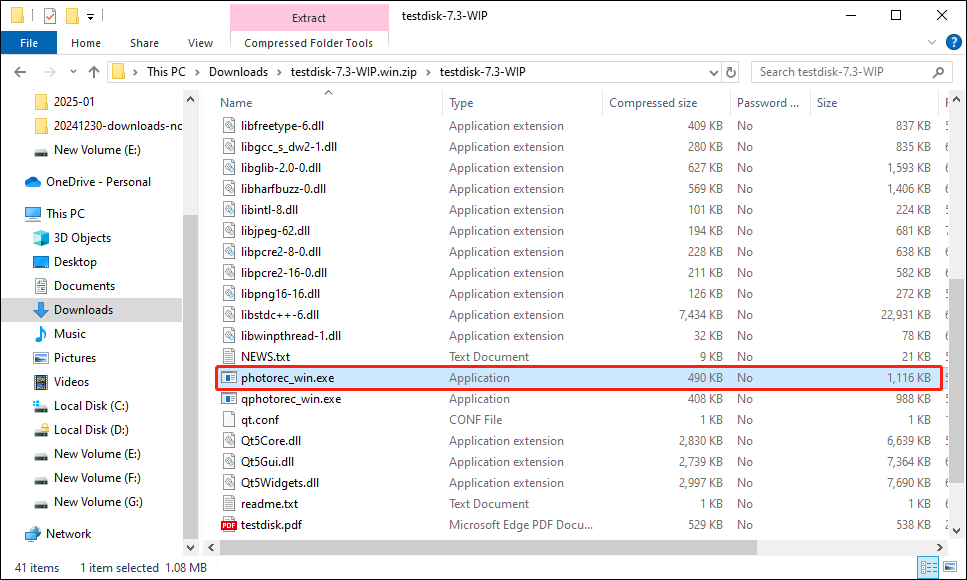
4. Access the folder that holds the extracted files. You should find a file named photorec_win.exe. Double-click this file to start the application.
How to Use PhotoRec to Recover Files
Utilizing PhotoRec software to recover data is a simple procedure, but it demands careful consideration to achieve optimal results. Below is the process to recover deleted files using PhototRec to follow:
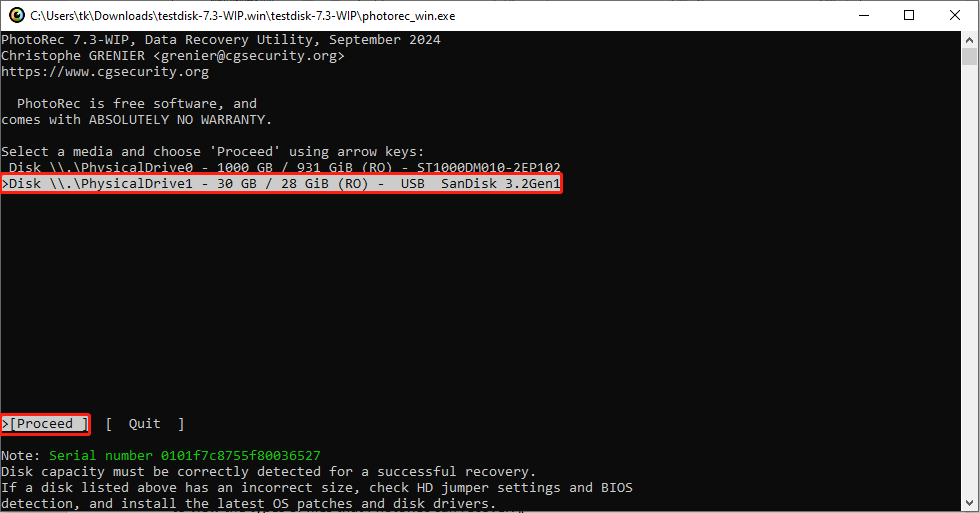
Step 1. Open PhotoRec and navigate using the Up/Down arrow keys to select the disk or partition where the lost files are located. Press Enter to validate your choice and continue with the recovery operation.
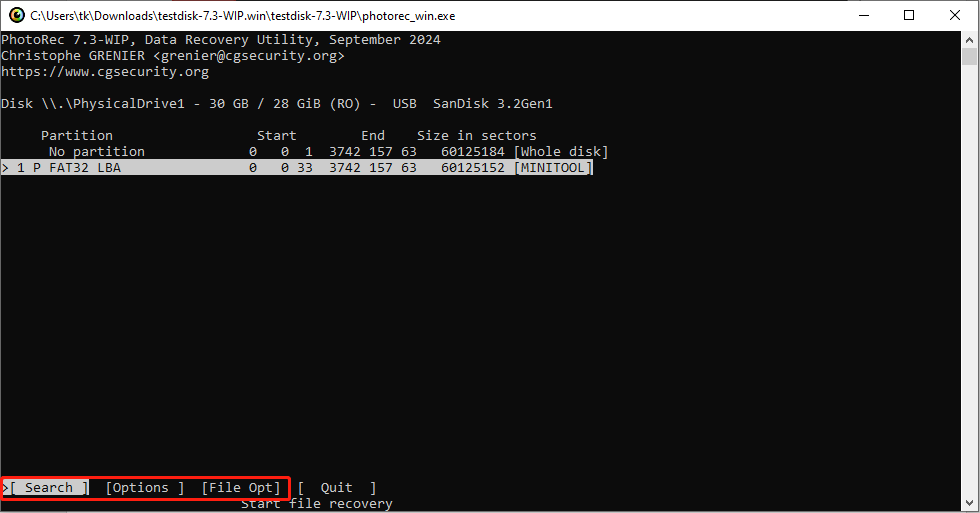
Step 2. In the subsequent window, use the Up/Down arrow keys to identify the file system used by the disk.
In this interface, PhotoRec will display three options: Search, Options, and File Opt. Select Search to initiate a complete data recovery scan. Hit Enter to commence the automated search for lost files. Additionally, you can navigate through Options using the Left/Right arrow keys to adjust the settings and use File Opt to view the types of files that PhotoRec can recover.
The PhotoRec Options include the following settings:
- Paranoid: Recovered files are validated by default, while invalid files are discarded.
- Allow partial last cylinder: This modifies the determination of disk geometry; it should primarily impact non-partitioned media.
- Expert mode: This allows the user to specify the file system block size and offset.
- Keep corrupted files: This option ensures that files are retained even if they are damaged or invalid.
- Low memory: Select this option if your device lacks sufficient memory and experiences crashes during recovery.
Step3. Then, choose the file system type in PhotoRect, including two selections: ext2/ext3 & Other and press Enter.
If the file system is ext2, ext3, or ext4, opt for the [ext2/ext3] selection. If the file system is different, such as NTFS or FAT32, choose [Other]. For example, the USB flash drive we chose to scan is FAT32, so we selected the [Other] option.
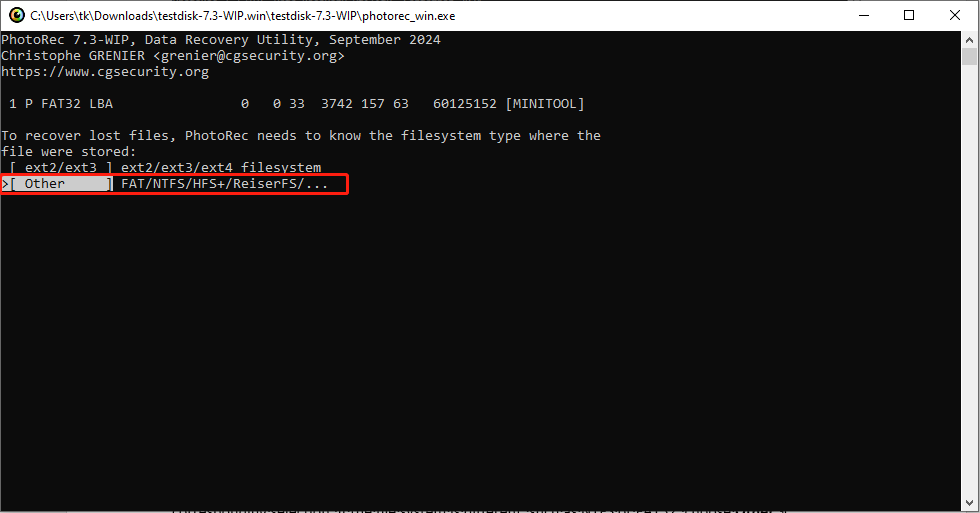
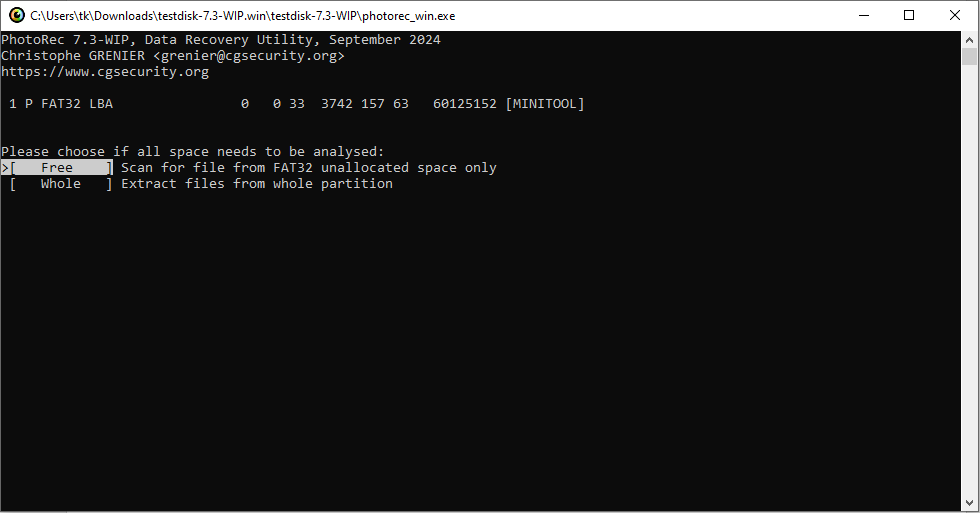
Step 4. In the next screen, run PhotoRec to search files either from an unallocated space or an entire drive. Select the option that fits your needs: Free or Whole, and then hit Enter.
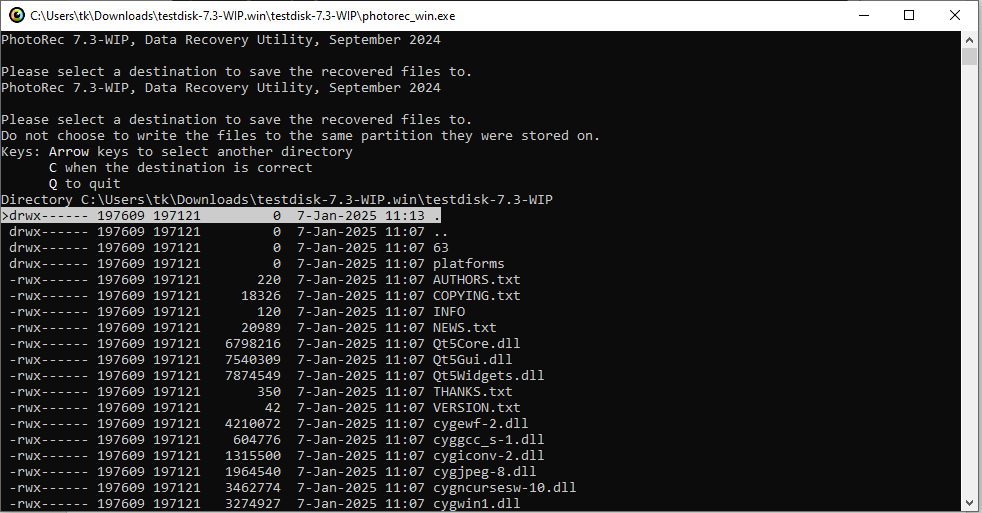
Step 5. Use the Up/Down arrow keys to choose a destination on your computer where you wish to store the recovered files. Make sure the selected destination has ample free space for the recovered data. It is worth noting that the save location should be different from the original location to avoid data overwriting.
Press C to initiate the recovery process. PhotoRec will now diligently search for and attempt to retrieve your lost files.
The Best Alternative to PhotoRec – MiniTool Power Data Recovery
After reading how to use PhotoRec to recover files, you may find the interface of PhotoRec is complex. Using Photo Rec to recover files is suitable for those who are sophisticated at the command-line interface. As the actions performed in PhotoRec cannot be undone, any errors could lead to serious damage to your other data. Consequently, opting for the best PhotoRec alternative may be advantageous.
MiniTool Power Data Recovery, regarded as the top free data recovery software for Windows 11/10/8.1/8, can assist you in retrieving your files without damaging the original data as long as they haven’t been completely overwritten by new data.
PhotoRec vs MiniTool Power Data Recovery
What makes MiniTool Power Data Recovery preferable over PhotoRec? Let’s examine the key features of MiniTool Power Data Recovery in comparison to PhotoRec.
- Solutions for Data Loss: MiniTool Power Data Recovery tackles various scenarios involving data loss, such as accidental file deletion, hard drive failures, and system crashes, and it can retrieve lost files as long as they haven’t been overwritten. PhotoRec can only run on a working device to recover accidentally deleted or lost files.
- Supported File Types and Devices: Both tools are capable of recovering various types of lost files, however, MiniTool Power Data Recovery is compatible with a more extensive range of file types. Moreover, you can run this data recovery tool to retrieve data from hard drives, external drives, SSDs, USB drives, and CDs/DVDs.
- User-Friendly: With an intuitive interface, MiniTool Power Data Recovery enables users of all skill levels, whether seasoned computer technicians or novices, to recover files in just three easy steps. PhotoRec lacks a user-friendly interface, featuring a basic command-line setup that may be challenging for non-technical users.
- High Security: Operating as a read-only tool, MiniTool Power Data Recovery scans drives without altering original data. It’s compatible with Windows 8/8.1, Windows 10, Windows 11, and Windows Servers. The open-source feature of PhotoRec may increase its vulnerability to malware and viruses and its actions are irreversible, meaning that any mistakes could have serious consequences for the user’s data.
The free version of MiniTool Power Data Recovery allows for file preview at no cost and offers 1 GB of complimentary file recovery, significantly lowering the chances of retrieving unnecessary files.
Now, click the green button below to download and install MiniTool Power Data Recovery Free, and then start it to recover your files in just three steps.
MiniTool Power Data Recovery FreeClick to Download100%Clean & Safe
How to Recover Files Using MiniTool Power Data Recovery
Step 1. Select the partition/location/disk to scan.
On the main interface of MiniTool Power Data Recovery, there are many options available under the Logical Drives tab, including all hard disk partitions on your computer and some specific locations like the Desktop, the Recycle Bin, and the option of Select Folder. If you have difficulties in finding the target partition, you can choose to scan the whole disk in the Devices tab.
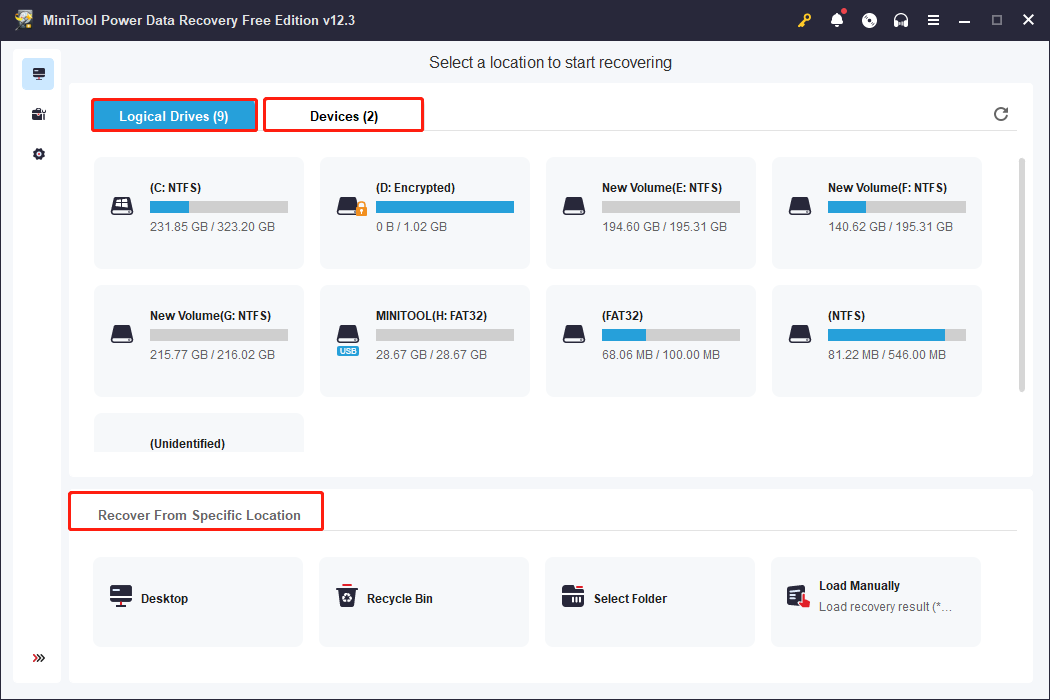
According to your actual situation, move the mouse to the specific location/target partition/device where you lost the file and click Scan. Subsequently, this recovery tool will begin scanning on its own. All you need to do is to wait patiently until the scan completes automatically to guarantee optimal scan results.
Step 2. Find and preview the needed files.
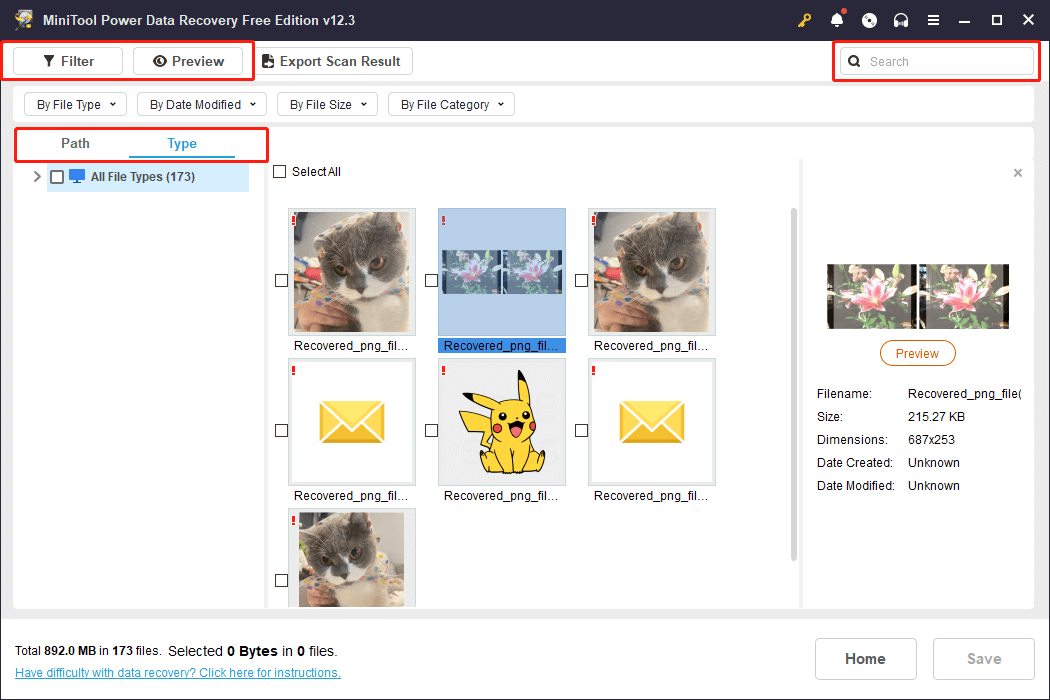
Once the scanning process is finished, five strong features will be ready for quick file recovery and verification. You can select the one that best suits your current needs.
- Path: This section shows all items located on the chosen partition by default. All files are categorized by their file paths and arranged in tree structures. To locate the necessary files, you need to navigate through a folder and its subfolders step by step. This is an excellent choice when you wish to recover files along with their original folder organization.
- Type: Within this tab, all files are organized by their type and format. This is ideal if you’re looking to recover a particular type of file, like picture, document, audio, video, e-mail, archive, database, etc.
- Filter: This feature allows you to exclude unwanted files based on file type, the latest modification date, file size, and file category. You can set multiple filter criteria simultaneously.
- Search: This enables you to conduct an exact search. Enter a partial or full file name in the search box located in the upper right corner and hit Enter, and you will receive accurate search results.
- Preview: This option is particularly useful for confirming that the recovered files are the ones you want. MiniTool Power Data Recovery Free Edition only permits saving up to 1 GB of files for free, so it’s essential to preview them first. You can easily double-click on an individual file to preview it.
Please remember that the Filter and Search features cannot be utilized simultaneously. And after using each function, you need to check the boxes of wanted files and click Save. If not, the checked files may be not ticked after returning to another function.
Step 3. Save the recovered files.
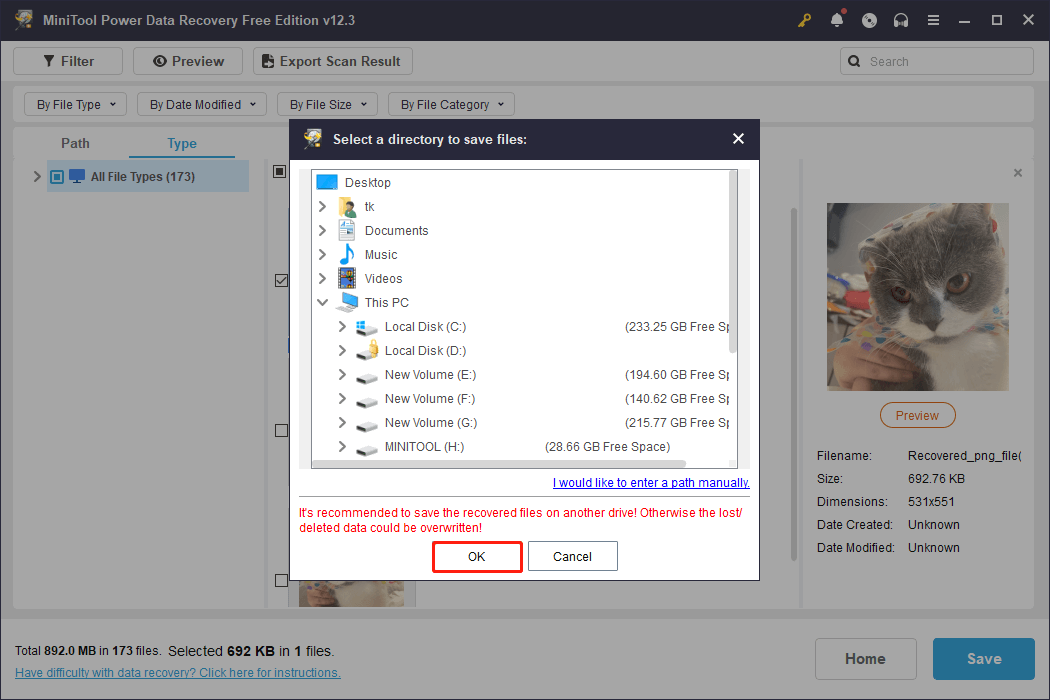
Verify that you have selected all the files you wish to recover. If so, press the Save button located in the scan results window. Next, select a destination to save the restored items and click OK. Be sure to choose a location different from the original directory where the data was lost to avoid the risk of data overwriting.
This free data recovery tool allows you to recover 1 GB of files for free and if you want to recover more files, you can upgrade to MiniTool Power Data Recovery Personal version.
Verdict
This article introduces how to use PhotoRec to recover files. PhotoRec is a reliable free file recovery tool but requires users to get certain techniques to understand its command-line interface and complex recovery process. Therefore, for a faster and more user-friendly alternative, no matter whether you are tech-savvy or not, you can jump right into using MiniTool Power Data Recovery.
Should you need any help with MiniTool Power Data Recovery, please feel free to reach out to the technique support team via [email protected].

