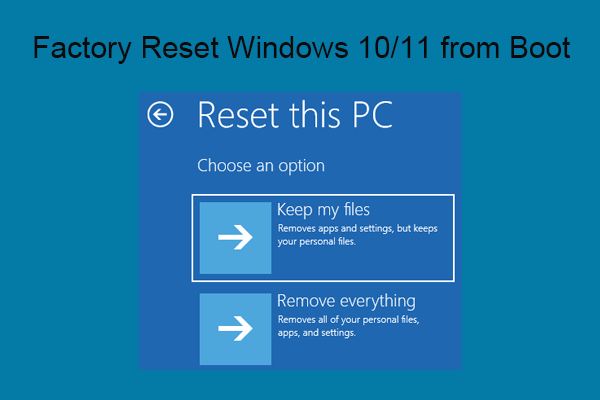
You may perform a factory reset on your laptop to resolve computer problems or improve the performance of a computer. But files might be lost even though you choose to keep them. How to recover files after a factory reset on your laptop? This article from MiniTool tells you how to do it.
Part 1 – Lose Files After Factory Reset Laptop
Laptops are commonly used nowadays in life and work. You must find that the running and responding speeds of your laptop slow down as you use it. Therefore, some of you choose to perform a factory reset to improve the performance. The factory reset will do a good job in useless file deletion, configuration resetting, and fixing disk errors. However, it may also bring you some troubles such as file missing. The next part will show you detailed steps to recover files after a factory reset.
A Specific Case of Losing Files After Resetting Windows
Restore deleted files after resetting Windows 10
In the hope of solving problems with a network adapter, I reset Windows 10 on my laptop. I saved some of my files on an external hard drive but I stupidly forgot about some of the pictures I had saved from my phone. When I did the reset, I chose to remove all my data, but when I got a second option to make it completely impossible to retrieve the files I chose "No". This makes me think there has to be a way to get the deleted files back. – LinneaWestmananswers.microsoft
Part 2 – Can You Recover Files after Factory Reset Laptop
A factory reset is a process that clears data and settings on the device and restores the device to the default status. It helps to troubleshoot most issues, like software updates, configuration issues, system errors, and more. When doing a factory resetting, your personal data, settings, installed apps, and accounts logged in on this device will be erased.
Does this indicate that your data can’t be recovered after a factory reset? Actually no. You have a chance to recover data after a factory reset without backups by using professional data recovery software. Among various file recovery software, I’d like to recommend MiniTool Power Data Recovery to you.
This is the best free data recovery software for Windows users since it fits all Windows systems. Therefore, no secondary damage will be caused to your original files due to the incompatible errors. Additionally, files stored on a corrupted computer, formatted USB drive, unrecognized external hard drive, or other devices can be detected and restored by using MiniTool Power Data Recovery. Furthermore, it is able to recover deleted photos, missing documents, lost videos, and so on.
You can find more functional features when using it.
How to Recover Files after Factory Reset with MiniTool Power Data Recovery
The following content shows you how to recover files after a factory reset with MiniTool Power Data Recovery. You can download and install it first by clicking the button below. Then, prepare another data storage device and connect it to your laptop to save the recovered files.
MiniTool Power Data Recovery FreeClick to Download100%Clean & Safe
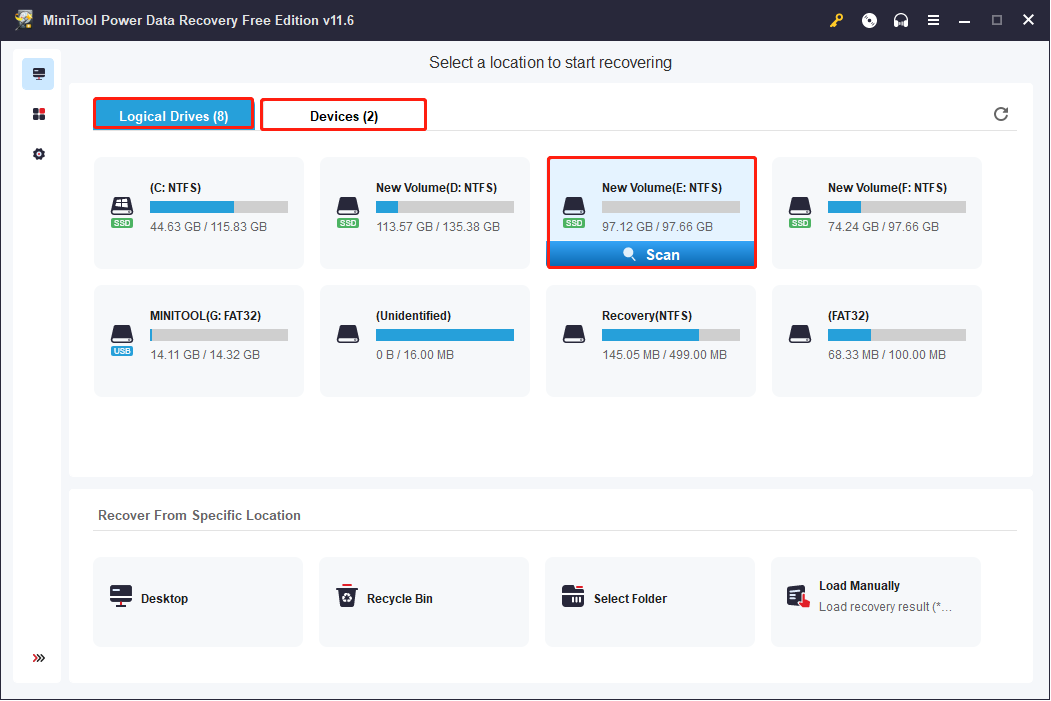
Step 1: Launch the software to enter the main interface.
You will see all the partitions detected on your laptop under the Logical Drives section, or you can turn to the Devices tab to see all the devices connected to the laptop. If the partition containing the lost files still exists, you are recommended to scan the partition.
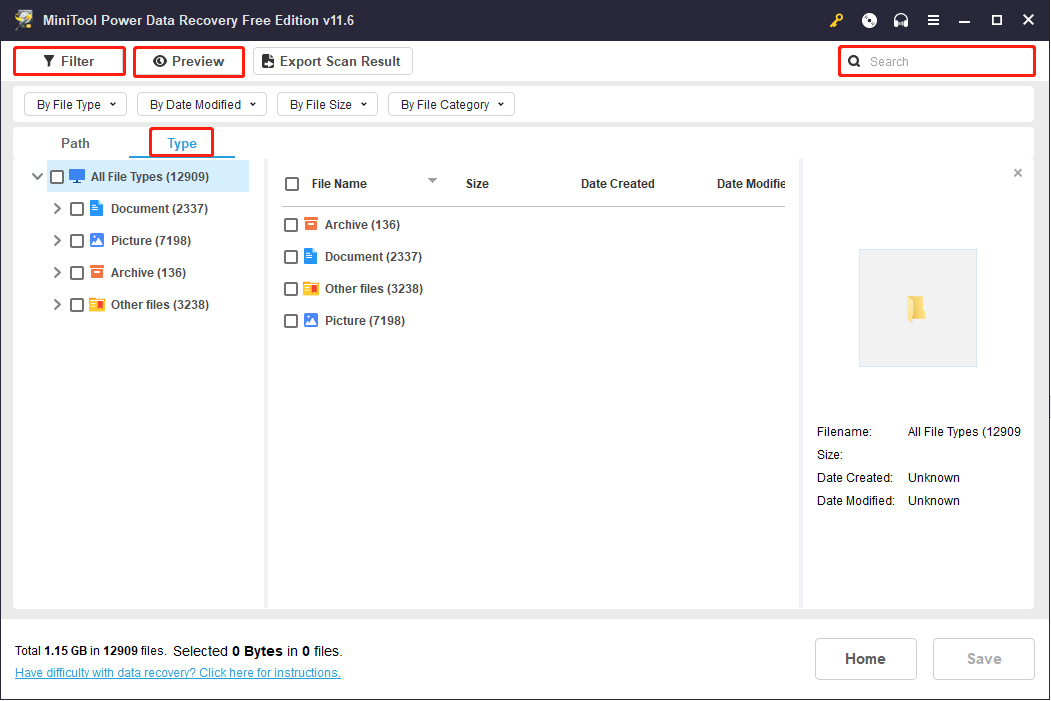
Step 2: Wait for the scan process to complete. You can expand different paths on the left sidebar to find your needed files. Considering that files might be renamed as Recovered file(1), and Recovered file (2)…, you can use the Preview function to verify the chosen file is the right one. You can preview photos, videos, audio, and files with this function.
There are other three features that can help you locate files:
- Filter: Set filter criteria to filter out unnecessary files.
- Type: Sort found files according to their types.
- Search: Find files that match the name you type in the search bar.
Step 3: Select all the files you want to restore, and click on the Save button to choose an appropriate storage path. You need to choose the removable device connected to the computer as the destination.
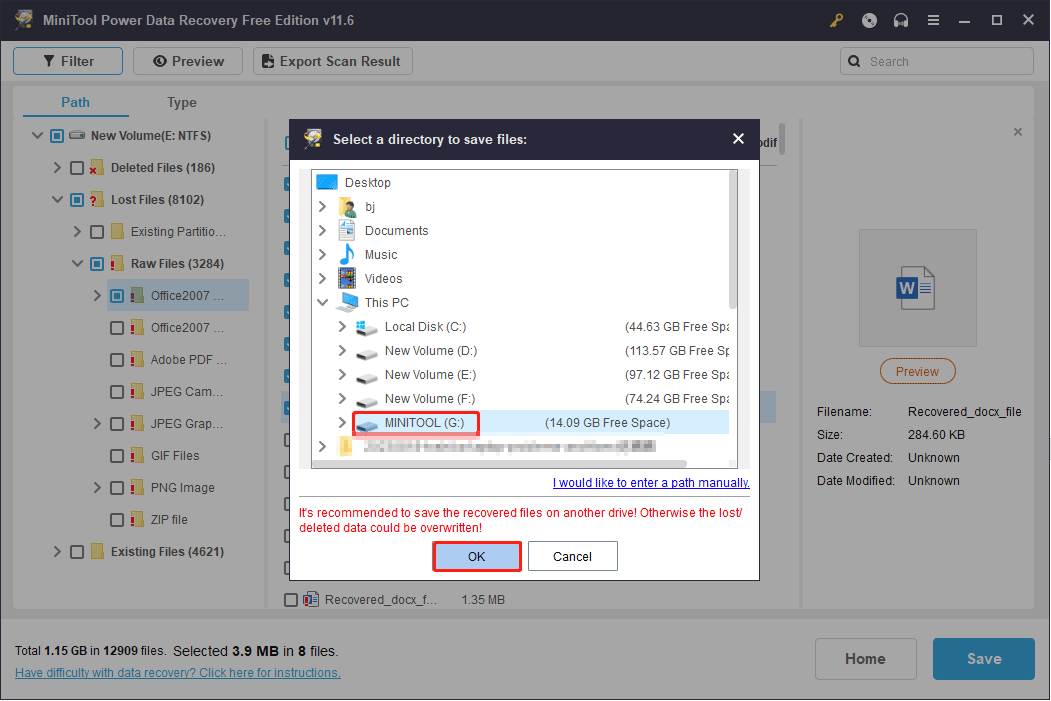
These are all the steps to recover data after resetting a laptop. After the recovery process is completed, you can go to the target device to check your files.
Recover Data After Factory Reset Using File History
You can try this method if you have backed up files with File History. Before performing the next steps, you should connect the device which you use to back up files, to the computer.
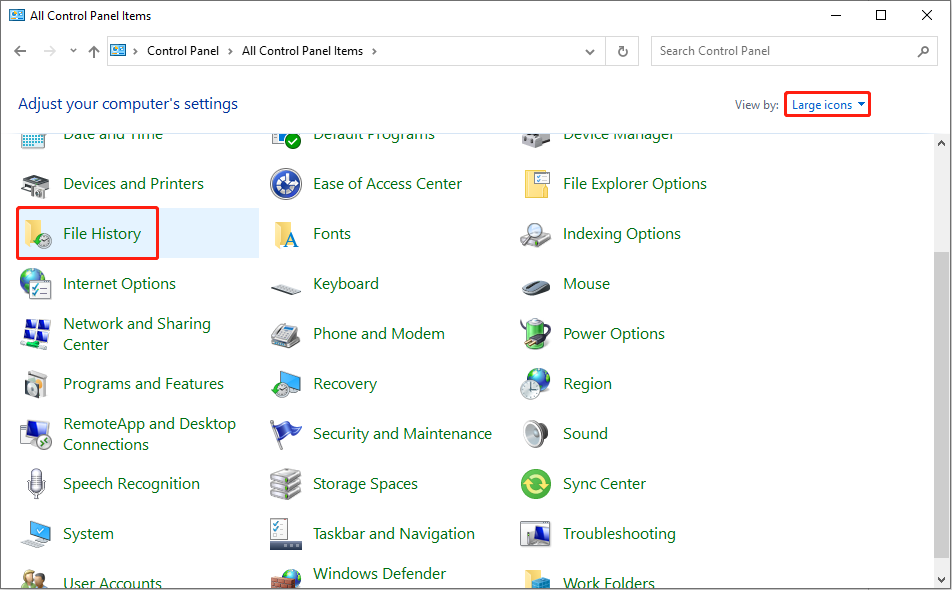
Step 1: Type Control Panel into the Windows Search bar and hit Enter to open the window.
Step 2: Choose File History if you choose the Large icons of the View by option.
Step 3: Select Restore personal files on the left pane.
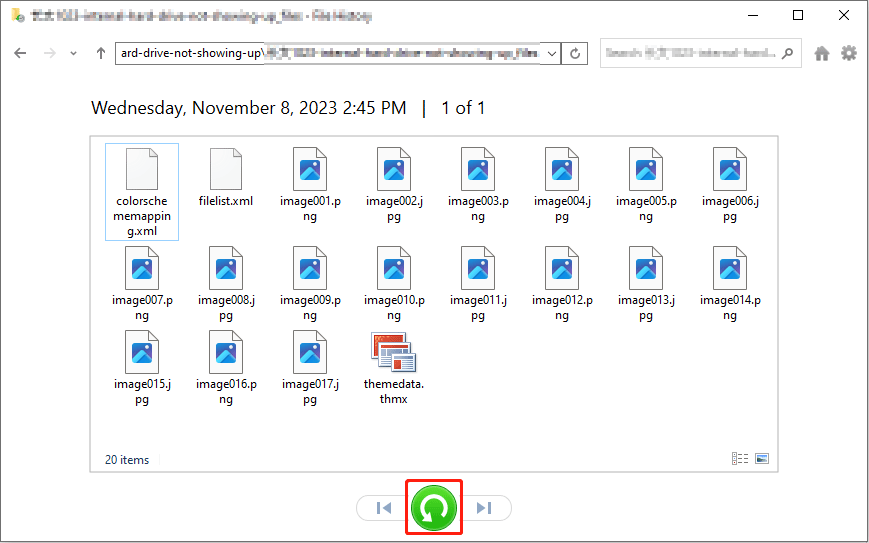
Step 4: Select the files you want to recover and click on the Green restore icon to get your files back.
If you are interested in how to factory reset a laptop, please move on to the next part.
Part 3 – How Do You Factory Reset a Laptop
Restoring to factory settings is the quickest way to solve issues and bring your laptop back to normal, whether the system is running slow or caught a virus. Do you know exactly how to perform a factory reset? I will walk you through the process of factory resetting different Windows systems.
Bonus Step: Back Up Your Laptop
As explained in the above content, the factory resetting process erased most data on your laptop. Therefore, you’d better back up files before doing a factory reset process. How to effectively back up data? MiniTool ShadowMaker helps you a lot.
This user-friendly backup software allows you to back up files in a few steps with a clean interface and clear instructions. MiniTool ShadowMaker Trial can be used for free within 30 days. You can download this tool to back up files safely.
MiniTool ShadowMaker TrialClick to Download100%Clean & Safe
Step 1: Install MiniTool ShadowMaker on your computer properly with the on-screen instructions.
Step 2: Connect another drive to your computer to store files and run the software.
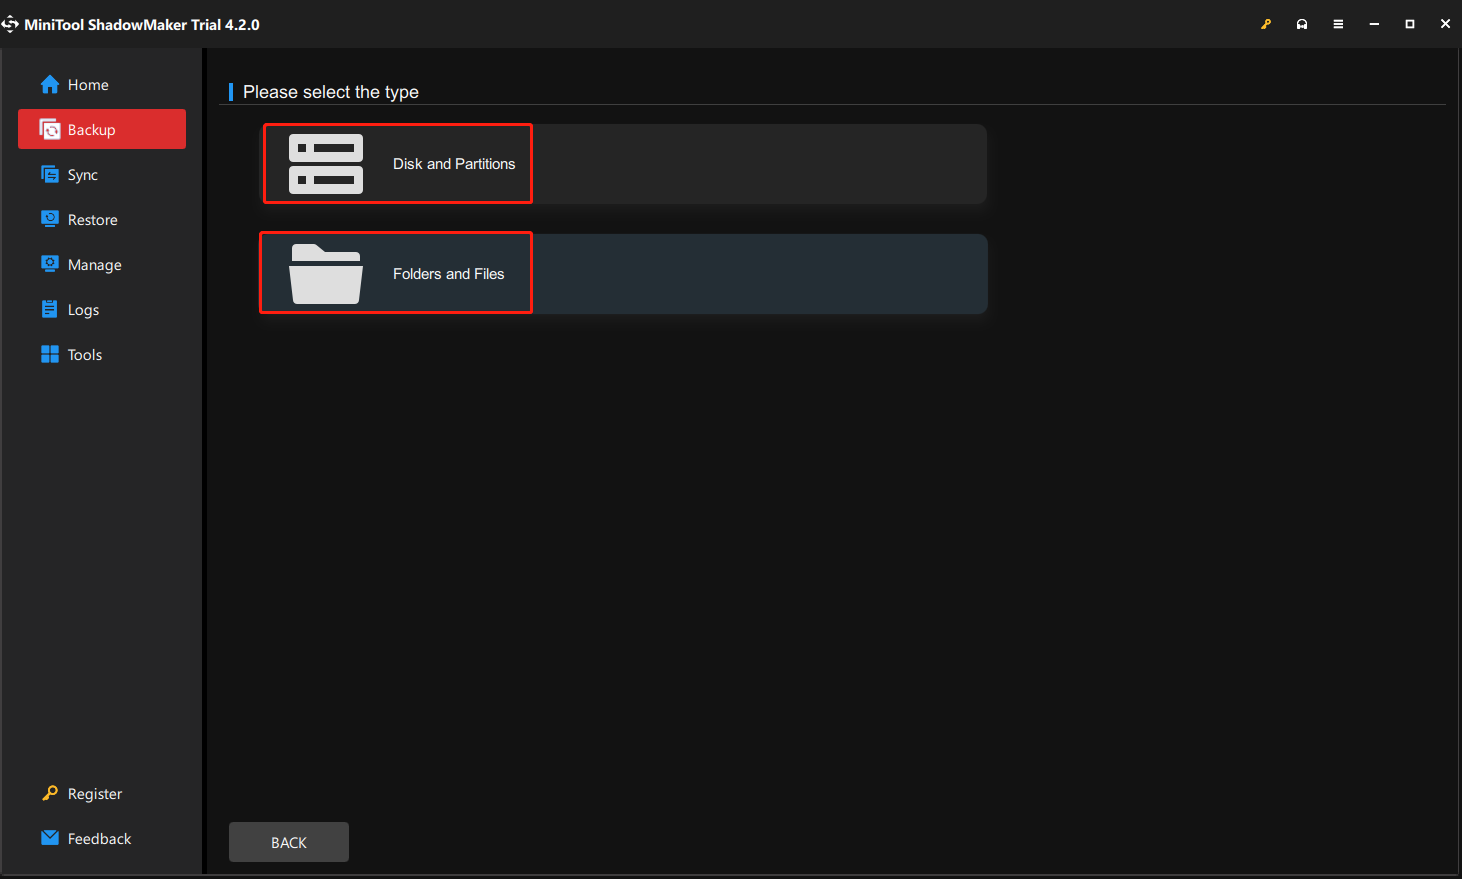
Step 3: Shift to the Backup tab on the left pane, where you can find the SOURCE and DESTINATION sections.
Step 4: Click on SOURCE to choose the backup content. You can choose Disk and Partitions or Folders and Files in the next interface. Click OK to confirm your choice.
Step 5: Click on DESTINATION to select the drive you just connected, then click OK.
Step 6: You will back to the Backup interface. Choose Back Up Now to start the data backup action immediately.
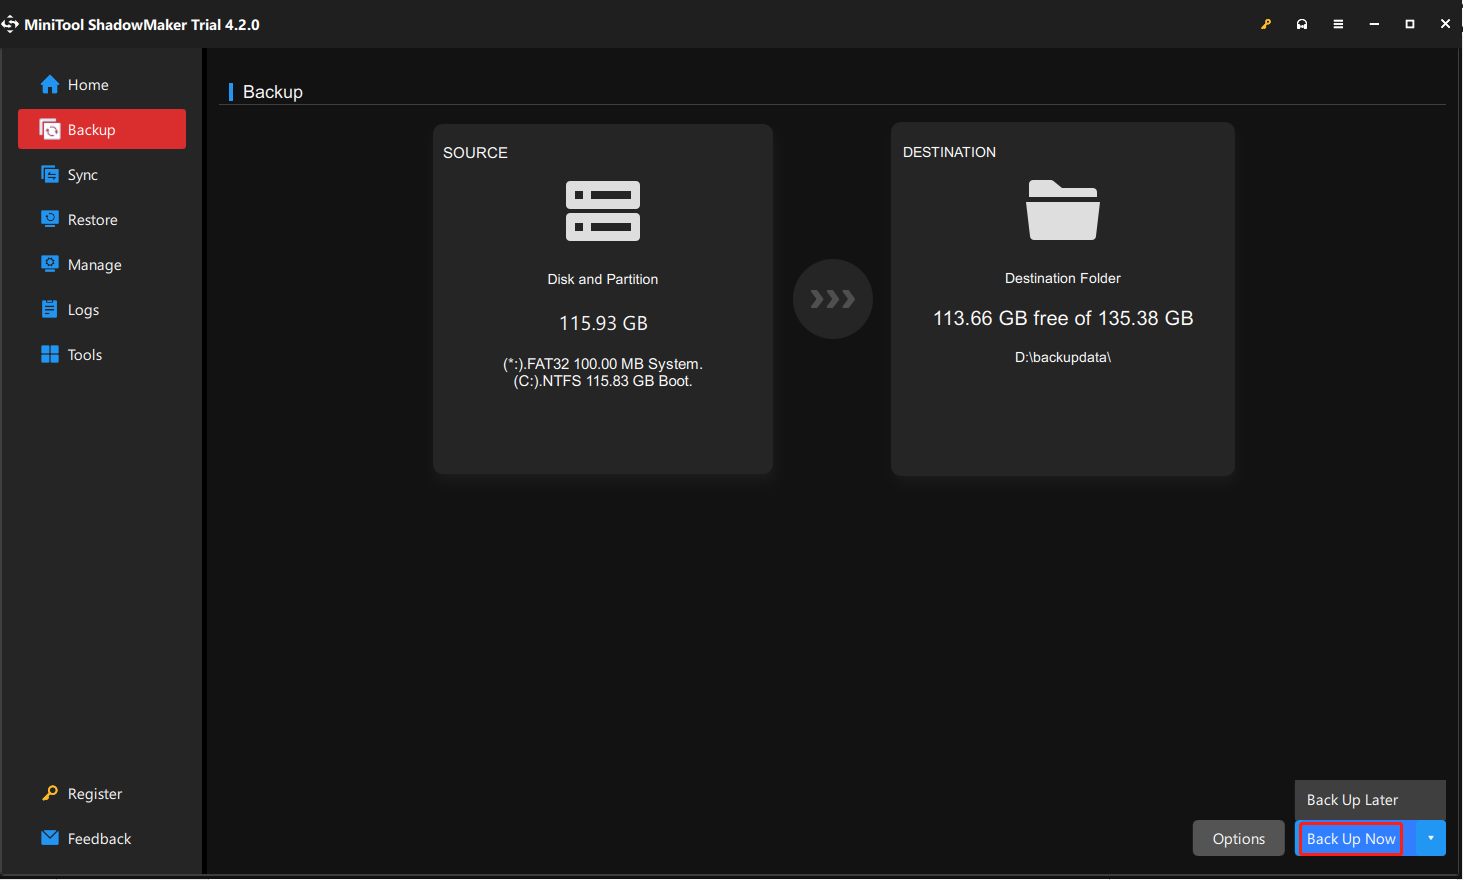
You can choose Back Up Later and go to the Manage tab to configure the backup.
How to Reset a Windows 7 Laptop to the Factory Settings
If you are running Windows 7 (or Windows Vista), you have two choices to perform a factory reset.
- The first is to reinstall Windows from scratch, which isn’t a factory reset at all unless you have all the original, factory-provided install media available. This method is a good way for users who want to permanently destroy all information saved on their laptops.
- Alternatively, you can use a manufacturer-provided recovery tool and factory-provided recovery partition (most major computer manufacturers, like HP and Dell, provide recovery partitions on laptops and tablets in lieu of installation media).
If you are not sure whether your Windows 7 laptop has a recovery partition, check the user manual for your specific model. You can also turn to the Disk Management tool to know if your laptop has a built-in recovery partition: Right-click on Computer > choose Management > choose Disk Management on the left pane. You will see all the drives and partitions on your laptop. Actually, the recovery partition may not show as Recovery here. You should pay attention to any partition between 8-16GB in size and check its properties.
Here, I will take HP as well as Dell for example to show the detailed steps to reset Windows 7 laptop to the factory settings without a disc.
HP Factory Reset
Step 1: Power off the computer and remove all peripheral devices.
Step 2: Power on the laptop and press and hold the F11 key to enter the Choose an option screen.
Step 3: Choose Troubleshoot and click on Recovery Manager to enter HP Recovery Manager.
Step 4: Select Factory Reset on the screen to reset the HP laptop to factory settings.
Dell Factory Reset
Step 1: Turn off the laptop and remove all the attached devices.
Step 2: Power on the laptop. When the Dell logo appears, press and hold the F8 key to open the Advanced Boot Option menu.
Step 3: Select Repair Your Computer by using the arrow keys, then press Enter to confirm.
Step 4: You need to choose a keyboard layout and click on the Next button.
Step 5: Log in as a local user or the Administrator, input the password, then click OK.
Step 6: Depending on the configuration, you may need to choose Dell Factory Tools, then click on Dell Factory Image Restore from the Dell Factory Tools menu.
Step 7: Click on the Next button to open the Confirm Data Deletion screen. You should opt for Yes, reformat hard drive and restore system software to factory condition.
Step 8: Click on the Next button to start the restore process. This process will take a few minutes. When it is over, click Finish to restart your laptop.
If you perform a factory reset without backing up files, you can try MiniTool Power Data Recovery to get your files back.
MiniTool Power Data Recovery FreeClick to Download100%Clean & Safe
How to Reset a Windows 8 Laptop to the Factory Settings
Windows 8 lets users restore their laptop to factory default settings, regardless of who made it or whether users have an install disc.
Step 1: Click on the Start menu and choose Settings > Change PC Settings.
Step 2: Shift to the General tab, then you will see three options on the right pane:
- Refresh your PC without affecting your files
- Remove everything and reinstall Windows
- Advanced startup
Step 3: Choose one according to your actual needs and click on Get started/Restart now.
Then, follow the on-screen instructions to finish the rest steps.
How to Reset a Windows 10 Laptop to the Factory Settings
Step 1: Press Win + I to open Windows Settings.
Step 2: Choose Update & Security and select the Recovery tab on the left pane.
Step 3: Click on the Get started button under the Reset this PC.
Step 4: Choose Keep my files or Remove everything on the following window based on your requirements.
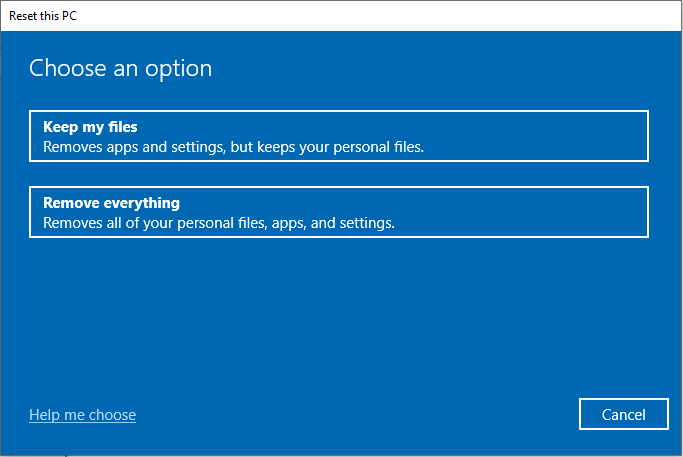
Step 5: Select Local reinstall (Reinstall Windows from this device) or Cloud download (Download and reinstall Windows), then click Next.
Step 6: Click on the Reset button. Your laptop will begin the reset process automatically, which might take a long time. You’d better plug in the power cord to avoid running out of power.
Wait for the process to complete. After this, you can enter your information and log into the laptop.
Can You Undo a Factory Reset
Some people find they’re not satisfied with the factory reset results, so they want to undo it. Is that possible? Unfortunately, you cannot “undo” a factory reset on Windows 10. But what you can do is recover all lost data from the internal hard drive with a powerful recovery tool and change settings manually according to needs.
Part 4 – Conclusion
No matter what kind of reasons push you to factory reset your laptop, keeping data safe should always be the primary thing. Once you discover your files are lost after a laptop factory reset, please restore them as quickly as possible. MiniTool Power Data Recovery can help you recover files after a factory reset easily.
MiniTool Power Data Recovery FreeClick to Download100%Clean & Safe
You are welcome to share any problems and puzzles about MiniTool software with us via [email protected].
