Are you undergoing GIMP photos lost due to unintentional deletion or software glitches? You can read this MiniTool post to recover GIMP photos with secure GIMP data recovery software or other feasible solutions on your computer.
What Is GIMP
GNU Image Manipulation Program, shortened as GIMP, is a free and open-source photo editing tool. This software is equipped with diverse functions, including photo retouching, image editing, format transferring, etc. Although this tool is not designed for drawing, plenty of users facilitate this software in drawing, creating posters, graphic designing, and completing other creation tasks.
Where Is the GIMP Profile Folder
The GIMP profile is used to store information encompassing software settings, painting tools, personalized keyboard shortcuts, etc. Sometimes, GIMP startup issues are triggered by the corrupted profile folder. Thus, it is necessary to know where the GIMP profile is on your computer. Here are the specific file paths for users in different computer operating systems.
- For Windows users: C:\Users\username\AppData\Roaming\GIMP\2.10
- For Linux users: /home/username/.config/GIMP/2.10
- For OSX users: /Users/username/Library/GIMP/2.10
The 2.10 in the file path refers to the version of GIMP. If you are running different GIMP versions, you will get the corresponding version number of the profile folder.
When your profile folder is corrupted, you can find and rename the profile folder, such as 2.10.outdated. Afterward, restart GIMP to recreate a new profile folder automatically.
How to Recover Deleted GIMP Files
When exporting a GIMP photo, you can choose a preferred location on your computer or other external data storage devices. This part will show you some feasible approaches to recover GIMP photos that are deleted or lost due to several reasons. You can read and choose an appropriate solution based on your case.
Way 1. Restore Deleted XCF Files from the Recycle Bin
If you save GIMP photos on your computer, restoring deleted GIMP XCF files from the Recycle Bin is the most basic solution. Unless you empty the Recycle Bin, simply deleted files will be kept in this folder for days for recovery.
Open the Recycle Bin on your desktop and look through the file list to pinpoint the GIMP photo. By default, GIMP saves photos in the XCF file format; thus, you can search the XCF files in the Recycle Bin to filter the necessary files.
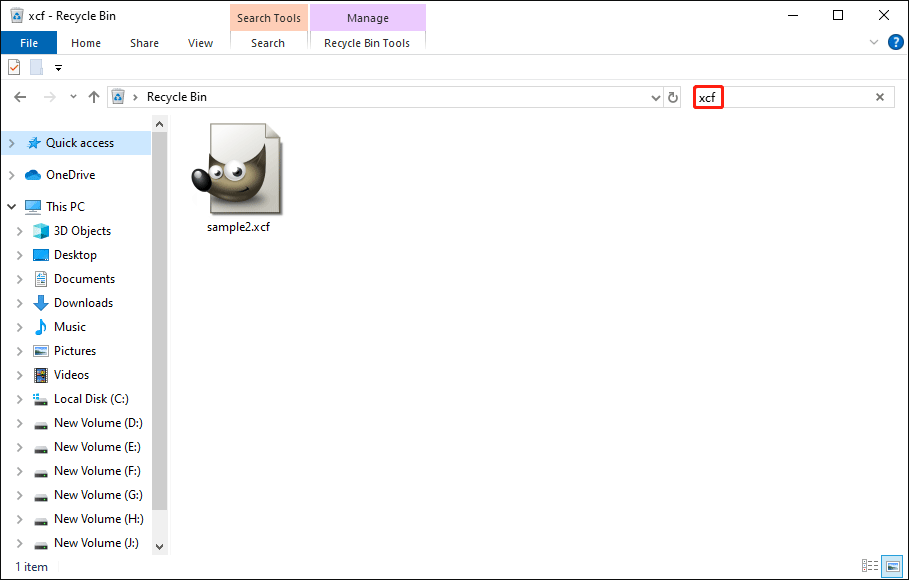
Right-click on the file and choose Restore to recover the deleted photo to the original path. Optionally, drag and drop the file to a preferred path.
However, when you are searching solutions online, it is a common situation that no desired GIMP files are found in the Recycle Bin. Move on to the next solution which may be more effective.
Way 2. Recover Lost GIMP Files Using MiniTool Data Recovery Software
Permanent data loss happens on several occasions, encompassing Shift deletion, virus attacks, device formatting, software crashes, and more. If your GIMP files are lost due to those reasons, you should ask for help from professional data recovery software, like MiniTool Power Data Recovery.
This free file recovery software enables you to recover GIMP photos as long as they are not overwritten. In addition to completing GIMP XCF file recovery on Windows, you can recover GIMP files from removable devices as well, including SD cards, USB drives, memory sticks, external hard drives, and more.
With various functional features and wide compatibility of devices and file types, MiniTool Power Data Recovery could be an ideal option among numerous GIMP data recovery software. You can get this software by clicking the download button below on your Windows.
MiniTool Power Data Recovery FreeClick to Download100%Clean & Safe
Step 1. Suppose the software is installed on your computer successfully, you can launch it to find the target partition. If you need to recover GIMP files from removable devices, connect the device to your computer and click the Refresh button to let the software recognize the device.
You have the option to shorten the scan duration by choosing a specific location to scan, such as the desktop, a certain folder, or the Recycle Bin. Here I scan the GIMP save folder as an example: opt for Select Folder from Recover From Specific Location > find and choose the target folder > click Select Folder to start scanning.
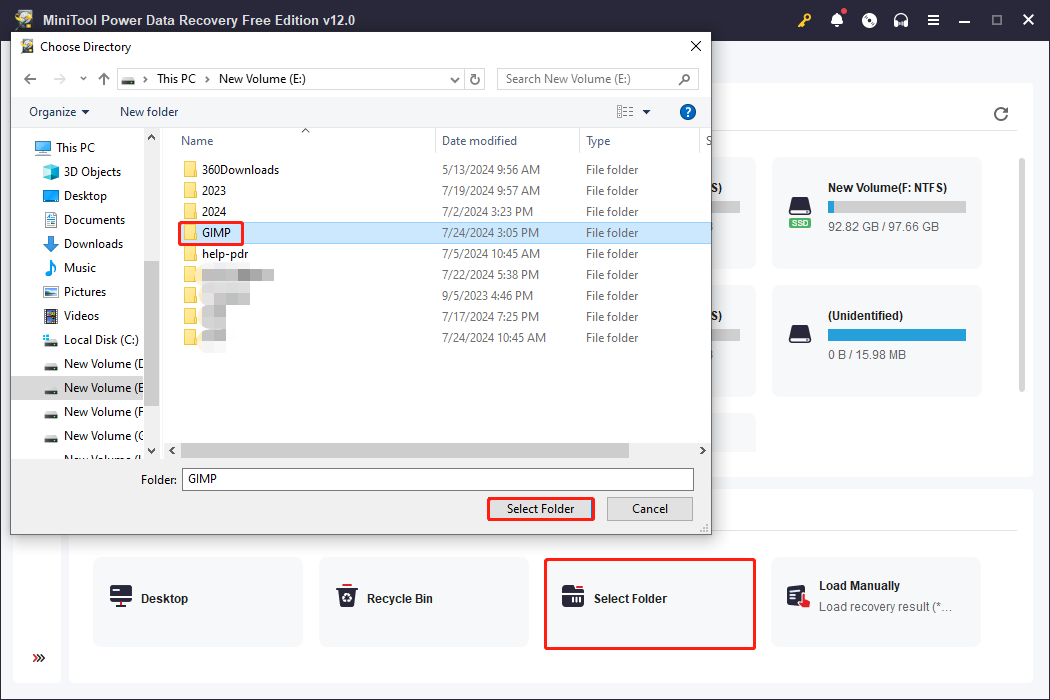
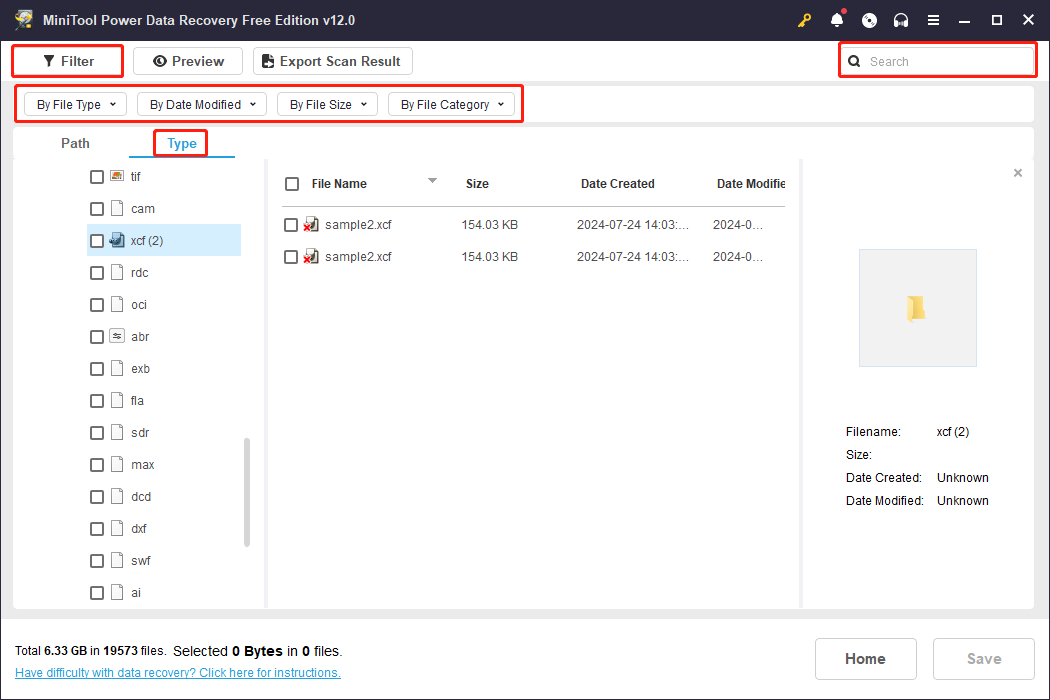
Step 2. You should wait patiently until the scan process is completed itself for the overall scanning of the chosen folder. The software displays files in accordance with their paths by default. To locate the wanted GIMP files quickly, you can utilize those features to filter out unnecessary files:
- Type: Shift to the Type tab where files are categorized by their types. You can expand the Picture option to find the XCF subcategory. If you save GIMP files in other file formats, such as JPG, PNG, GIF, TIFF, and other RAW image formats, this feature works well still.
- Filter: Click the Filter button to set conditions, which can restrict file types, file size, file modified date, and file category.
- Search: Use the Search feature to find wanted GIMP files directly. If you remember the file name, type it (both full and partial names are available) into the search box and press Enter. The software will detect the matched items automatically.
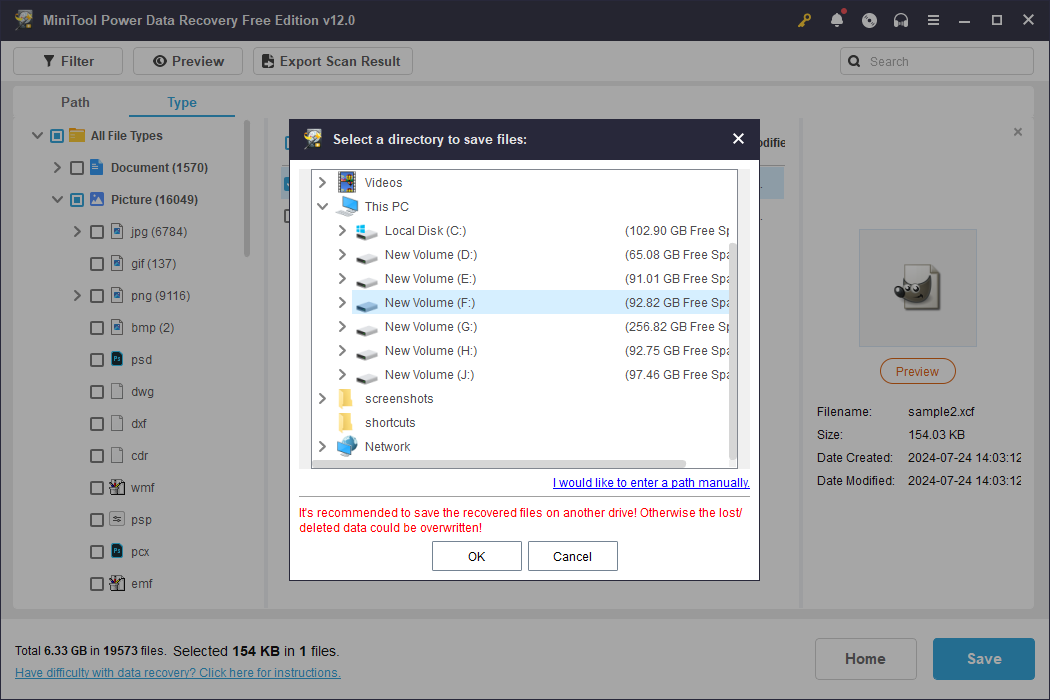
Step 3. Tick the wanted files and click the Save button to choose a new destination for those photos. Saving files to the original path might cause data overwriting, resulting in data recovery failure.
You will be prompted to a small window, which informs the data recovery process is completed. Afterward, you can close the software and navigate to the chosen destination to check the restored files.
The free edition of MiniTool Power Data Recovery has 1GB of free data recovery capacity. If the chosen files exceed the limitation, the recovery process will be suspended. To obtain an unlimited data recovery capacity, you should update to an advanced edition.
Way 3. Recover GIMP Photos with MiniTool Photo Recovery
MiniTool Photo Recovery is a specialized multimedia file recovery tool. Different from MiniTool Power Data Recovery, this tool will only search for photos, videos, and audio files from the target location. You can locate the target GIMP files easier with this tool. Get this software and start the GIMP XCF file recovery task with the following instructions.
Step 1. After downloading and installing MiniTool Photo Recovery, double-click to launch the software and click Start to enter the main interface.
Step 2. In the following interface, you need to choose a partition where the GIMP images are saved, then click Scan to start scanning.
Optionally, click Settings to choose the specific file type you need. For instance, you can untick the Audio/Video option and then expand the Graphics & Picture to find and choose the GIMP file format. If you make any changes, click OK to save them.
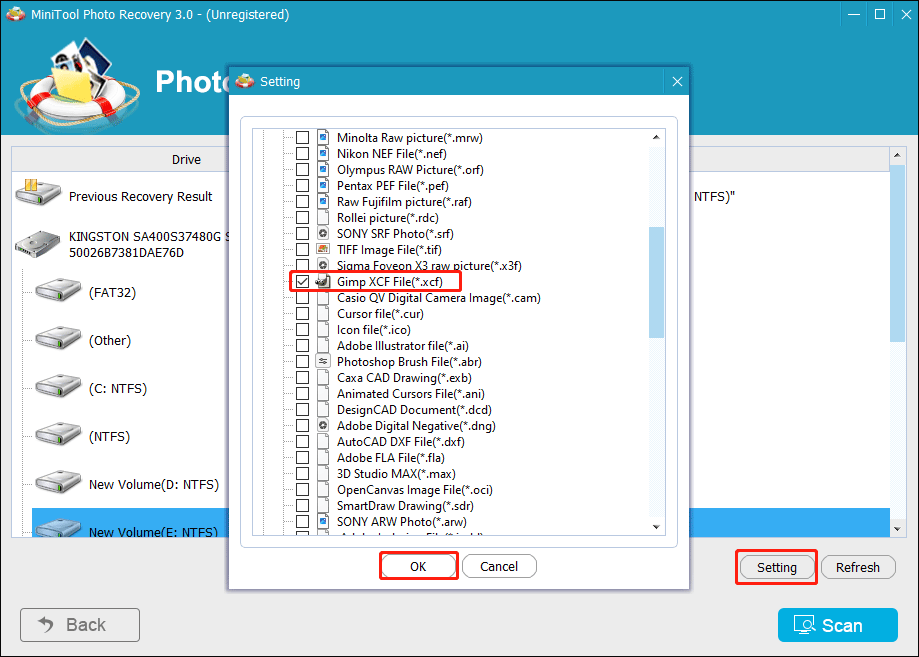
Step 3. Wait for the scan process to complete. All the found pictures are classified by their file formats. You can look through the file list to find the Gimp XCF Files option. Tick the target files and click Save.
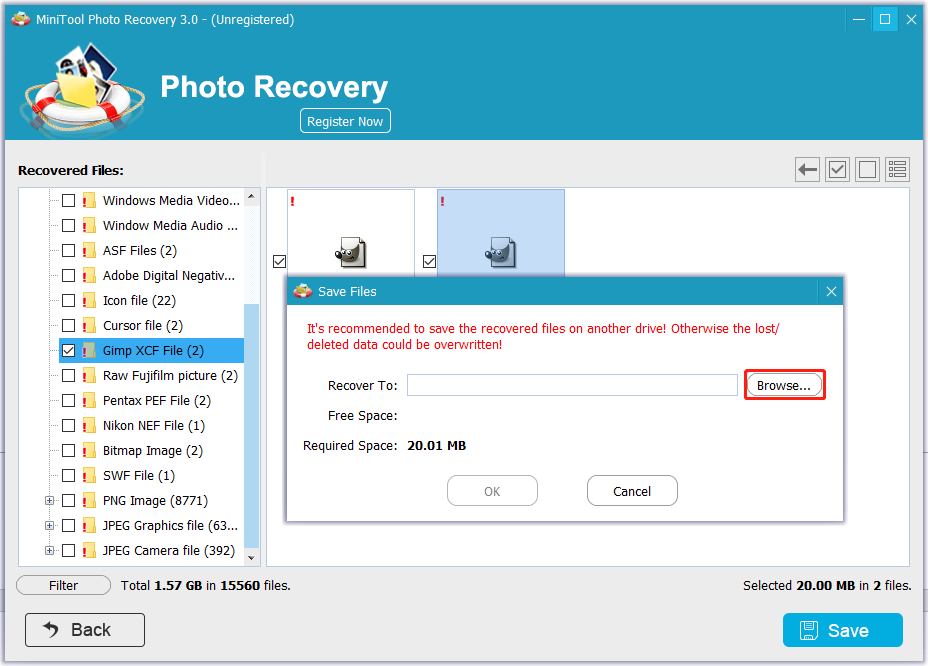
In the prompt small window, click Browse to choose a destination and click OK to confirm. Do not save those files to the original folder, which may cause data overwriting.
The unregistered edition of MiniTool Photo Recovery allows you to recover photos no more than 200MB. You can check the Comparison page to learn the functions and limitations of different editions.
If you have backed up GIMP files to other places, you can recover deleted GIMP files effortlessly by copying and pasting the wanted files to the destination directly.
How to Recover Unsaved GIMP Files
However, most GIMP users suffer from file loss owing to the software crashing. Software crashes give you no chance to save the current editing files and put you at a high risk of losing file content. It could be annoying to lose a painstaking project. Nevertheless, there are two possible solutions to help you minimize the data loss possibility.
Method 1. Recover Unsaved GIMP Files from Document History
This method works if you have the habit of saving files during the creation process. GIMP keeps the saved files in Document History. You may be able to find one version that is the closest to the lost one. Here is how to recover unsaved files in GIMP.
Step 1. Open the software and click File at the top toolbar.
Step 2. Choose Open Recent > Document History. You can look through the file list at the top right pane to verify if there is one file you need.
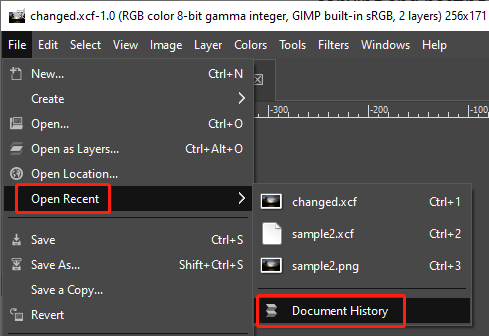
If there is the target one, double-click on it to open the file in GIMP. After that, you can post-edit on it again.
Method 2. Recover Unsaved GIMP Files with GIMP Prompt Recovery Windows
According to GIMP developers, they now have developed a crash recovery utility for this application. If you experience a software crash when editing a file, you can restart the software directly. You may get a prompt that informs unsaved changes due to the software crash. Just follow the on-screen instructions to restore your unsaved files.
However, GIMP crash recovery doesn’t always work. You can get more detailed information from the Simplified bug reporting and crash recovery section on this page.
Tips to Avoid GIMP Files Lost
GIMP users should know that there is no autosave feature in this application. However, data loss or software crashes happen without any signs, leading to data loss occasionally. Here are some tips for you to safeguard your files.
#1. Back up GIMP Files in Regular
When it comes to safeguarding data, file backup should be the prior choice compared with other approaches. You can choose to back up the GIMP files by using Windows built-in utilities, such as File History and Backup and Restore (Windows 7). Alternatively, to reduce the manual manipulations, you can choose cloud storage stations, like OneDrive, Google Drive, etc., or make use of third-party file backup software, such as MiniTool ShadowMaker.
This file backup software enables you to back up files, folders, disks, and partitions. Additionally, it contains robust functions, allowing you to back up files periodically on a daily, weekly, monthly, or event basis. If needed, why not get this software by clicking the download button below to experience the powerful backup features for free within 30 days?
MiniTool ShadowMaker TrialClick to Download100%Clean & Safe
Step 1. Open the software and click the Keep Trial button.
Step 2. Change to the Backup tab. Click the SOURCE option and select Folders and Files. You should navigate to the target GIMP folder on your computer and click OK to confirm.
Step 3. Click DESTINATION to select a path to store the backup files, then click OK to save your choice.
Step 4. To modify the backup settings, you should choose Options at the bottom of the Backup interface. You can decide the backup type in the Backup Scheme section and determine the backup schedules in the Schedule Settings section. Afterward, click OK to save your settings.
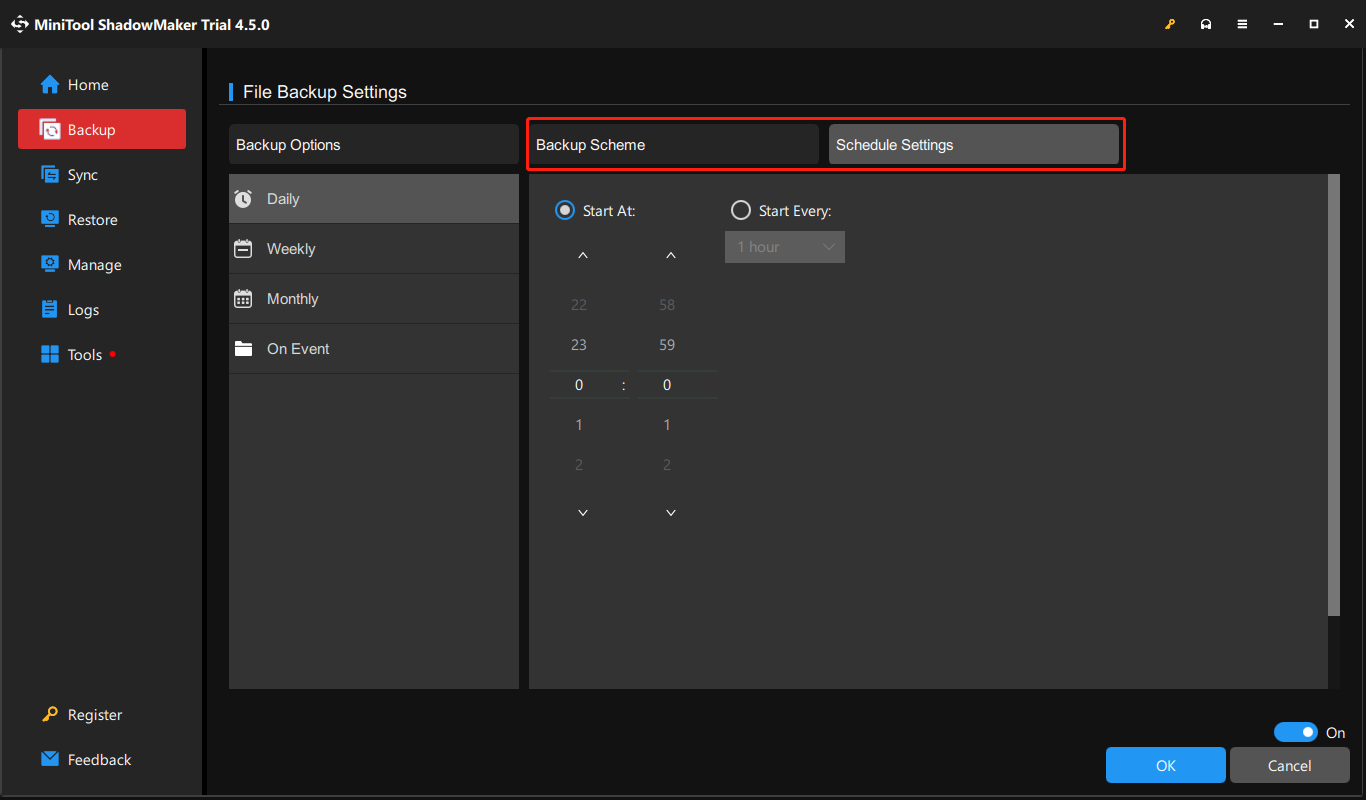
Step 5. Click Back Up Now to start the backup process.
#2. Save the Operations in Time
To counter the GIMP crashing frequently, you should save your operations in time to avoid data loss. You can press Ctrl + S to save the file. By default, the file is saved with the Untitled name. If you have already saved the current file, pressing the Ctrl + S key combination will replace the older version of the image. Optionally, pressing Shift + Ctrl + S can save files with a different name.
Final Words
As one of the top-ranked photo software, GIMP is practical for designers and drawers. However, GIMP users still suffer from data loss due to unintentional deletion, software crashing, malicious attacks, etc. This post shows you several methods to recover GIMP photos that are deleted or unsaved. Additionally, it gives two feasible suggestions to prevent data loss in advance.
If you have any problem using MiniTool software, please feel free to let us know via [email protected].
