What is the error message “Could not locate efibootbootx64.efi”? What to do when this error message appears? What causes trigger this error? This post from MiniTool will walk you through several feasible methods to fix it on Windows and find the reasons for this error.
About Could Not Locate EFIBOOTBOOTX64.EFI
Help: I tried to install Windows via a bootable pen drive and it is showing that efi\boot\bootx64.efi is missing. I checked in the pen drive and its name is bootaa64.efi. Did I download the wrong version of Windows or the file name is just wrong? Any help to fix could not locate efibootbootx64.efi?www.windowsphoneinfo.com
The “could not locate efibootbootx64.efi” error signifies a problem in the communication between your bootable device and the UEFI settings of your system. This issue often arises during processes such as installing or repairing the Windows operating system.
If efibootbootx64.efi not found, corrupted, or if the system is not properly configured to recognize the bootable device, for instance, Secure Boot settings that limit access to the boot loader, you will encounter this error. This indicates that the system cannot access the necessary files to start the installation or repair process, ultimately preventing you from moving forward with your intended operation.
Important Information Before Moving Forward
Before trying the fixes, you need to do some checks to help you better solve the could not locate efibootbootx64.efi problem.
Check 1. Check BIOS Mode (UEFI or Legacy)
It is essential to recognize that UEFI has mostly superseded the conventional BIOS in contemporary systems. Legacy mode (or CSM) is present in UEFI systems to accommodate older operating systems and hardware. Knowing whether your system’s current BIOS mode is currently in UEFI or Legacy mode is crucial for troubleshooting the EFI boot error.
Check 2. Check for Hardware Spec
What’s more, you need to perform a PC Hardware check. Verify an option concerning UEFI or BOOT Mode. If UEFI is available, then your motherboard is compatible with it. If it isn’t present, your system might only support legacy BIOS.
Check 3. Check the Current Partition Format (GPT or MBR)
Additionally, you need to verify the partition style to check whether your drive is formatted as MBR or GPT. Understanding the partition style is crucial because it influences how the system boots and how the EFI boot files are accessed. By ensuring that the partition style aligns with your operating system’s requirements, you can take the necessary steps to fix the boot error effectively.
How to Fix Could Not Locate EFIBOOTBOOTX64.EFI Error
After getting the above three pieces of information, you can according to your system determine to choose which method to fix this error. Let’s move on to the methods on how to fix the could not locate efibootbootx64.efi error.
Workaround 1. Convert MBR to GPT Using Professional Third-party Software
If your system is compatible with UEFI after checking as mentioned previously, you need to change the partition style from MBR to GPT if it is currently MBR.
MiniTool Partition Wizard is an intuitive and professional tool for managing partitions. It has the capability to convert MBR to GPT without losing any data, and the reverse is also possible. Additionally, it can format FAT32 on partitions that exceed 32 GB, clone hard drives, and more.
MiniTool Partition Wizard FreeClick to Download100%Clean & Safe
Follow the instructions using MiniTool Partition Wizard:
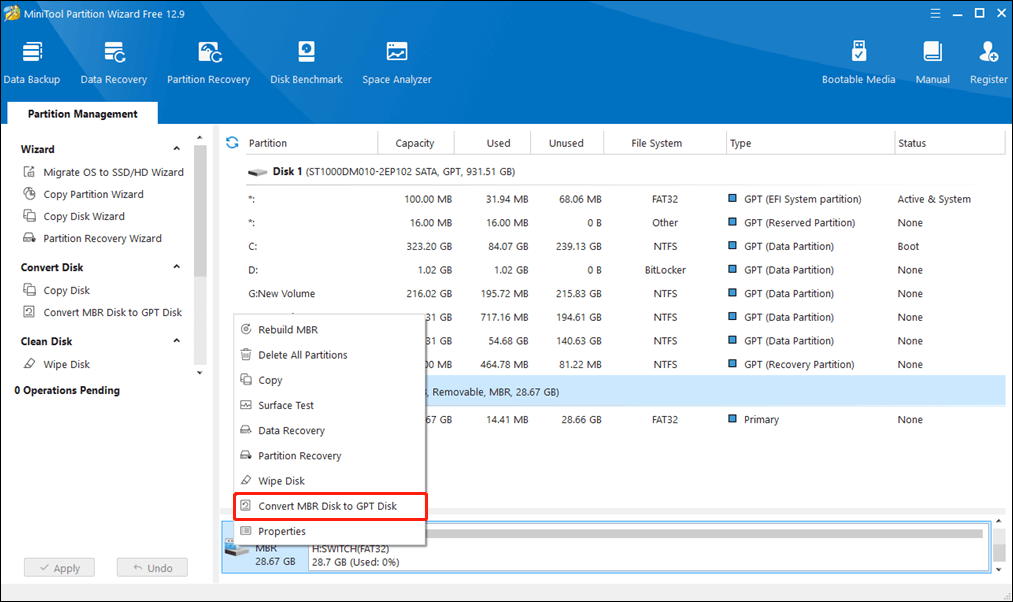
Step 1: Open MiniTool Partition Wizard. Right-click on the system disk and select the option to Convert MBR Disk to GPT Disk from the menu that appears. A warning message will show up. Review the information and click OK.

Step 2: Press the Apply button to initiate the process. A confirmation window will appear. Click Yes to proceed with the operation. During the conversion, your computer may need to restart. Just follow the instructions given.
Workaround 2. Convert MBR to GPT Using Windows Command Prompt
MBR2GPT is a utility designed for 64-bit Windows 10 version 1703 or later. It allows for the conversion of a boot disk from MBR to GPT without losing any data. Here is the step-by-step guide:
Step 1: Press the Windows key + S to launch the Windows Search feature. Type cmd in the search box, and the Command Prompt application will show up in the result list. Right-click on the application and select Run as administrator to open it.
Step 2: In the Command Prompt window, enter mbr2gpt /convert /disk: 0 /allowfullOS and hit Enter. Typically, Disk 0 is the system disk. Once the conversion is finished, you can verify that the system disk is indeed GPT by using the DiskPart command “list disk“. A GPT disk will display an asterisk in the Gpt column.
Those who do not use Windows 10 version 1703 or later can follow the following instructions to run commands:
MiniTool ShadowMaker TrialClick to Download100%Clean & Safe
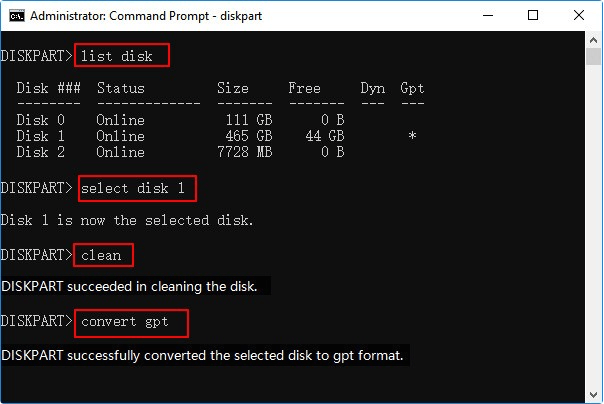
Step 1: Press Win + S to launch the Windows Search feature. Type cmd in the search box, right-click on Command Prompt, and select Run as administrator to open it.
Step 2: Type the following commands one by one and press Enter after each:
- diskpart
- List Disk
- select disk X (Replace “X” with the number of the disk you want to convert)
- clean
- convert gpt

Workaround 3. Set UEFI Mode
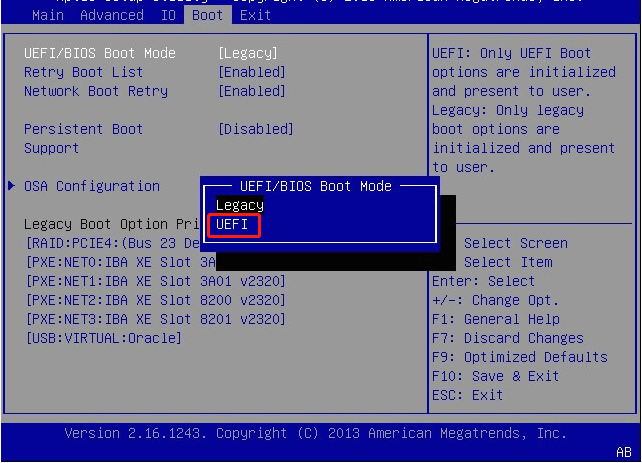
After transforming your disk from MBR to GPT, it’s essential to make sure that your system is configured to UEFI mode in order to fix the “Could not locate efibootbootx64.efi” error. Make sure to choose this option to enable UEFI to access the GPT disk partition format. Follow the steps to enable UEFI:
Step 1: Access BIOS/UEFI by pressing Del, F2, or ESC (check your motherboard model for the correct key).
Step 2: Navigate to the Boot, Boot Options, Boot Order, or Advanced Boot menu.
Step 3: Select UEFI to read GPT disk partition style.

Step 4: Save changes and exit by pressing the appropriate key or selecting the exit option.
Step 5: Confirm changes and reboot your system.
Recommended Tip: Recover the EFI File Using MiniTool Power Data Recovery
If you find the efibootbootx64.efi file is lost, consider using a professional and robust data recovery tool to get it back. MiniTool Power Data Recovery for your conference. This powerful data recovery software allows you to recover files of 1 GB for free.
MiniTool Power Data Recovery FreeClick to Download100%Clean & Safe
Final Words
Follow the steps mentioned above to fix the could not locate efibootbootx64.efi error. Hope the information can be useful for you.


