Is Copilot available on Windows 10? How do I enable Copilot on Windows 10? Of course, Microsoft Copilot can be used on Windows 10. And in this post, MiniTool will guide you on how to enable Copilot in Windows 10 in a simple way, and let’s see it.
Microsoft Copilot in Windows 10
Before showing how to enable Copilot in Windows 10, let’s look at an overview of this AI-powered chatbot.
Originally Microsoft Copilot was introduced as a Windows 11-only feature. Eventually, Microsoft decided to release this AI assistant to its Windows 10 operating system. This tool can help to answer complex questions, interact with your computer, etc.
In terms of the way of working, Copilot in Windows 10 works similar to the tool in Windows 11 – on the right-hand side of Taskbar, you can see a button that allows you to bring up the AI assistant. Of course, some functional differences exist.
To know more information, see our previous tutorial – Microsoft Plans to Add the AI Copilot Feature to Windows 10.
If you don’t plan to upgrade to Windows 11 anytime soon but want to experience this AI tool, follow the guide below to learn how to get Microsoft Copilot in Windows 10.
How to Enable Copilot in Windows 10
To install Windows 10 Copilot, you need to install Windows 10 Build 19045.3754 or newer and use a third-party app to tweak the system. Now, let’s see a complete guide.
Move 1: Install or Upgrade to Windows KB5032278
On November 16, 2023, Microsoft released Windows 10 22H2 Build 19045.3754 (KB5032278) to the Release Preview Channel. According to Microsoft, this Build brought Microsoft Copilot. On November 30, 2023, KB5032278 was released officially and the Build number has been elevated to 19045.3758. This update adds the Copilot in Windows (in preview) button to the right side of the Taskbar.
To enable Copilot in Windows 10, you should make sure you use the Home or Pro edition and the PC uses at least 4GB of RAM and 720p resolution.
MiniTool ShadowMaker TrialClick to Download100%Clean & Safe
Now, let’s see how to get Windows 10 KB5032278:
Step 1: Go to Settings > Update & Security.
Step 2: On the Windows Update page, check for updates.
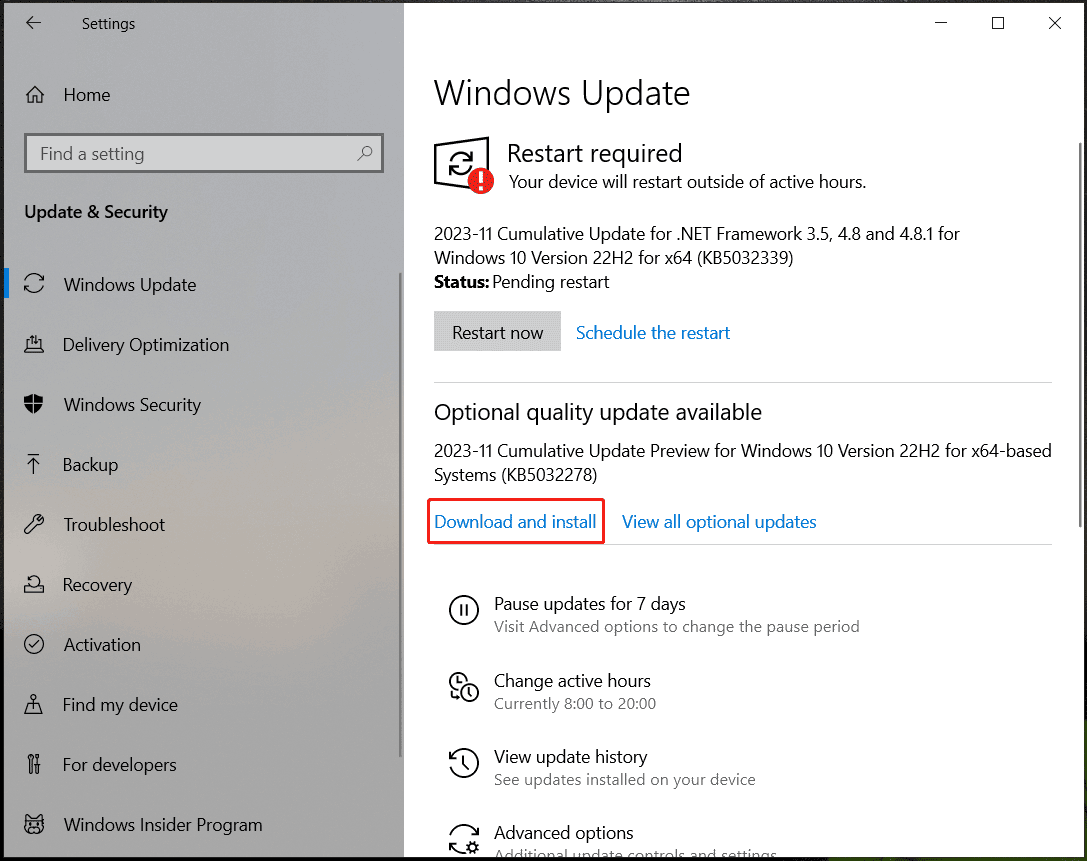
Step 3: You may notice that 2023-11 Cumulative Update Preview for Windows 10 Version 22H2 for x64-based Systems (KB5032278) is an optional update. Just tap on Download and install from the Optional quality update available list.

Step 4: After downloading and installing this update, restart your PC to apply this update.
Move 2: Use ViVeTool to Enable Copilot in Windows 10
After installing Windows 10 KB5032278, you can see Copilot on your PC. If not, you can use ViveTool to enable Microsoft Copilot.
See these steps:
Step 1: Open Edge and make sure you upgrade it to the latest version – go to edge://settings/help.
Step 2: Visit GitHub and download the latest ViVeTool.

Step 3: Extract the archive to a folder on your PC.
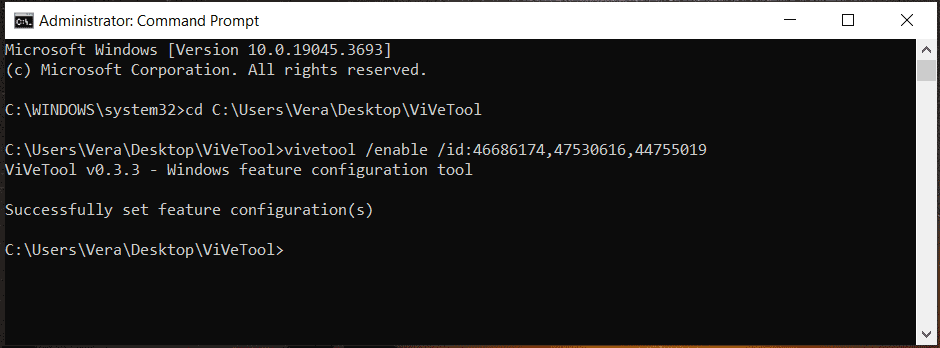
Step 4: Launch Command Prompt with admin rights and go to the folder with ViVeTool files using the command line like cd C:\Users\Vera\Desktop\ViVeTool.
Step 5: Execute this command – vivetool /enable /id:46686174,47530616,44755019 in the CMD window.

Step 6: Restart your PC. Then, Copilot should be enabled in the Taskbar after logging in to the system. If you cannot see this AI assistant, you need to modify the registry.
Step 7: Search for regedit to open Registry Editor and then go to this path: HKEY_CURRENT_USER\SOFTWARE\Microsoft\Windows\Shell\Copilot\BingChat.
Step 8: Double-click on the IsUserEligible DWORD and set its value data to 1.
Step 9: Restart the system and right-click on the Taskbar to choose Show Copilot (preview) button.
Final Words
After reading this tutorial, you know how to install Copilot in Windows 10. Follow the full guide to install the KB5032278 update. If you cannot see the AI tool, use ViVeTool to enable Copilot in Windows 10.

