If you encounter “server DNS address could not be found” error when trying to access some websites in Google Chrome browser, try the 4 methods in this post to fix this error. If you are looking for a free data recovery tool, hard drive partition manager, backup and restore program for Windows 10/8/7, MiniTool software is top recommended.
When you are trying to use Google Chrome browser to access some websites, sometimes you meet this error: server DNS address could not be found. What does this mean? How to fix DNS address could not be found error? Check the 4 methods below.
About “Server DNS Address Could Not Be Found” Error
Why does “server DNS address could not be found” error occur? You will see this message when the Domain Name Server (DNS) is not available.
A domain name is a human readable address of a website like xxx.com. This website also has an IP (Internet Protocol) address. You can either enter the domain name or the IP address to access that website.
DNS server matches the domain name to its related IP address. When you enter the domain name of a website in Google Chrome, your computer contacts DNS server to request and connect the IP address related to the domain name, thus, to open the target website.
If the DNS server can’t find the IP address of the website, then the “server DNS address could not be found” error appears in Google Chrome, and this site can’t be reached in Chrome.
Fix DNS Server DNS Address Could Not Be Found Google Chrome with 4 Methods
Below are 4 methods trying to help fix DNS address could not be found error in Google Chrome.
1. Update Network Adapter Driver
You can try easy ways first. Follow the steps below to update outdated network adapter driver or reinstall the driver.
Step 1. Open Device Manager Windows 10. Press Windows + R, type devmgmt.msc and click OK to open Device Manager.
Step 2. Scroll down to expand Network adapters. Right-click your network adapter device and click Update driver.
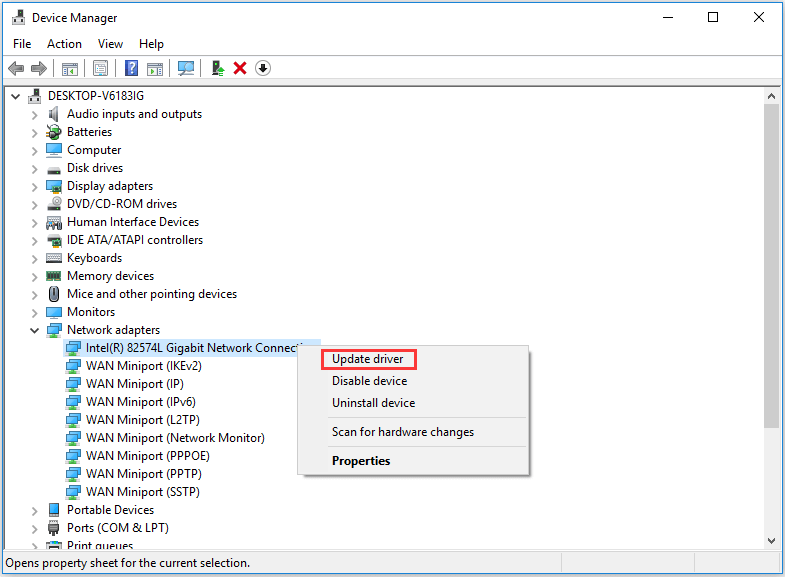
Step 3. Then click Search automatically for updated driver software and Windows will start searching and updating the driver to the latest available version.
If you want to reinstall the driver, you can choose Uninstall device, restart your computer, and your computer will try to install the latest version of the driver. You can also go the manufacturer website to download and install the driver.
2. Clear Google Chrome Host Cache
Step 1. Turn on Incognito mode in Google Chrome. You can open Chrome browser, and press Ctrl + Shift + N shortcut to open a new Incognito window.
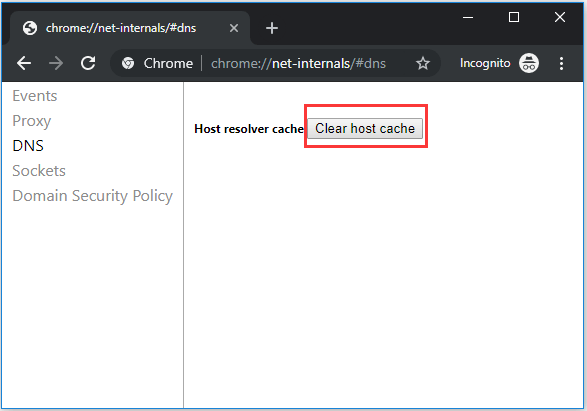
Step 2. Next you can type chrome://net-internals/#dns in the address bar and press Enter to open the link.
Step 3. Find Clear host cache button and click it. Then you can check if the “server DNS address could not be found” error is fixed.
3. Change DNS Server Settings
Step 1. Open Control Panel Windows 10. You can press Windows + R, type control panel, and hit Enter to open it.
Step 2. Click Network and Internet -> Network and Sharing Center -> Change adapter settings.
Step 3. Right-click your network connection icon and select Properties.
Step 4. Choose Internet Protocol Version 4 (TCP/IPv4) and click Properties.
Step 5. Tap General tab and click Obtain DNS server address automatically if it is not selected, then click OK. If it is already selected, then you can click Use the following DNS server address, and input 8.8.8.8 in Preferred DNS server and 8.8.4.4 in Alternate DNS server, and click OK.
4. Flush DNS, Reset IP
You can also try to flush DNS or reset IP address to fix server DNS address could not be found Google Chrome error.
Step 1. Press Windows + R, type cmd, and press Ctrl + Shift + Enter to open Command Prompt Windows 10 as administrator.
Step 2. Type the following command lines to flush DNS, renew or reset TCP/IP. Hit Enter to execute the command after typing each command line.
- ipconfig /flushdns
- ipconfig /renew
- ipconfig /registerdns
- netsh int ip reset
