As the name suggests, CPU overclocking represents the process of increasing the operating frequency of the CPU to make it run faster than the factory default specifications. This technology is usually used to improve overall system performance, especially in high-load application scenarios such as games and video processing.
However, CPU overclocking sometimes may cause system stability and compatibility issues. For example, some users may experience problems such as being unable to open programs or computer crashes after overclocking the CPU. Thus, I will show you how to disable CPU overclocking in BIOS and Windows below.
How to Disable CPU Overclocking in BIOS
If you have some knowledge of computer hardware and configuration principles, you can choose to turn off CPU overclocking by adjusting the BIOS settings or reset the BIOS settings to default. Here are the operation steps.
Step 1. Start your computer, and then press and hold the BIOS key like F2, F12, Esc, Del, etc. before the computer is booted.
Step 2. When you access the BIOS menu, go to the advanced mode (if necessary).
Step 3. Navigate to the menu for adjusting overclocking settings. This option varies for different brands of your computers, but it will usually be displayed as OC, Tweaker, Advanced CPU Configuration, or Frequency Settings.
Step 4. Find the option related to CPU frequency and set it to Auto or Default. Alternatively, you can find the option to restore all BIOS settings to factory default.
Step 5. Save the changes and exit BIOS.
How to Turn off CPU Overclocking Without BIOS
If you are not familiar with the BIOS interface and the dazzling settings, you can follow the steps below to turn off CPU overclocking from power options.
Step 1. In the Windows search box, type Control Panel and press Enter to open it.
Step 2. Make sure the items are listed by Category, and then select Hardware and Sound > Power Options.
Step 3. Click Change plan settings next to the power plan that is selected. When the new window pops up, click Change advanced power settings.
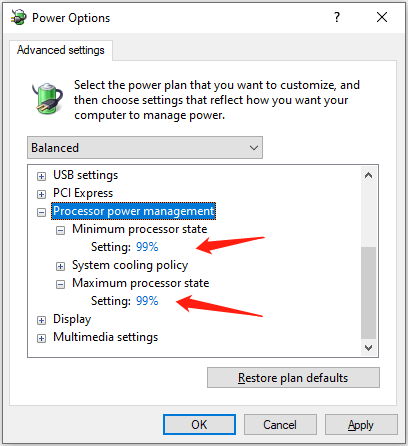
Step 4. Scroll down the page until you see Processor power management. Double-click on it to expand it. Next, expand the Minimum processor state and Maximum processor state options.
Step 5. If the processor states are set to 100%, change them to 99%.

Step 6. Click Apply and OK sequentially to make this change take effect.
If you have ever installed CPU overclocking software to adjust CPU frequency, voltage, and power limit, it is recommended that you uninstall them to completely disable CPU overclocking. To uninstall a program, go to Control Panel, click Uninstall a program under Programs, right-click the target application, and then select Uninstall from the context menu.
What to Do if Computer Performance Deteriorates After Disabling CPU Overclocking
If your computer’s performance drops significantly after turning off CPU overclocking, you may consider the following optimization measures:
Tip 1. Change the Power Plan
Computers usually have a high-performance power plan. It is used to maximize the computer’s performance, ensuring that the CPU and other hardware maintain high frequencies and responsiveness all the time.
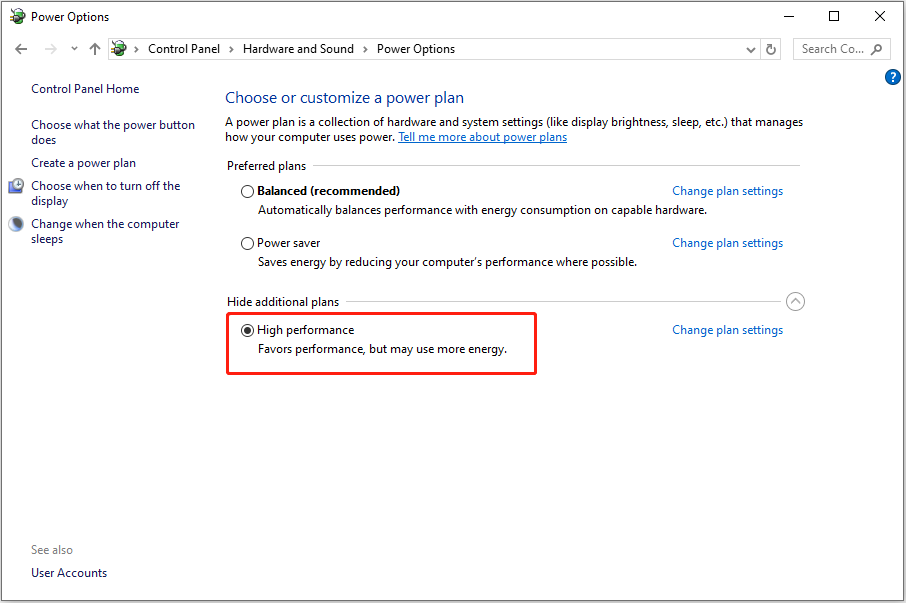
To use this power plan, go to Control Panel > Hardware and Sound > Power Options. Then tick the High performance option.

However, you should note that using the high-performance power plan will generate more heat and higher power consumption.
Tip 2. Lower Graphics Settings in Games
If your game performance decreases after turning off CPU overclocking, you can lower the game’s graphics settings appropriately for a smoother gaming experience.
Tip 3. Use PC Tune-up Utility
There are many powerful and reliable computer performance optimization software on the market that can help speed up your computer, and MiniTool System Booster is one of them. It can help speed up CPU, RAM, and hard drive resources to ensure that the computer is in high performance.
You can use it for free within 15 days to verify if it suits you.
MiniTool System Booster TrialClick to Download100%Clean & Safe
Bottom Line
In the above parts, I described how to disable CPU overclocking from BIOS and by changing power options. You can choose the method you prefer to complete this task. Also, you can do the tricks above to optimize your system performance without overclocking.


