How can you download and install Media Feature Pack if you are using Windows 11 N or KN editions? In this post, MiniTool offers a step-by-step guide on getting Windows 11 Media Feature Pack. Let’s look through some details.
Media Feature Pack Windows 11/10 for N
For standard Windows 11 editions like Home, Pro, Education, Enterprise, etc., they come with a mass of pre-installed apps including Windows Media Player, Microsoft Teams, Skype, Voice Recorder, and more.
Although these apps are convenient to some users, some regions take issue against the integration of these media apps, saying it is a monopoly against vendors of similar third-party apps. The famous event is the European Union (EU) sued Microsoft for abuse of its dominant position in the market according to competition law.
As a result, Microsoft offers the special N edition of Windows 11 and 10 for the European market. For the Korean market, Windows 11 KN is available. Windows 11 N and KN have similar features to the main editions but they lack some media features.
To break this limitation, Microsoft offers Media Feature Pack for Windows 11 and 10 N & KN. This package includes media-related technologies like certain pre-installed media apps – Movies & TV, Groove Music, Voice Recorder, and Skype, as well as Windows Media Player.
So, how to install Media Feature Pack for N and KN versions of Windows 11/10? Move to the next part to find out what you should do.
Media Feature Pack Windows 11 Download & Install via Settings
Windows 11 Media Feature Pack can be installed as an optional update and let’s see the step-by-step guide on how to install Media Feature Pack via Settings.
Step 1: Press Win + I on the keyboard to open Settings.
Step 2: Tap on Apps from the left pane and click Optional features.
Step 3: On the new page, tap on View features from the Add an optional feature section.
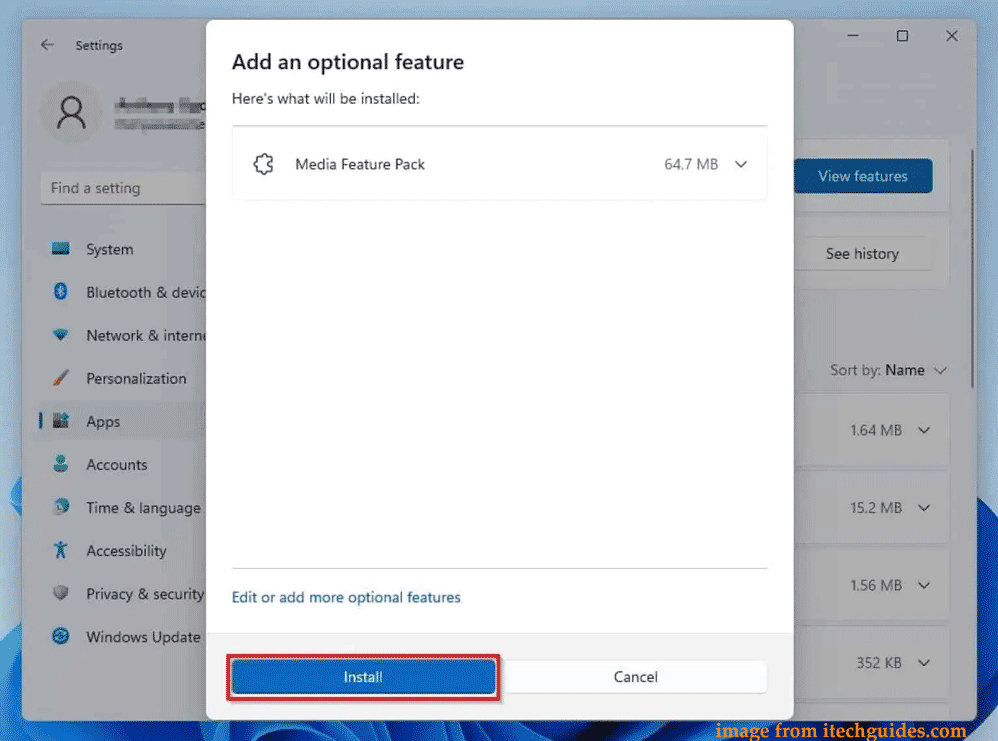
Step 4: In the search box, type in media feature pack and then check the box of Media Feature Pack.
Step 5: Click Next > Install and then Windows starts downloading and installing Media Feature Pack for Windows 11. After the installation, restart your PC.
Install Media Feature Pack for Windows 10/11 Via PowerShell
You can also install Media Feature Pack for N versions of Windows 11/10 via PowerShell. To accomplish this, follow the steps below:
Step 1: Type powershell into the search box and tap on Run as Administrator.
Step 2: Type the command – DISM /Online /Get-Capabilities and press Enter. Then, many optional features are listed.
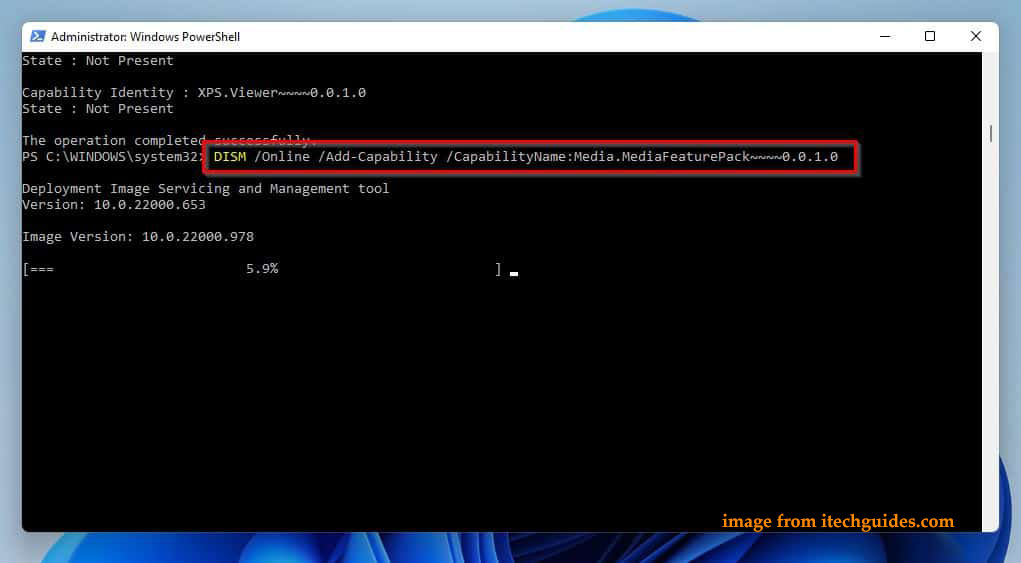
Step 3: Locate Media Feature Pack and note down its exact name. Then, run the command – DISM /Online /Add-Capability /CapabilityName:PackName. Replace PackName with the name of Media Feature Pack you have noted. Next, the installation process starts.
Install Additional Codecs After Media Feature Pack
After finishing installing Windows 11 Media Feature Pack, you also need to install some additional codecs and apps via Microsoft Store which can enhance your multimedia experience. They are:
- VP9 Video Extensions
- Web Media Extensions
- HEIF Image Extensions
- HEVC Video Extensions from Device Manufacturer
- Movies & TV
- Windows Media Player
- Xbox Game Bar
- Voice Recorder (Windows Sound Recorder)
- Skype
Final Words
That’s all the information on how to install Media Feature Pack in Windows 11 N & Windows 10 N. If you are running a N version of Windows 11/10, you can install media-related features. If you are in other regions, it is a good choice to install the standard Windows edition that comes with pre-installed media apps without installing Media Feature Pack and additional codecs.
Before reinstalling Windows 11/10 Home, Pro, Education, etc., on your PC, you had better back up your files with PC backup software – MiniTool ShadowMaker to avoid data loss.
