Windows 11/10 users who are experiencing some computer errors may choose to run some commands in CMD or PowerShell to fix problems. While most of you are familiar with the Command Prompt and know how to run it as an administrator, it seems that few know how to open an elevated PowerShell prompt. Here’s a guide from MiniTool.
What Is an Elevated PowerShell Prompt
PowerShell prompt is a management and troubleshooting tool. It is a gateway to execute commands and manage tasks, providing you with controlled and automatic functions.
An elevated PowerShell prompt is a command-line interface with elevated privileges that enables you to perform administrative tasks. In the field of Windows operating systems, elevated privileges are often required when performing critical administrative tasks. An elevated PowerShell prompt will grant you the right to perform actions that need administrative privileges, protecting the system’s integrity while ensuring optimal functionality. Therefore, it is important for you to know how to open an elevated PowerShell prompt on Windows 10/11.
How to Open an Elevated PowerShell Prompt
Many people know how to run PowerShell prompt. But how to open an elevated PowerShell prompt on Windows may confuse some of you. Here are numerous ways for you to open an elevated PowerShell prompt. Keep reading.
Method 1: From Start Menu
Opening an elevated PowerShell prompt from the Start menu or through the Search box is a simple way. Here’s how you can do it.
From the Start Menu:
Hit the Start menu and scroll down the application list until you find the Windows PowerShell folder. Expand it, then right-click Windows PowerShell and choose Run as Administrator.
Use the Search Box:
Press the Win + S key combination to bring up the Search box, type Windows PowerShell in the box, and choose Run as administrator in the right pane.
When UAC pops up, click on Yes to continue. Afterward, an elevated PowerShell prompt will open with “administrator” in the upper-left corner.
Method 2: Through Task Manager
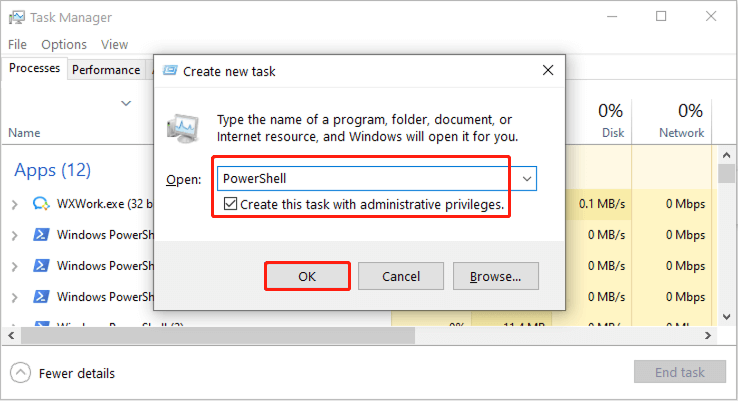
Not only can Task Manager allow you to view the performance of the system but also let you create a new task. So, you can use it to run the PowerShell command as administrator. Here are the steps.
Step 1: Right-click on the Start button and select Task Manager to open it.
Step 2: When entering the Task Manager interface, click on the File tab in the upper-left corner, and choose Run new task.
Step 3: When the new window prompt appears, type PowerShell in the Open box, and then check the Create this task with administrative privileges option and click on OK. Then, an elevated PowerShell prompt will be opened.
Method 3: Using Run Dialog
The Run dialog can execute many commands. Using it to open an elevated PowerShell prompt is a good option. The operations are as follows.
Step 1: Press the Win + R keys or right-click on the Start button and choose Run to open the Run dialog.
Step 2: Type PowerShell in the Open box and press the Shift + Ctrl + Enter keys.
An elevated PowerShell prompt will be shown here.
Method 4: With Command Prompt
The Command Prompt is a command-line interface procedure, allowing you to execute all kinds of commands, manage files, and troubleshoot the Windows operating system. You can open PowerShell from CMD by following the below instructions.
Step 1: Press the Win + S keys to open the Search window, type Command Prompt in the box and choose Run as administrator.
Step 2: When prompted by UAC, hit Yes to continue.
Step 3: In the Command Prompt window, type the following command and hit Enter to run it.
powershell Start-Process powershell -Verb runAs
Method 5: Employing File Explorer
The Windows powershell.exe file is located in the File Explorer. You should find and open the file to run PowerShell command as administrator. Here’s how to do it.
Step 1: Right-click on the Start button and select File Explorer or just double-click on the File Explorer icon on your desktop.
Step 2: Type the following path in the address bar and hit Enter.
C:\Windows\System32\WindowsPowerShell\v1.0
Step 3: Locate and right-click on the powershell.exe file, and choose Run as administrator.
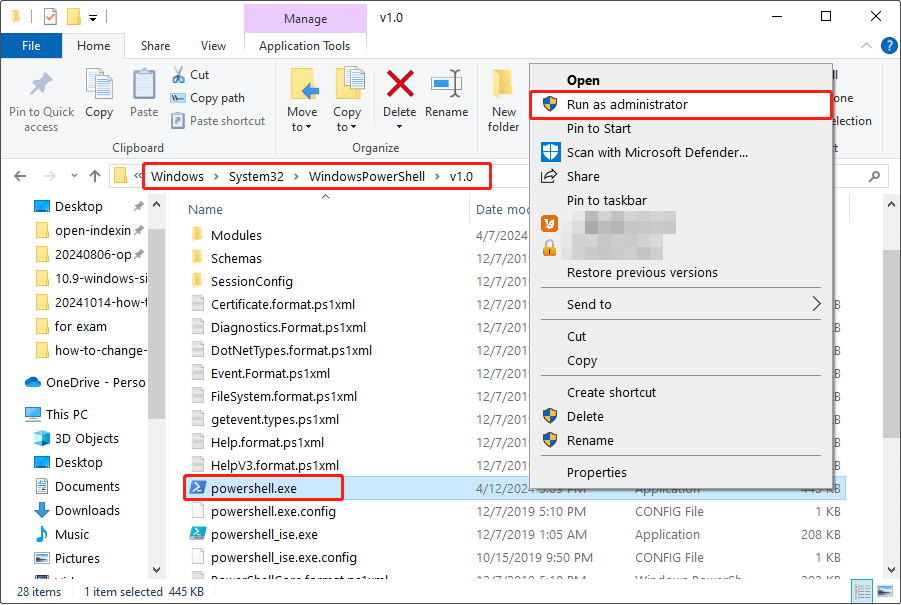
Step 4: Hit the Yes button when there is a UAC window. An elevated PowerShell prompt will be displayed.
Method 6: By Control Panel
Through the Control Panel, you can view and manipulate system settings and controls. It also allows you to adjust various options. Opening an elevated PowerShell prompt is included in it. Follow the steps below.
Step 1: Press the Win + R keys to open the Run dialog, type Control Panel, and hit Enter.
Step 2: Click on View by, and choose Category.
Step 3: Select System & Security > Administrative Tools.
Step 4: Right-click on the PowerShell file and choose Run as administrator.
Wrapping Things Up
This article displays a sea of ways to help you open an elevated PowerShell prompt, such as using Task Manager, Control Panel, and so on. Hope this guide can be helpful.
