A static IP address is needed sometimes. But the question is that many Windows users don’t know how to set up a static IP on their computers. Noticing this, MiniTool decided to introduce static IP address to you and shows you the detailed steps on how to assign a static IP address to a Windows 11/10 computer. Please read with care.
This page will focus on how to set up a static IP on Windows 11 (or Windows 10) PC. Before going through the steps to set a static IP address Windows 11, I’d like to discuss what a static IP address is and the differences between static IP address and dynamic IP address. After that, I’ll tell you when you need to assign a static IP address and how to use a static IP address.
What Is Laptop MAC Address? How To Find & Change It On Windows 10?
MiniTool Power Data Recovery TrialClick to Download100%Clean & Safe
What Is Static IP Address
What does IP address mean? An IP (Internet Protocol) address is a unique number assigned to every device on a network; it identifies the computers connected to the internet and used by network devices to communicate with other devices.
What is a static IP address? To be specific, a static IP address is a permanent (32 bit) number assigned to a computer via ISP (Internet service provider). All in all, the static IP address is known as fixed IP address or dedicated IP address that is relative to the dynamic IP address.
Static vs Dynamic IP Addresses
What is a dynamic IP address? Dynamic means change; Dynamic addresses are assigned by the DHCP (Dynamic Host Configuration Protocol) servers and they are changed from time to time.
What are the main differences between static IP address and dynamic IP address? The static IP address doesn’t change while the dynamic IP address changes over time.
In the following content, I’ll tell you why you need to use a static IP address. Then, I’ll show you how to set a static IP address.
Why Should You Use Static IP Address
What are the reasons for setting up a static IP address on your Windows 11 or Windows 10 computer?
- The external devices, websites, or services need to remember your IP address.
- You host a web server or other internet server.
- You need to forward ports to a specific device.
- It’s necessary to run a print server.
- There’s a file server in your network.
- The networked printer or remote access program (like VPN) is used.
If you assign a static IP address to computer, it will use the same IP address when connecting to network.
Advantages of setting up a static IP address:
- Great DNS support
- Reliable communication
- Convenient remote access
- Easy server hosting discovery
- Improved geo-location services
How to Set up a Static IP Address
How to assign a static IP address to a device? Let’s take Windows 11 computer as an example. As for how to set a static IP address on Windows 10 PC, the steps are basically the same.
There are 3 common ways to set up a static IP on Windows 11/10.
Set up a Static IP Address from Settings
- Press Windows + I to open the Settings app.
- Go to the Network & internet option in the left pane.
- Select the Ethernet or WiFi connection you’re using.
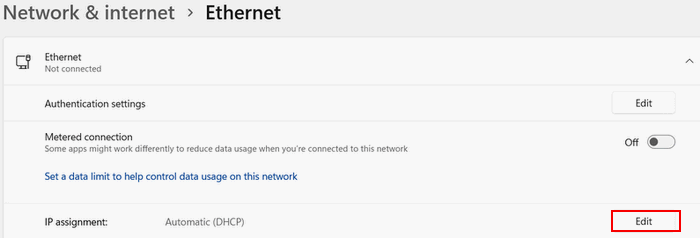
- Locate the IP assignment section and click Edit.
- The Edit network IP settings window will appear.
- Select Manual from the drop-down menu.
- Turn on IPv4 and set a static IP address.
- Set the Subnet prefix length to 24 and Gateway to 10.1.2.1.
- Configure the Preferred DNS address or enter the Alternate DNS address if you have any.
- Click Save.

Assign a Static IP Address via Command Prompt
- Run Command Prompt as administrator.
- Type ipconfig /all and press Enter.
- Go to your Network Adapter to find information: IPv4 address, Subnet mask, Default Gateway, and DNS servers.
- Type netsh interface ip set address name=”*” static ip_address subnet_mask default_gateway and press Enter. (* stands for the network name and you should type the correct static IP address, Subnet mask and default gateway.)
- Please run the netsh interface ip set dns name=”DNS name” static dns_server command if you want to assign a static DNS server address.
Read this if you don’t know how to run a program as administrator in Windows 11:
Set a Static IP Address using PowerShell
- Open Windows Powershell as administrator.
- Type Get-NetIPConfiguration and press Enter.
- Information to note down: InterfaceIndex, IPv4Address, IPv4DefaultGateway, and DNSServer.
- Type New-NetIPAddress -InterfaceIndex value -IPAddress value -PrefixLength value -DefaultGateway value and press Enter.
- Type Set-DnsClientServerAddress -InterfaceIndex value -ServerAddresses value and press Enter if you’d like to assign a DNS server address.
That’s all about how to set up a static IP.
How To Enable DHCP Or Change TCP/IP Settings In Windows 11/10?


