Is It Recommended to Turn off System Restore?
System Restore is a Windows built-in feature that allows you to return the system to a previous healthy state when the computer encounters some issues. Windows 10 gives you the opportunity to go back to a previous version of Windows by automatically creating a restore point when a system change is detected (such as installing a new driver/software or updating a driver) or you create a restore point manually. It is a good option to protect and repair your computer.
If you disable system protection, all the previous restore points will be deleted and a new restore point will not be created. So, it is not recommended to turn off System Restore.
If you indeed want to disable System Restore, it is highly recommended to use third-party data backup software to make a system backup or data backup. For example, you can use MiniTool ShadowMaker to create a full Windows 10 backup. This software not only can backup system files but also personal files. More exciting still, it provides you with a 30-day free trial.
MiniTool ShadowMaker TrialClick to Download100%Clean & Safe
How to Turn off System Restore Windows 10?
Once you make a backup of your computer, you can follow the methods below to stop System Restore.
Way 1. Windows 10 Disable System Restore From System Protection
The easiest way to disable System Restore is to turn off system protection Windows 10. The steps are as follows.
Step 1. Press the Windows + E key combination to open File Explorer.
Step 2. In the left panel, right-click This PC and select Properties from the context menu.
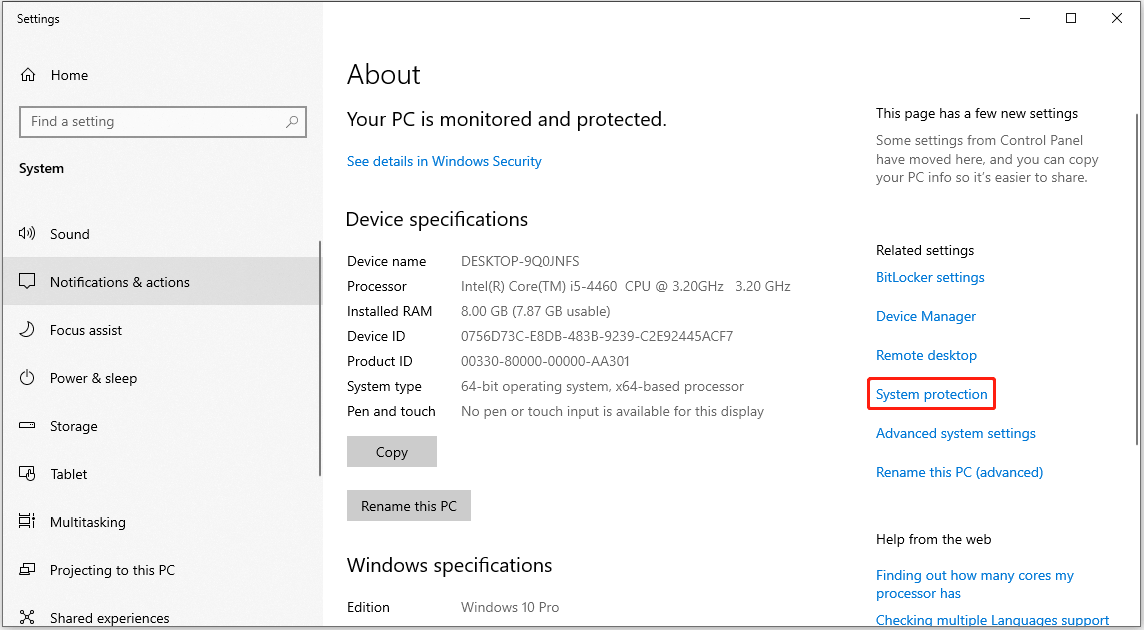
Step 3. In the new settings window, click System protection.
Step 4. Select the drive with system protection enabled, and click Configure. Next, select the Disable system protection option.
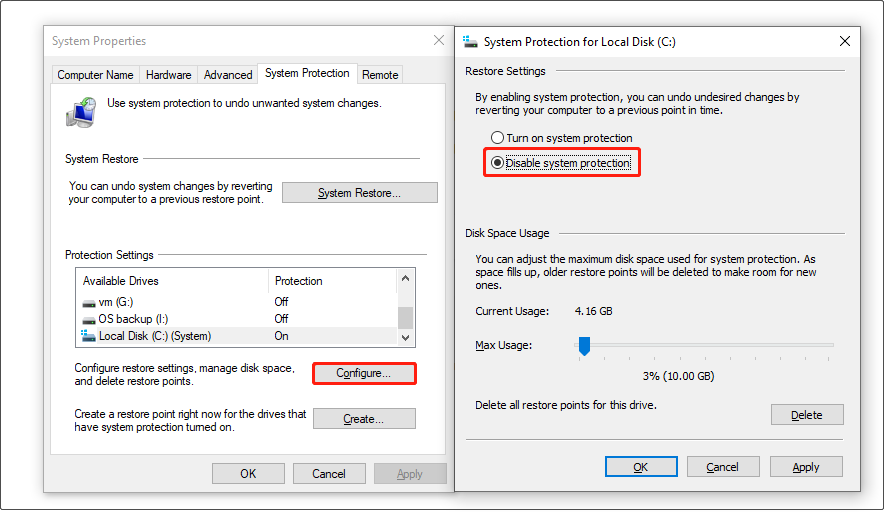
Step 5. Click OK. A window will pop up prompting you whether you are sure to disable system protection for this drive, just click Yes.
Way 2. Use Local Group Policy Editor
Alternatively, you can disable System Restore by configuring a local group policy. You can follow the steps below to complete this task.
Step 1. Press the Windows + R key combination to open the run window. In the text box, type gpedit.msc and click OK.
Step 2. Navigate to Computer Configuration > Administrative Templates > System > System Restore.
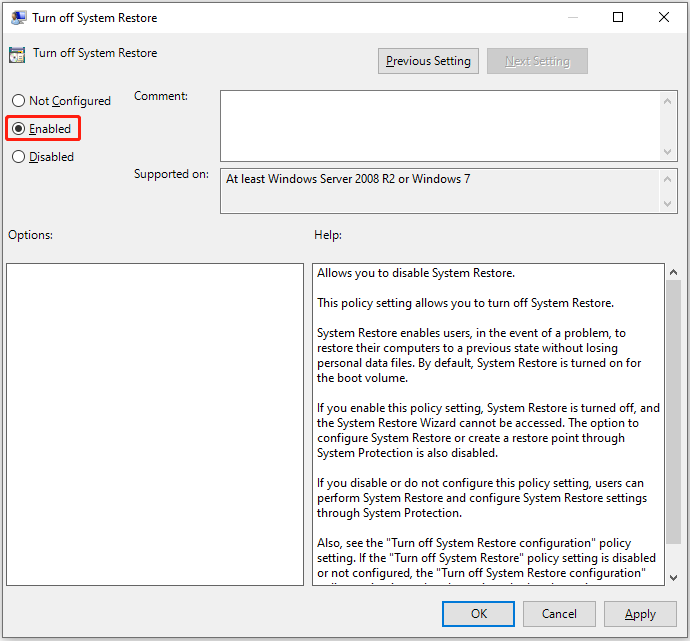
Step 3. In the right panel, double-click Turn off System Restore. In the pop-up window, select the Enabled option and click OK.
Way 3. Disable System Restore Registry
You can also choose to turn off System Restore via Registry Editor.
Step 1. Right-click the Start button on the taskbar and click Run. In the input box, type regedit and click OK.
Step 2. If a UAC window appears, select the Yes option. Here you may be interested in this post: How to Fix UAC Yes Button Missing or Grayed Out?
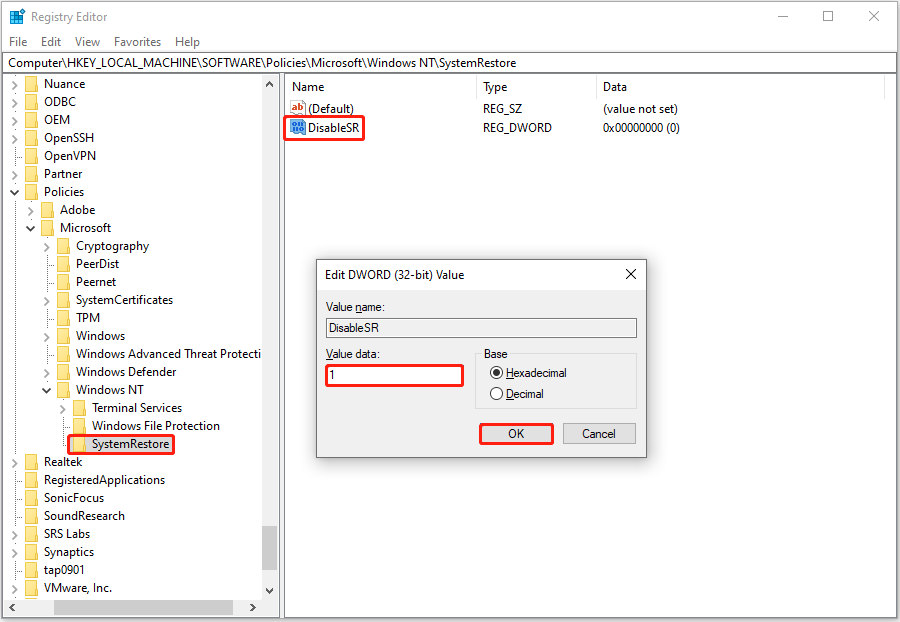
Step 3. In Registry Editor, navigate to the following location:
Computer\HKEY_LOCAL_MACHINE\SOFTWARE\Policies\Microsoft\Windows NT
Right-click Windows NT and select New > Key. Then rename the newly created key to System Restore.
Step 4. In the left panel, select System Restore, then right-click any blank space in the right panel and choose DWORD (32-bit) Value. Name the new value to DisableSR.
Step 5. Double-click DisableSR. In the new window, specify the value data to 1 and click OK.
MiniTool Power Data Recovery FreeClick to Download100%Clean & Safe
Bottom Line
To sum up, this post describes three ways to turn off System Restore in Windows 10. If System Restore is disabled, we recommend you back up your system via MiniTool ShadowMaker.
MiniTool ShadowMaker TrialClick to Download100%Clean & Safe
Additionally, if you have the demand for deleted file recovery, you can use MiniTool Power Data Recovery.
Should you have any questions about MiniTool software, do not hesitate to contact us via [email protected].
