By default, Windows 10 automatically combines taskbar icons. Simply put, if you open two File Explorer windows, they will appear as a single button on the taskbar. When Windows 10 taskbar icons are grouped, a lot of taskbar space can be saved.
However, you may prefer to see Windows taskbar separate icons and icon names to gain quick access to programs, files, and system settings. So, here we list three effective ways to assist you in making the Windows 10 taskbar show individual icons.
How to Ungroup Taskbar Icons in Windows 10
Way 1. Using the “Never Combine Taskbar Buttons” Feature
The easiest and fastest way to ungroup taskbar icons in Windows 10 is to use the “never combine taskbar buttons” feature from Windows Settings.
First, right-click on any blank space on the taskbar to select Taskbar settings. Or you can go to this page by pressing the Windows + I key combination and then clicking Personalization > Taskbar.
Second, under the Combine taskbar buttons section, select the Never option from the drop-down menu. You can also consider choosing the When taskbar is full option based on your own needs.
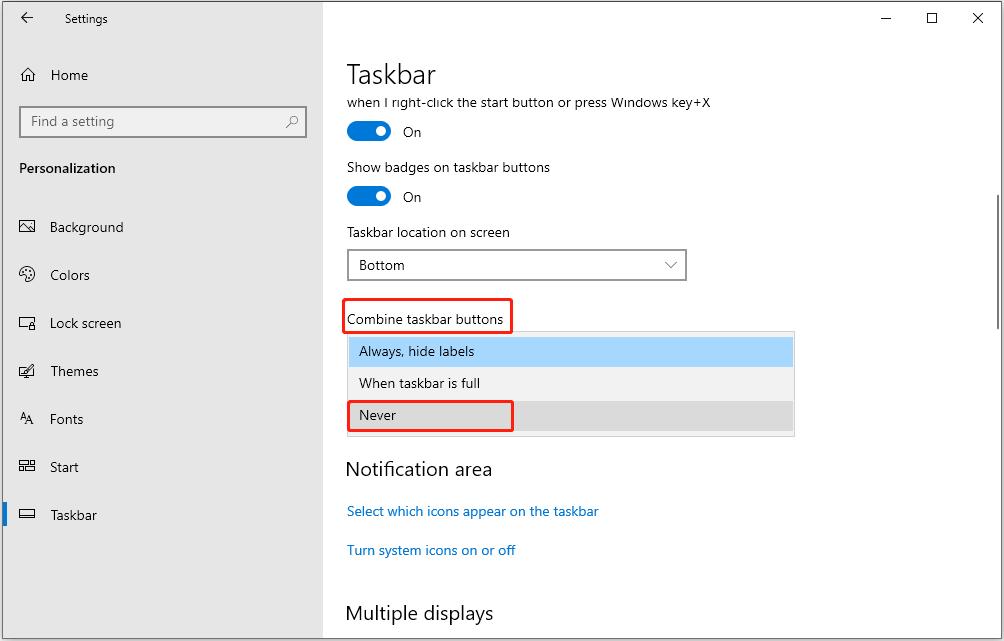
Now the taskbar icons should be separated and display the name of each icon.
Way 2. Ungroup Taskbar Icons Using Registry Editor
If Windows Settings not opening, you can take advantage of the Windows registry to ungroup taskbar icons in Windows 10
MiniTool ShadowMaker TrialClick to Download100%Clean & Safe
Step 1. Right-click the Start button to select Run. Then type regedit in the text box and press Enter.
Step 2. On the top address bar, navigate to this location:
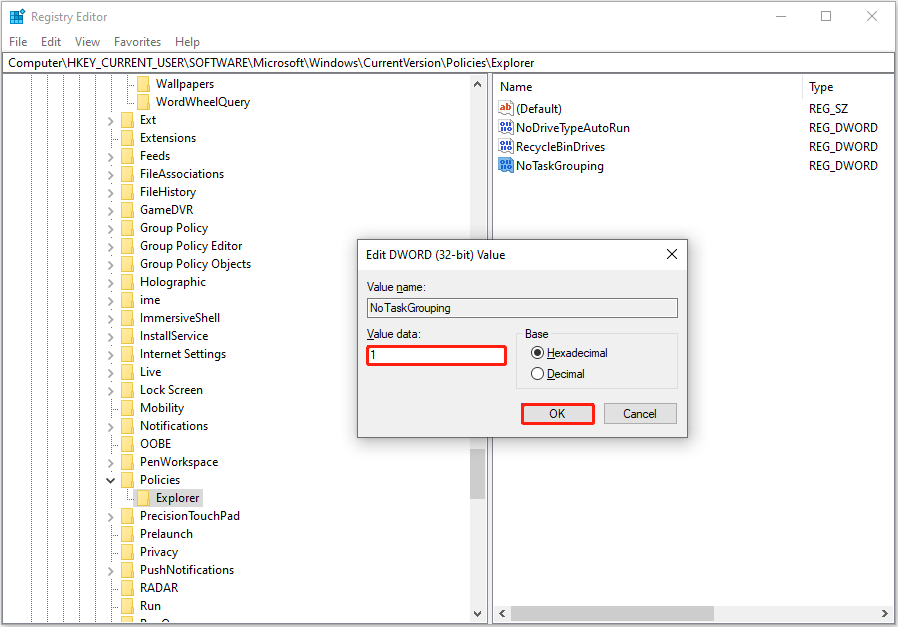
Computer\HKEY_CURRENT_USER\SOFTWARE\Microsoft\Windows\CurrentVersion\Policies\Explorer
Step 3. In the right panel, right-click any blank space to select New > DWORD (32-bit) Value. Then you need to name the newly created value to NoTaskGrouping.
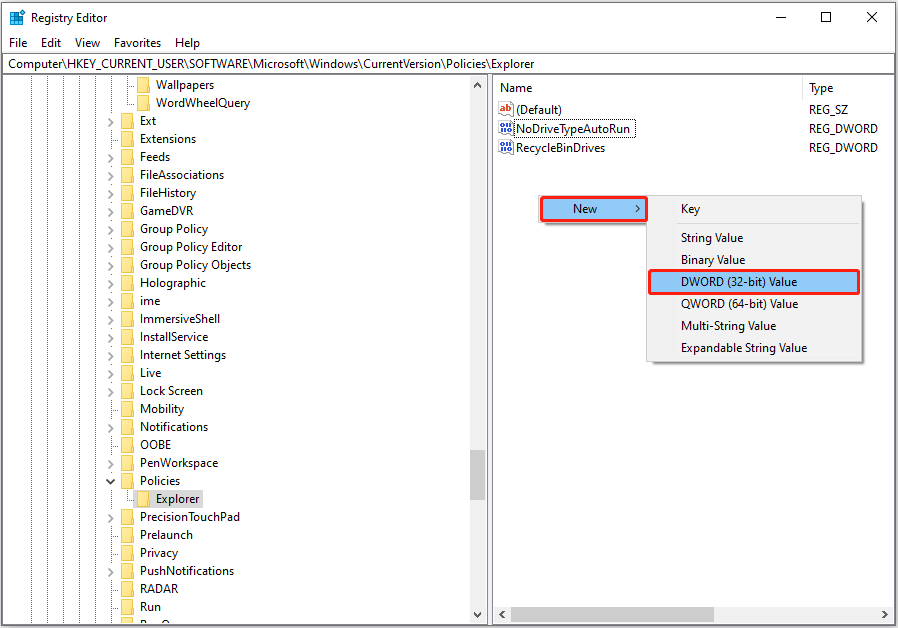
Step 4.Double-click on NoTaskGrouping. In the new window, set up its value data to 1 and click OK.
Step 5. Restart your computer and check if the taskbar icons are separated.
How to group icons in the taskbar Windows 10 again? Just delete the NoTaskGrouping DWORD value.
MiniTool Power Data Recovery FreeClick to Download100%Clean & Safe
Way 3. Ungroup Taskbar Icons Using Local Group Policy Editor
The last way to ungroup taskbar icons in Windows 10 is to use the Local Group Policy Editor. The detailed steps are as follows.
Step 1. Open Local Group Policy Editor by using the Windows search box. If the search bar takes a long time to load, you can find solutions from this post: How to Fix Windows Search Bar Slow Windows 10/11.
Step 2. Navigate to the following location:
User Configuration > Administrative Templates > Start Menu and Taskbar
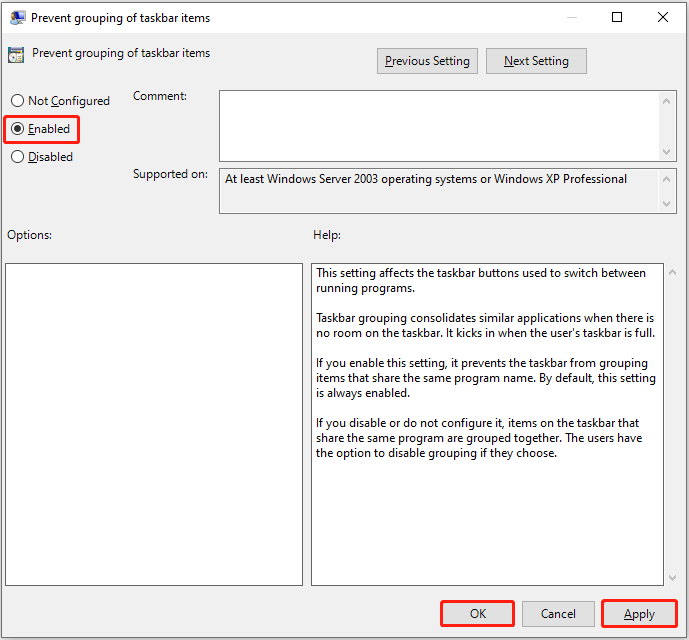
Step 3. In the right panel, scroll down to find and double-click Prevent grouping of taskbar items.
Step 4. In the pop-up window, select the Enabled option and then click Apply > OK.
Bottom Line
In short, this article offers you three efficient methods to ungroup taskbar icons in Windows 10. You can choose the most preferred one to complete the necessary actions.
By the way, if your files are deleted by mistake, you can use MiniTool Power Data Recovery to recover deleted files.
MiniTool Power Data Recovery FreeClick to Download100%Clean & Safe
For more assistance with MiniTool software, please contact [email protected].
