Many users reported encountering Windows 11 24H2 network issues. What causes Windows 11 PCs not to have internet? How to fix internet or Wi-Fi issues in Windows 11 24H2 update? This post from MiniTool provides 4 fixes to help you.
When you experience Windows 11 24H2 network issues after updating, it can be incredibly frustrating and exasperating. Modern computing heavily relies on a stable internet connection for various tasks. Being disconnected from the internet or Wi-Fi can significantly hinder users’ productivity, making it difficult to complete projects, communicate with colleagues, or even relax with your favorite online activities.
Understanding the potential causes of these Windows 11 24H2 network issues and knowing how to troubleshoot them can help you regain your connection and get back to work efficiently. All of the answers you can find in this post. Keep reading!
Why Windows 11 24H2 Update Causes Internet/Wi-Fi Issues
After the upgrade to Windows 11 24H2, some devices are struggling to connect to the internet via Ethernet and Wi-Fi. Instead of obtaining a valid IP address from the router or DHCP server, they receive an IP address that begins with 169. This leads to a loss of internet and network connectivity. Common symptoms include:
- Unable to activate network adapters or these adapters may immediately turn off again when users try to enable them.
- Wi-Fi selections are absent from the system tray and the network configuration settings.
- Network adapters showing as inactive in the network settings of the Control Panel, even though they show as enabled in the Device Manager.
- Computers are not appearing on the network, impacting file and printer sharing.
The major Windows 11 24H2 update was expected to offer new features and security improvements but has caused issues for many users. Problems include the blue screen of death, hard drive space being filled with undeletable files, disappearing mouse cursors, and internet issues in Windows 11 24H2 after installation.
In this post, follow us to learn how to fix internet or Wi-Fi issues in Windows 11 24H2 update in the following parts.
Fix 1: Remove WinHTTPAutoProxySvc Dependency
Modifying the Windows registry can be an effective way to resolve conflicts that may lead to issues with network services malfunctioning, including Windows 11 24H2 network issues. Follow these steps carefully:
MiniTool ShadowMaker TrialClick to Download100%Clean & Safe
Step 1: Press Win + R together to open the Run dialog box, type regedit, and press Enter.
Step 2: In the pop-up UAC window, click the Yes button to grant administrator permission.
Step 3: Navigate to the following key:
HKEY_LOCAL_MACHINE\SYSTEM\CurrentControlSet\Services\WcmSvc
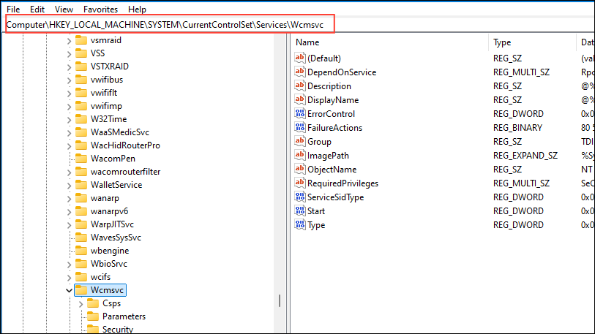
Step 4: Find and double-click the DependOnService entry in the right pane.
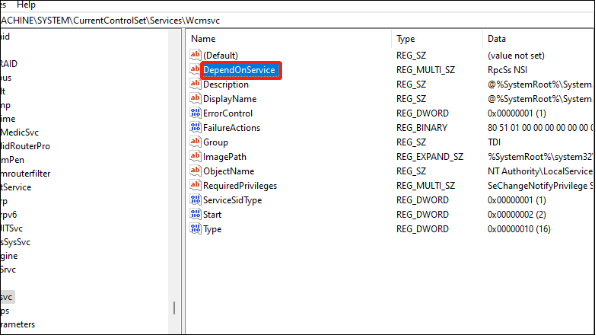
Step 5: In the pop-up interface, remove WinHTTPAutoProxySvc from the list, leaving only RpcSs and NSI.
Step 6: Click the Ok button to save the change.
Restart your PC to check whether these internet/Wi-Fi issues in Windows 11 24H2 are solved.
Fix 2: Enable the WinHTTP AutoProxy Service
If the WinHTTP Web Proxy Auto-Discovery Service is turned off, users might face different network connectivity problems, such as Windows 11 24H2 network issues. Turning on the WinHTTP Web Proxy Auto-Discovery Service may help address these connectivity issues by enabling the system to detect and apply the appropriate settings for network communication.
Step 1: Press Win + R together to open the Run dialog box, type regedit, and press Enter.
Step 2: In the pop-up UAC window, click the Yes button.
Step 3: Go to the following registry key:
HKEY_LOCAL_MACHINE\SYSTEM\CurrentControlSet\Services\WinHttpAutoProxySvc
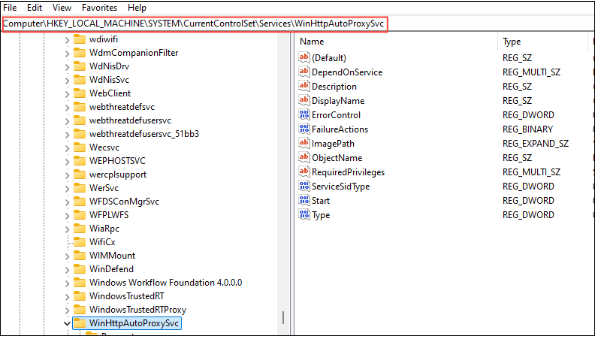
Step 4: In the right panel, find and double-click the entry called Start.
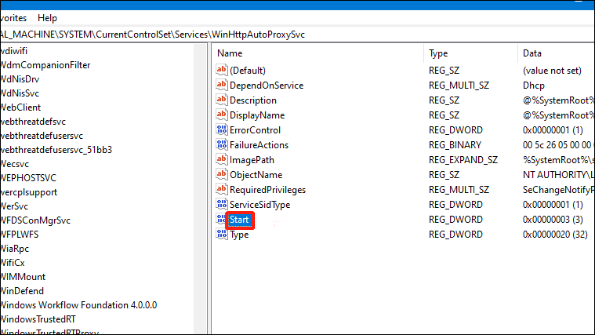
Step 5: Change the value from 4 (disabled) to 3 (manual) under the Value data section and click OK to save changes.
Restart your PC to check whether these Windows 11 24H2 network issues are solved.
Fix 3: Modify the Windows Connection Manager Service
Modifying the dependencies of the Windows Connection Manager service can assist in enabling critical network services and enhancing overall connectivity and performance on your Windows system.
Step 1: Press Win +X to the WinX menu and select Command Prompt (Admin) or Windows Terminal (Admin).
Step 2: Click Yes in the UAC window.
Step 3: In the command prompt window, copy and paste the following command and then press Enter:
sc config WcmSvc depend= RpcSs/NSI
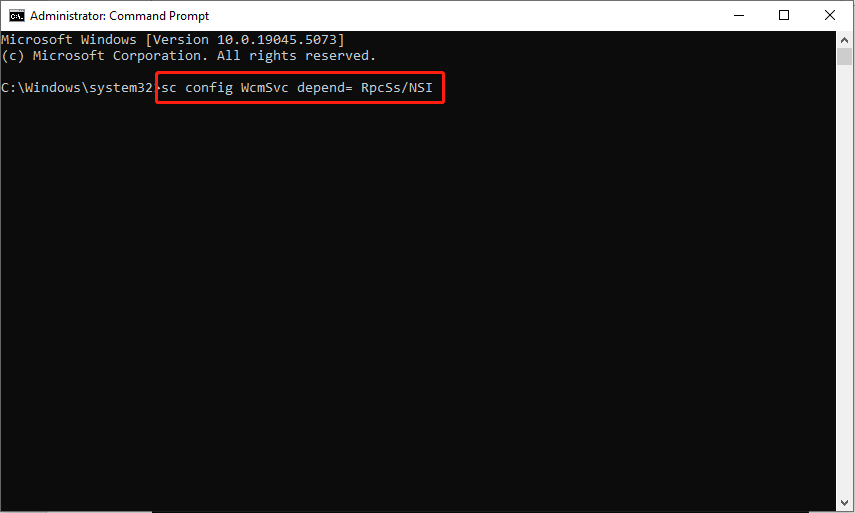
Step 4: Hold off until the command has been completed successfully. Reboot your computer to implement the changes.
Fix 4: Set a Static IP Address Manually
Assigning a static IP address can effectively resolve issues related to Dynamic Host Configuration Protocol (DHCP), which is responsible for automatically assigning IP addresses within a network.
Step 1: Press Win + I to open Windows Settings and go to Network & Internet.
Step 2: In the right phan, select Ethernet or Wi-Fi based on your connection type.
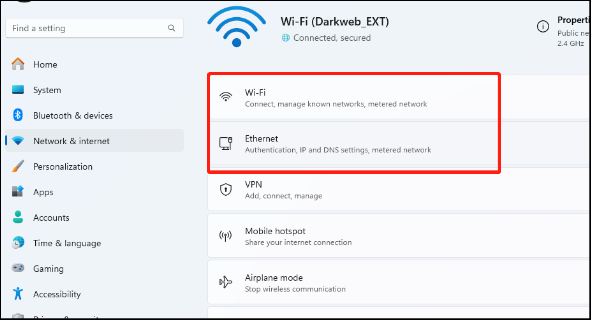
Step 3: Choose Hardware properties.
Step 4: Click the Edit button next to the IP assignment.
Step 5: Under the Edit IP settings section, select Manual from the drop-down menu and toggle the IPv4 switch On.
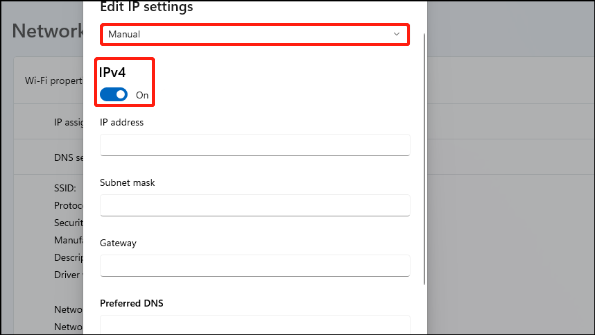
Step 6: Input the IP address, subnet mask, gateway, and DNS server details given by your network administrator or Internet Service Provider.
Step 7: Click the Save button to apply the settings.
Restart your computer and see if these issues are gone.
Final Words
Restoring internet access following the Windows 11 24H2 update can be difficult, but fortunately, one of these solutions has assisted you in fixing Windows 11 24H2 network issues. Hope everything can be useful for you.
