Compared to Windows 10 and other operating systems, Microsoft has upped the minimum system requirements of Windows 11. Among them, the obvious change is that Windows 11 requires TPM version 2.0.

Well then, what is TPM and how can you tell if your PC has TPM for Windows 11? Get related information from the following part.
What Is TPM?
TPM, short for Trusted Platform Module, is an international standard for a secure cryptoprocessor. And it is a dedicated microcontroller that is designed to protect user credentials, encryption keys, and other sensitive data through integrated cryptographic keys to avoid malicious attacks. For example, if you need to use BitLocker to encrypt or decrypt your hard drive, TPM is necessary.
In short, TPM is about security. TPM is a chip that is usually integrated into your PC’s motherboard or you can add it separately into the CPU.
To install Windows 11, you should make sure your PC has TPM 2.0 and is enabled. Otherwise, you will receive an error to tell you that you can’t install Windows 11 when using Windows 11 compatibility check tool although other hardware meets the system requirements.
So firstly, how to check if your PC has TPM for Windows 11? 3 ways are available.
3 Ways: Windows 11 TPM Check
Check the TPM Management Console
The operation is very simple and follow the steps below:
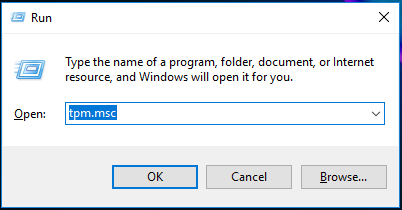
1. Press the Win + R keys to open the Run windows, type tpm.msc and click OK to open Microsoft Management Console.
2. Then, a window appears to tell you a check result. If you see the message “the TPM is ready for use” from the Status section and the TPM version is 2.0, it means your PC can run Windows 11. If you see the message saying “Compatible TPM cannot be found”, verify that this PC has a 1.2 TPM or later, and it is turned on in BIOS.
Check Windows 11 TPM via Device Manager
- In Windows 10, right-click on the Windows icon and choose Device Manager to open this app.
- Expand Security devices and see if any TPM entries display.
Windows 11 TPM Check via Command Prompt
In addition, you can check if your PC has TPM for Windows 11 by using Command Prompt.
- Run Command Prompt as administrator.
- Copy and paste this command to the CMD window and press Enter.
wmic /namespace:\\root\cimv2\security\microsofttpm path win32_tpm get * /format:textvaluelist.xsl
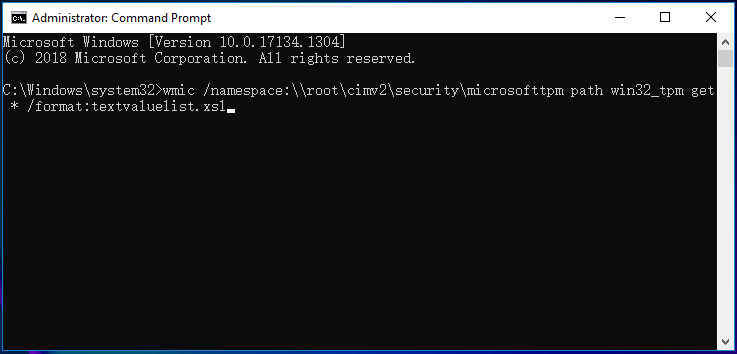
This tool will return three values for TPM – IsActivated, IsEnabled, and IsOwned. To meet the TPM requirement for Windows 11, They should be all TRUE.
How to Enable TPM
If your PC has TPM but it is not enabled, you still can’t install Windows 11 successfully. Thus, make sure it is turned on. Well then, how to enable TPM? You can do this task in Windows 10 or BIOS.
How to Enable TPM in Windows 10
1. In Windows 10, navigate to Settings > Update & Security.
2. Go to Recovery, click Restart now from the Advanced startup section.
3. Click Troubleshoot > Advanced options > UEFI Firmware Settings.
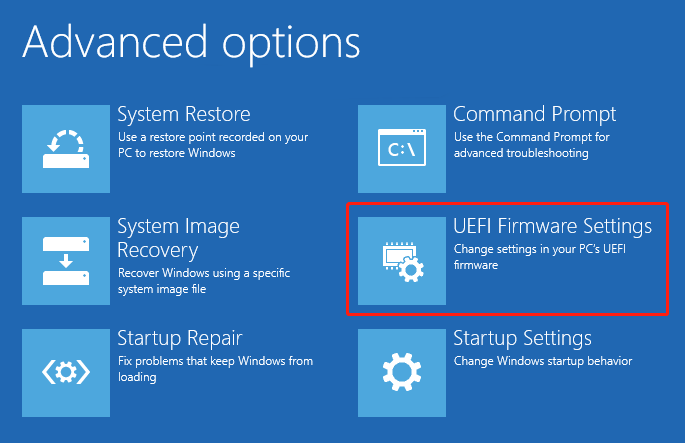
4. Click Restart to get the security settings screen.
5. Select the Trusted Platform Module (TPM) option and press Enter. Then, enable it.
6. Exit the settings and confirm the changes to reboot your machine.
How to Enable TPM in BIOS
- Restart your PC and press a specific key to enter BIOS. (Related article: [5 Ways] How to Get Into BIOS on Windows 11 on Restart? )
- Go to the Security tab, look for TPM and then enable it.
- Save the change and boot the PC.
Bottom Line
How to check if your PC has TPM for Windows 11? How to enable TPM in BIOS or Windows 10? Now, you get the answers and just do by following the mentioned methods.
