The Wlanapi.dll missing error can manifest as issues connecting to Wi-Fi networks or crashes in applications that use wireless features, causing frustration for users relying on a stable connection for work, communication, or entertainment. Fortunately, MiniTool provides solutions to resolve the Wlanapi.dll not found issue.
About Wlanapi.dll Not Found
The Wlanapi.dll is a dynamic link library file utilized by Windows to connect and interact with wireless LAN adapters. When this file is missing, corrupted, or outdated, connectivity problems can occur, potentially hindering some applications or services from functioning properly.
The wlanapi.dll not found error message may appear to any software or system that relies on this file within any of Microsoft’s operating systems. There are various ways in which wlanapi.dll errors may appear on your computer. Below are some of the more typical examples:
- Wlanapi.dll not found.
- Wlanapi.dll missing.
- Cannot find [PATH]\wlanapi.dll.
- The procedure entry point could not be located in the dynamic link library wlanapi.dll.
- This application failed to start because wlanapi.dll was not found. Re-installing the application may fix this problem
- Cannot start [APPLICATION]. A required component is missing: wlanapi.dll. Please install [APPLICATION] again.
Reasons Why Does Wlanapi.dll Not Found
Here are some potential explanations for the Wlanapi.dll not found error:
- Outdated drivers: Users might have an old version of the driver installed on their device that requires an update or replacement.
- Corrupt files: The driver files may have become corrupt or damaged due to incidents like virus infections or sudden power loss.
- Malware infection: If a computer is infected with malware, it can lead to various issues, including problems with DLL files like Wlanapi.dll.
- Inadvertent deletion: If the DLL file is accidentally deleted or misplaced, the system will be unable to locate it when needed.
- Compatibility issues: Issues with the registry or incomplete installations of software can cause the file to be unrecognized or improperly accessed.
Way 1. Recover Deleted DLL File
>> Restore the Wlanapi.dll File from the Recycle Bin
If you encounter the Wlanapi.dll not found issue, the initial step is to carefully inspect the Recycle Bin on your computer. It’s possible that this crucial file was unintentionally deleted but can still be recovered. To restore files from the Recycle Bin, adhere to these three straightforward steps:
Step 1: Access the Recycle Bin by double-clicking its icon located on your desktop.
Step 2: Once in the Recycle Bin, scroll through the list of removed items or utilize the search function at the top right corner to find the Wlanapi.dll file.
Step 3: If the file is located, right-click on it and choose Restore from the context menu. The Wlanapi.dll file will be returned to its original location on your computer.
>> Recover the Wlanapi.dll File Using MiniTool Power Data Recovery
If you have emptied the Recycle Bin or found the Recycle Bin is grayed out, an effective method to recover your DLL file is by using DLL file recovery software, like MiniTool Power Data Recovery. This free file recovery software can recover various file types, including documents, images, videos, audio files, and more. MiniTool Power Data Recovery allows users to preview files available for recovery before the restoration process, helping ensure the successful retrieval of important documents.
Click the download button below to recover Wlanapi.dll file.
MiniTool Power Data Recovery FreeClick to Download100%Clean & Safe
Follow the instructions to recover the missing Wlanapi.dll file in three steps:
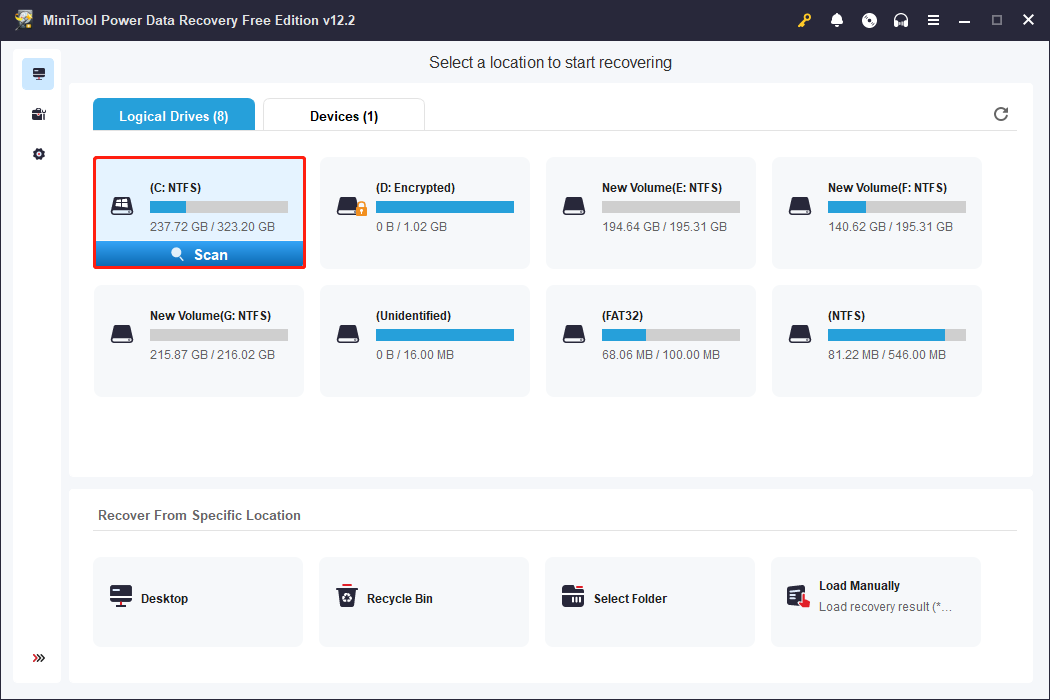
Step 1: Download and install MiniTool Power Data Recovery, then start the program. By default, you will be in the Logical Drives section. Choose the partition where the lost Wlanapi.dll files are and click Scan. Wait for the scan to complete automatically for optimal results.

Step 2: Once the scanning is done, identified files will be categorized in the Path tab under Deleted Files, Lost Files, and Existing Files. You can expand each section to locate items. Utilize the Filter, Type, Search, and Preview features to find the Wlanapi.dll file.
Step 3: Choose the files you need and click Save to restore them. To prevent overwriting existing data, the recovered files should be saved in a different location.
Way 2. Run SFC and DISM
Corrupted system files can lead to the Wlanapi.dll not found error. Utilizing both the System File Checker (SFC) and the DISM tool can fix damaged files and restore the integrity of the system.
Step 1: Type cmd in the Windows search bar.
Step 2: Right-click on Command Prompt and choose the Run as administrator option.
Step 3: When the User Account Control prompt appears, click Yes.
Step 4: Next, copy and paste the following command and press Enter:
sfc /scannow

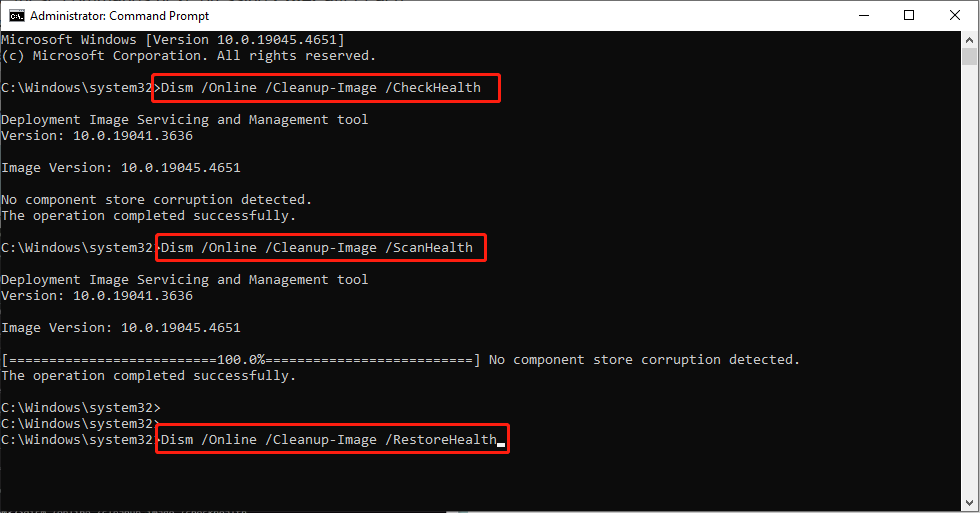
Step 5: Wait for the scan to complete. If Windows detects any violations of system file integrity, it will attempt to rectify them. Following this, execute the next set of commands, pressing Enter each time:
DISM /Online /Cleanup-Image /CheckHealth
DISM /Online /Cleanup-Image /ScanHealth
DISM /Online /Cleanup-Image /RestoreHealth

Step 6: Close the Command Prompt and restart your computer.
Way 3. Update the Network Adapter Driver
It is important to understand that outdated network adapter drivers can lead to various issues, such as Wlanapi.dll issues. By upgrading these drivers, you can significantly improve your overall connection performance. Here’s how to do it:
Step 1: Press Win + R to open the Run dialog, type devmgmt.msc in the box and hit Enter.
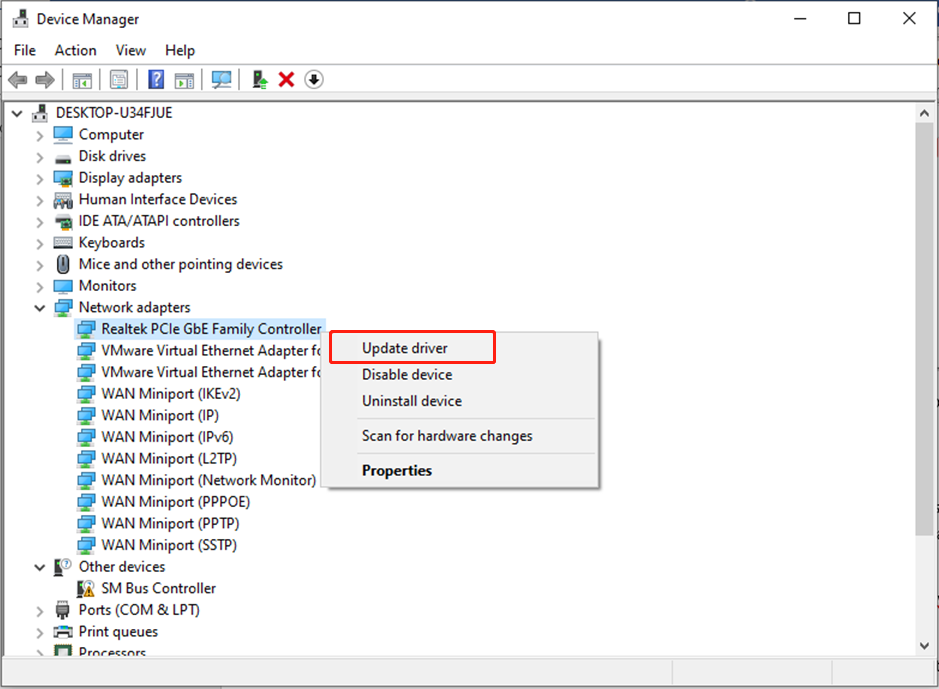
Step 2: In the Device Manager window that appears, double-click on Network adapters to expand the list.
Step 3: Right-click on your network adapter driver and select Update driver.

Step 4: In the pop-up window, you can update the network adapter driver automatically or manually based on your demands.
Step 5: Follow the on-screen guide for installing the latest network driver.
Wrapping Things up
The Wlanapi.dll not found or missing error can disrupt your wireless network functions. This article aims to help you resolve the issue so you can use your device without problems. Good luck!


