Introduction to Arch Linux
Released in 2002, Arch Linux is a Linux distribution based on the x86-64 architecture. As one of the popular Linux distros, Arch Linux has the following characteristics:
- It is free and open-source.
- It encourages the community to participate in its construction.
- It has pacman package manager and Arch User Repository (AUR).
- It adheres to KISS (keep it simple and stupid) principle. Therefore, you can choose the system components you want during installation to avoid a lot of useless pre-installed software. This also means high customization.
- It adopts a rolling release model, that is, there is no so-called major version update, and each regular update will keep the system and software in the latest state.
- It has no graphical interface (additional manual installation is required), so the installation process is more difficult.
7 Best Lightweight Linux Distros for Old PCs [2020 Updated]
How to Install Arch Linux
If you are a beginner of Linux, I recommend you to dual boot Arch Linux and Windows, so that you can avoid many troubles. As for the Arch Linux install guide, you can refer to the following contents:
Step 1: Go to the official Arch Linux download page to get the ISO file. Then, burn the ISO image into a USB drive with Etcher, Rufus, or other burning tools.
Step 2: Click the button below to free download MiniTool Partition Wizard. This tool can help you install Arch Linux more easily.
MiniTool Partition Wizard FreeClick to Download100%Clean & Safe
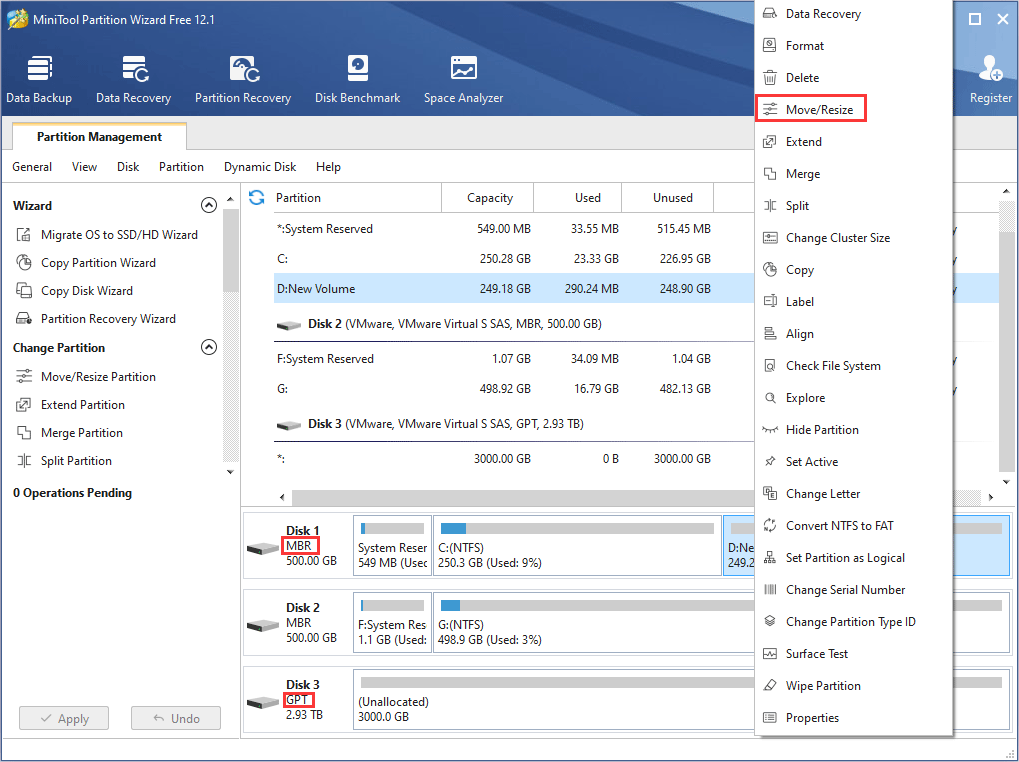
Step 3: Launch MiniTool Partition Wizard and pay attention to the type of the disk (MBR or GPT) where the Arch Linux is to be installed. Then, right-click a partition on the disk and choose Move/Resize.
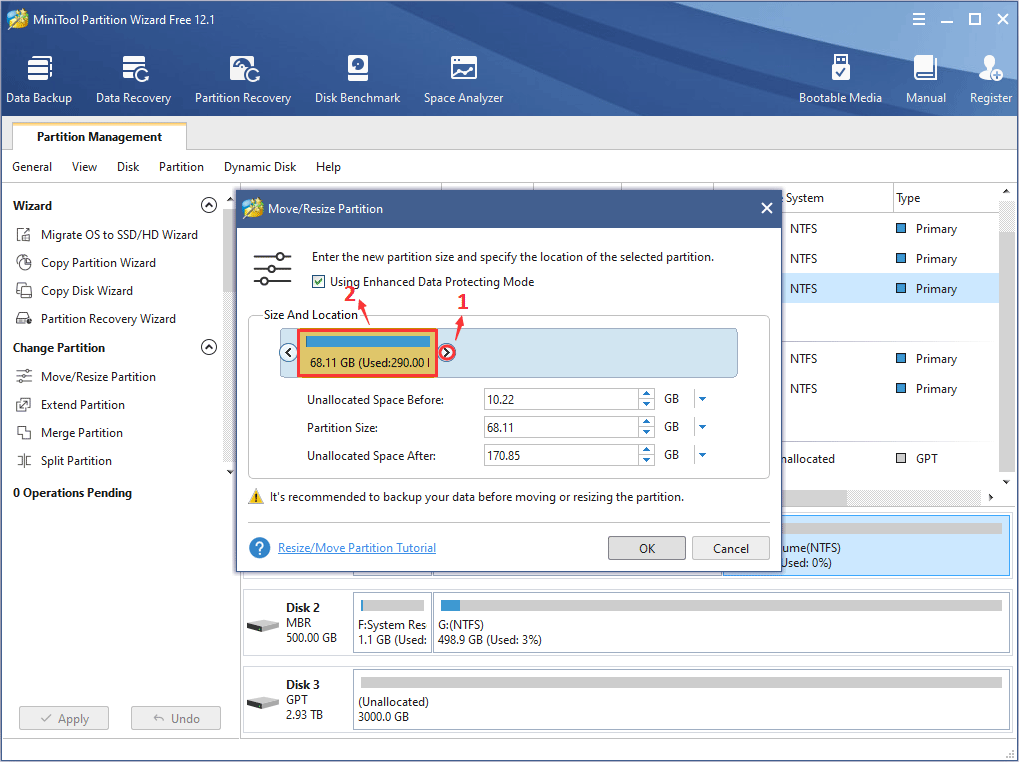
Step 4: On the pop-up window, you can do two things: 1. drag the arrow to resize (shrink or extend) the partition; 2. drag the partition box to move the partition. With these methods, you can resize and then move all partitions to create unallocated space. Then, click OK button.
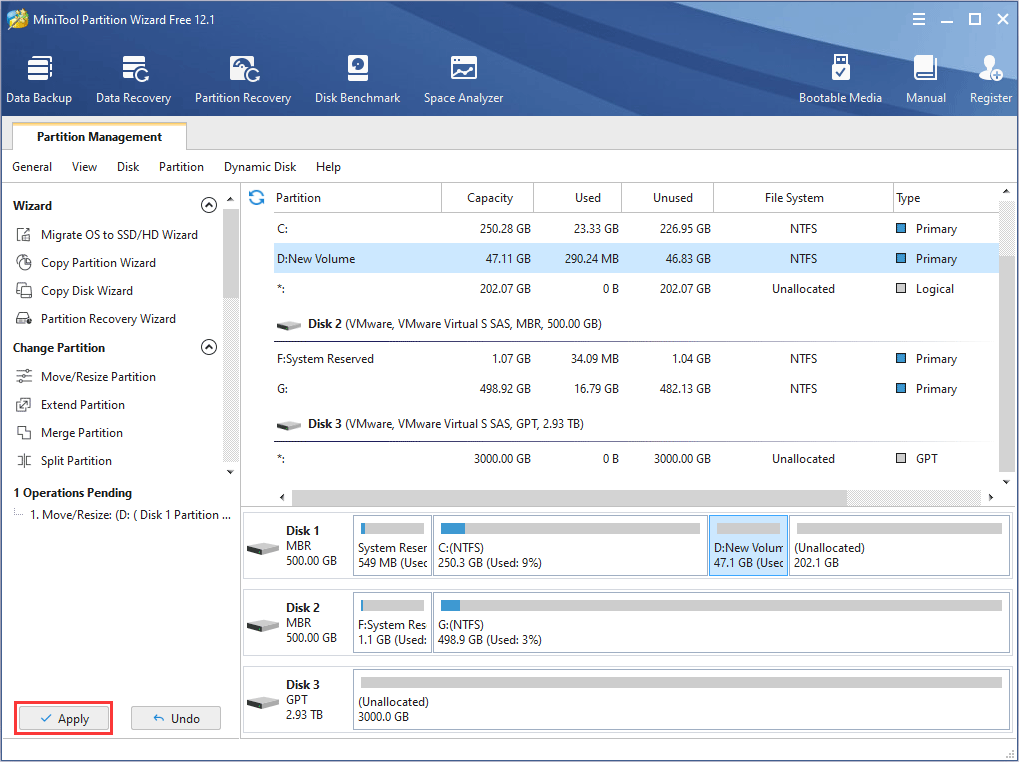
Step 5: Click Apply button to execute the pending operation (when you move/resize certain partitions, such as the C drive, the PC may require a reboot).
Step 6: Right-click the unallocated space and choose Create.
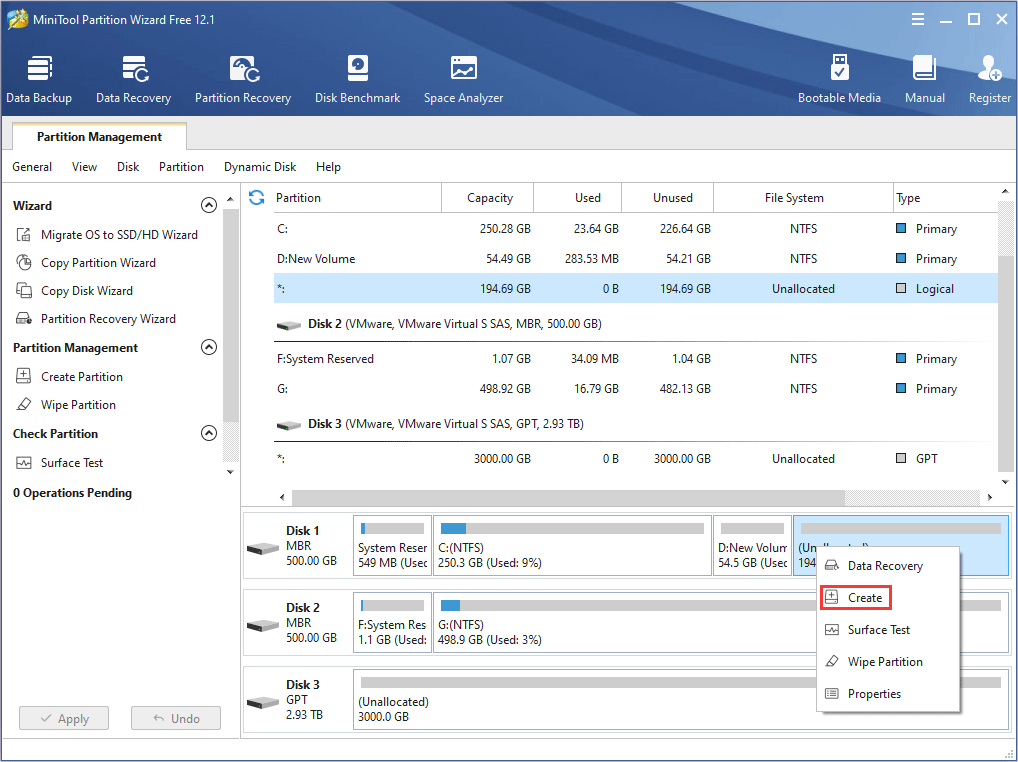
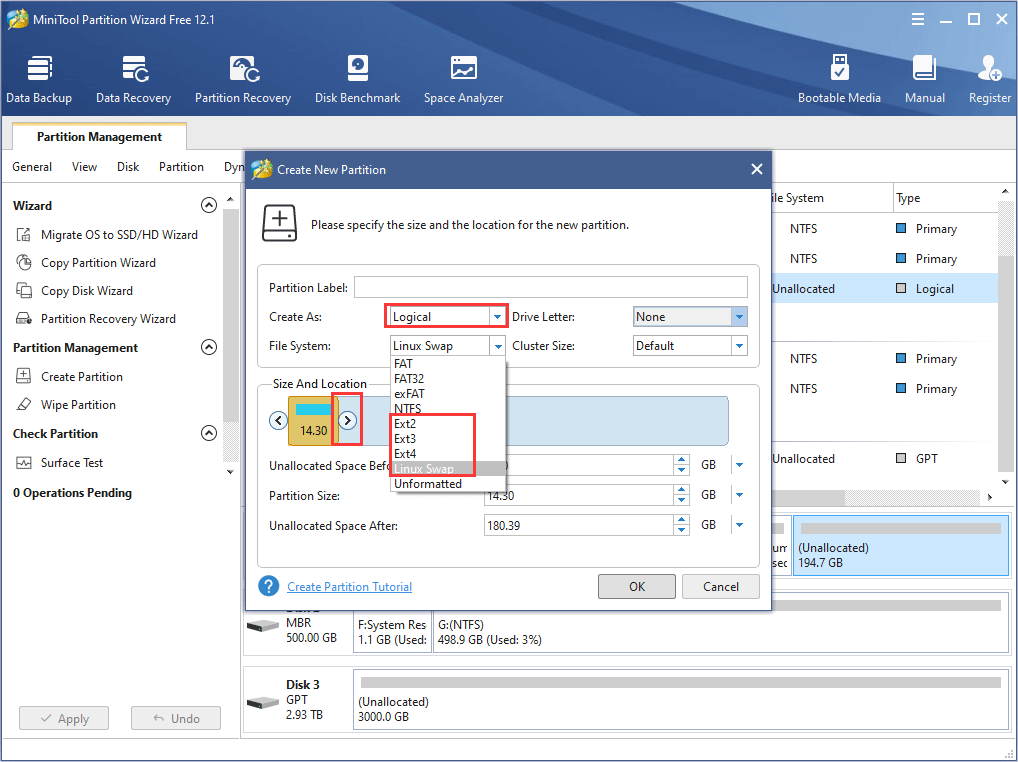
Step 7: In the pop-up window, you should pay attention to the following points:
- In the box next to Create As, choose Primary if the disk is a GPT disk, or choose Logical if the disk is a MBR disk (MBR disk can’t hold more than 4 primary disk. To know more, please click MBR vs GPT).
- In the box next to File System, choose Linux Swap or Ext4. In this way, you can create a swap or an Ext4 partition. Many people may like to create multiple Ext4 partitions to mount under directories like “/boot“, “/“, “/home“, etc.
- Under Size and Location, drag the arrow to resize the partition. After all is done, click OK
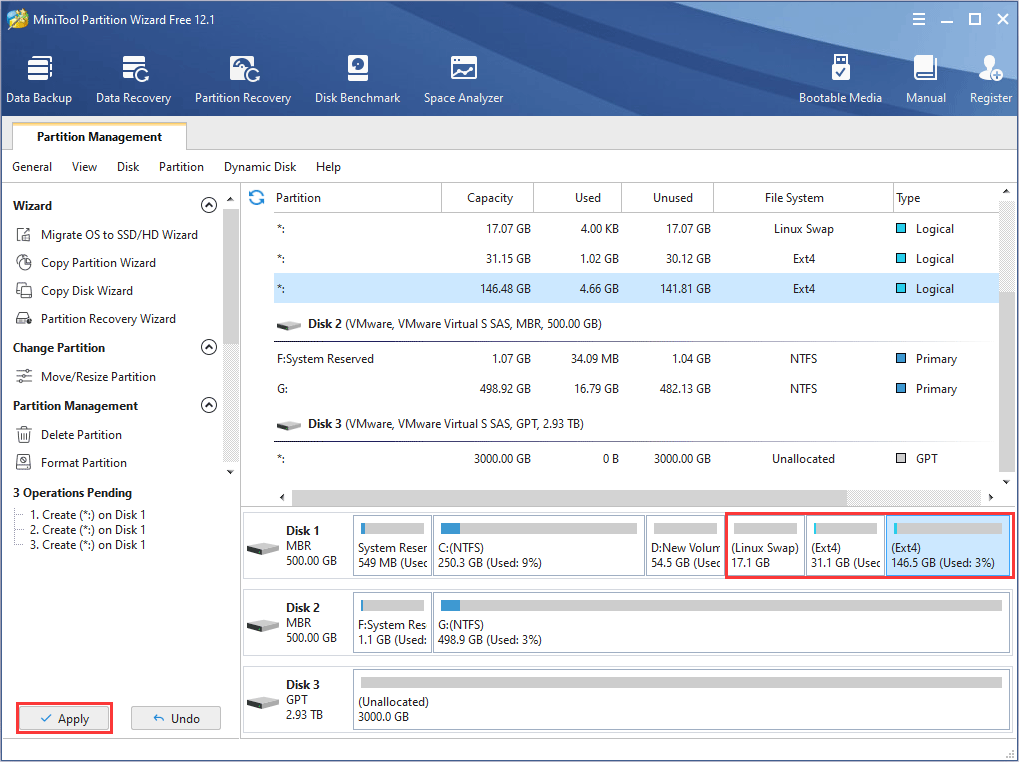
Step 8: Repeat the partition creation process until you create enough partitions. Then, check the layout of the partitions and click Apply button if it is OK.
Further Reading:
If you decide to install Arch Linux on a new hard drive (for example, Disk 3 in the above picture), you should initialize the disk to MBR or GPT first. Then, you can continue to perform the above operations.
Step 9: Connect the Arch Linux installation USB drive to your computer and then restart your computer. Once the PC reboots, press the BIOS key appearing on the screen to enter Firmware. In the firmware, set the boot sequence to make the computer boot from the USB drive (or you can press boot menu key to make the PC boot from USB drive faster).
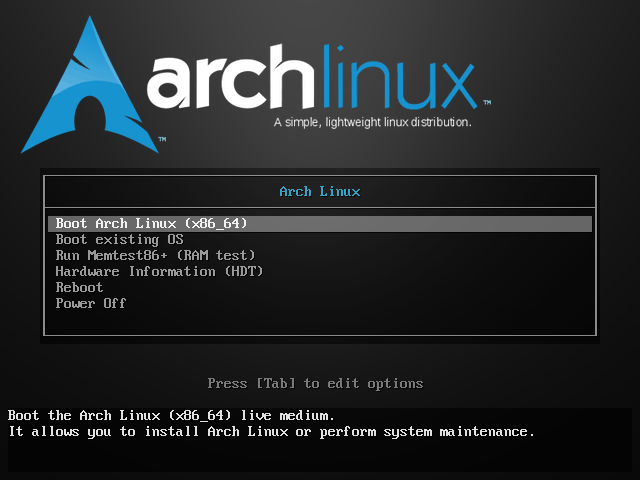
Step 10: After booting from the USB drive, you should see the following picture. If you enter Windows directly, please check whether the startup sequence is set successfully. If you do not see this interface, please check whether the USB installation media is successfully created. In the picture, choose Boot Arch Linux (x86_64) option.
What Is the Difference Between 32 Bit and 64 Bit (x86 vs x64)
Step 11: Arch starts to load files. After loading is complete, you will enter an interface with a command prompt. In this interface, you are to execute a series of commands to install Arch Linux on your disk. If you are not familiar with the common operations under the command line, please learn the following useful shortcut keys first:
- Tab: Auto-complete command line.
- ↑(Ctrl+p): Display the previous command.
- ↓(Ctrl+n): Display the next command.
- Ctrl-C: Terminate the currently executing command.

Step 12: Set the keyboard layout. But if you do not want to change the default US keyboard layout, you may skip this step.
- Use “ls /usr/share/kbd/keymaps/**/*.map.gz” command to list all available keyboard layouts
- Use “loadkeys KEYMAP” command to set the keymap you wish to use.
Step 13: Connect to Internet. Arch Linux install cannot be completed offline, because it needs to download the required components. Therefore, you should first connect to the Internet. To do that, please refer to the steps below:
If your network is a wired network and the router supports DHCP:
- Plug in the Internet cable and then execute “dhcpcd” command to obtain the IP address.
- Execute “ping -c 3 google.com” command to determine whether the network connection is normal. If you can see something like the following picture, it means you are connected to the network:

If your network is a wireless network:
- Execute “iwctl” command to enter a command line environment beginning with [iwd].
- Execute “device list” command to list all currently available network card devices. Remember the name (wlan0 here) of the wireless network card you are using in the Name column, because the following commands will use it.
- Execute “station wlan0 scan” command to perform a wireless network scan. In the command, you should replace “wlan0” with the name of the wireless network card you are using.
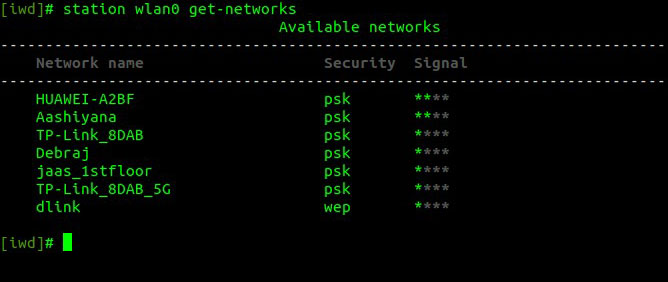
- Execute “station wlan0 get-networks” command to list the wireless networks currently scanned. Please replace “wlan0” with your wireless network name.
- Execute “station wlan0 connect CatAndPomelo” command to connect your network card (wlan0) to the designated network (CatAndPomelo). You should replace the two items according your situation.
- If the network has a password, you will be prompted to enter the password, and then press Enter to confirm.
- If all goes well, you are now connected to the network. Then execute “quit” command to exit iwd After that, please use the above ping command to test the network connection.
Step 14: Once you have verified that you have a working Internet connection, run “timedatectl set-ntp true” command enable Network Time Protocol (NTP), allowing the system to update the time via the network. Under normal circumstances, this command will not give you output. No output is the best message.
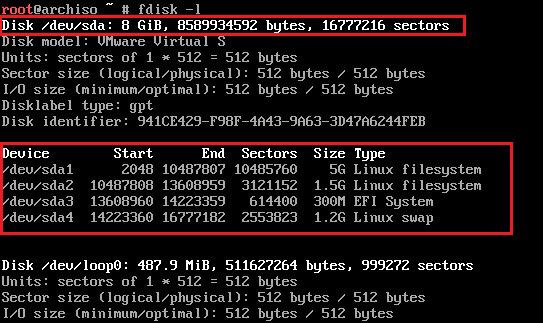
Step 15: Run “fdisk -l” command to check current partition layout. In this step, you should pay attention to the following two things:
- If your disk is a GPT disk and there is another OS installed on it, there should be an EFI partition. If you don’t find it there, you should create it manually (if you are using a MBR disk, skip this step).
- Take note the name of these partitions (like /dev/sda1, /dev/sda2, etc.) and their types (EFI, swap, Linux file system, etc.) for future use.
Further Reading:
In general, “EFI partition not found in GPT disk” issue usually occurs in new hard drive. In this case, you should do the following things:
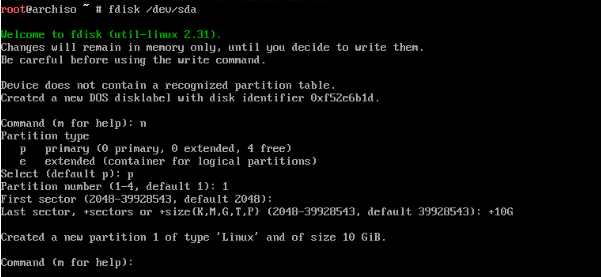
- Run “fdisk /dev/sdx” command to enter the operating environment of fdisk (“sdx” should be replaced accordingly, for example, sda, sdb, etc.).
- If the GPT disk is not initialized, enter “g” to create a brand new GPT partition table, otherwise you can skip this step.
- Enter “n” to start creating a new partition. In this step, you should be prompted to choose partition type (primary or logical), set partition number, set partition size, etc.
- Enter “p” to check the newly created partition.
- Enter “t” and select the newly created partition number to change its type. Then enter “ef” to change the partition type to EFI (Entering “l” can list all supported types).
- Enter “P” to check partition again. Then, enter “w” to write all previous operations to disk to take effect.
- Enter “fat -F32 /dev/sdxY” to format the EFI partition (“sdxY” is the partition number of the EFI partition).
Step 16: If all is OK, you should now mount partitions you created previously.
- Use “mount /dev/sdx* /mnt” command to a partition to “/” directory.
- Use “swapon /dev/sdX2” command to activate swap space.
- If you use EFI/GPT booting method, you should use “mkdir /mnt/boot” command to create “/boot” directory and then use “mount /dev/sdx* /mnt/boot” command to mount a partition to “/boot” directory (MBR disk can skip this step).
Introduction to Linux File System [Structure and Types]
Step 17: Use “vim /etc/pacman.d/mirrorlist” command to select an appropriate mirror. When you find a suitable mirror, in the normal mode, press dd to cut the link of the mirror, then press gg to return to the top of the list, and press the uppercase P to paste the link to the front of the list. The first mirror image has the highest priority. Finally, save and exit with “wq” command.
Step 18: Run “pacstrap /mnt base base-devel linux linux-firmware dhcpcd” command to download the Arch Linux mirror and install it on the disk. Here you need to wait for a while. When the command prompt reappears, you can proceed to the next step.
Step 19: Run “genfstab -L /mnt >> /mnt/etc/fstab” command to generate fstab file. This file determines how a hard disk (partition) is used or integrated (mounted) into the entire Linux system. For Windows and Linux dual operating system users, fstab can mount partitions in FAT format and NTFS format, allowing them to share resources in the Windows system from Linux.
Step 20: Run “arch-chroot /mnt” command to give the control right to our newly installed Arch Linux system. After performing this step, our operations will be performed in the newly installed system on the disk.
Step 21: Use the following two commands to set time zone.
- ln -sf /usr/share/zoneinfo/REGION/CITY /etc/localtime. In this command, REGION and CITY represent your time zone.
- hwclock –systohc.
Step 22: Generate locale file to set the language options you wish to use.
- Run “vim /etc/locale.gen” and then uncomment any locales you wish to use (remove the # mark).
- Run “locale-gen” command to generate locale file.
- Run “vim /etc/locale.conf” to open locale configuration file. Then, at the first line of the file, add the following content “LANG=en_US.UTF-8” to set it as the locale you want to use. Then, save and exit.
Step 23: Set hostname.
- Run “vim /etc/hostname” command and enter your hostname at the first line of the file. Then, save and exit.
- Run “vim /etc/hosts” and then add the following contents at the end of the file (“viseator” should be replaced by your hostname). Then, save and exit.

Step 24: Run “passwd” command to set the root password.
Step 25: Use Pacman package manager to install Bootloader.
- Run “pacman -S os-prober ntfs-3g” to these packages.
- If you use BIOS/MBR boot method, run “pacman -S grub” to install grub package, run “grub-install –target=i386-pc /dev/sdx” to deploy grub (please replace “sdx” accordingly), and then run “grub-mkconfig -o /boot/grub/grub.cfg” to generate configuration file.
- If you use EFI/GPT boot method, run “pacman -S grub efibootmgr“, “grub-install –target=x86_64-efi –efi-directory=/boot –bootloader-id=grub“, and then “grub-mkconfig -o /boot/grub/grub.cfg“.
- Run “vim /boot/grub/grub.cfg” to check whether the entry of each system is successfully generated if you have multiple systems. In the file, check whether there are Windows or other system name entries near the end of the menuentry section. If the system entry is not generated normally, there will be no system entry when booting.
Further Reading:
When you do this step, you may encounter various problems for various reasons. For example:
- If you have ever installed Linux, but did not delete the original Grub, then the computer cannot start successfully.
- If you do not see the Arch Linux system entry or the file does not exist, it may be that the Linux kernel has not been deployed correctly. Please check whether the /boot directory has not been mounted correctly.
In a word, if your operations are not correct, you may encounter problems. If so, please search online to find solutions.
Step 26: The last step is to reboot your computer. Please run “exit” command and then “reboot” command. But if you have mounted “/mnt/boot” before, please run the following three commands in order: “umount /mnt/boot“, “umount /mnt“, and “reboot“. If you reboot and log into Arch Linux smoothly, the Arch Linux install is completed.
Linux Desktop Environments Comparison: Cinnamon vs MATE vs XFCE
Bottom Line
Is this post helpful to you? Can you install Arch Linux smoothly by following this guide? Have you encountered problems when installing Arch Linux? Please leave a feedback in the following comment zone. In addition, if you have encounter when creating Linux Swap or Ext4 partition, please contact us via [email protected]. We will get back to you as soon as possible.
