Windows 7 Won’t Boot [Symptoms and Causes]
In general, when Windows won’t boot, its means that the computer will not respond or the PC gets black screen or blue screen error. The causes of these problems are classified into 2 categories: hardware issue and software issue.
The hardware issues include:
- The battery is drained.
- Some hardware components (like PSU, motherboard, etc.) are broken down.
- Some hardware components (for example, two different RAM cards) are incompatible with one another.
- Unstable hardware connection and dust.
- Overheating
The software issues include:
- Overclocking.
- Lost or corrupt system files.
- Outdated drivers.
- Virus attack.
- …
Windows 7 Won’t Boot [Solutions]
When the “computer won’t boot Windows 7” issue happens to you, you can try the following methods to solve your problem.
Possible Solutions
- Charge Your Computer
- Wait Until the PC Is Cooled Down
- Remove External Devices and Newly Installed Components
- Disable Overclocking
- Run Startup Repair
- Diagnose Memory
- Repair System Files
- Update Drivers
- Rebuild MBR
- System Restore or System Image Recovery
- Reinstall System
- Check Bad Sectors
Fix 1. Charge Your Computer
If you press the power button but the Windows 7 PC doesn’t respond, please charge this PC first. It’s very likely that the battery is drained. If you are sure the power is enough, then the cause may be the hardware components like PSU and motherboard. Therefore, I recommend you to get your PC repaired in PC store.
Fix 2. Wait Until the PC Is Cooled Down
Sometimes, the “Windows 7 won’t boot” problem is caused by PC overheating. In this case, you can wait until the PC is cooled down and then try starting this PC again. If this problem is caused by overheating, I recommend you to consider replacing the cooling system.
Fix 3. Remove External Devices and Newly Installed Components
Have you connected some external devices to your PC? Have you added or replaced some hardware components in your PC? It’s also possible that the “Windows 7 won’t boot” problem is caused by these devices, if these devices are incompatible with your PC and interfere with the normal boot process of Windows.
Therefore, please remove these devices to see whether the problem is solved. These external devices include: printers, scanners, media card readers, small media cradles (iPod, PDA, MP3 player, etc.), digital cameras and video recorders, USB storage devices, CDs or DVDs from all optical drives, docking station, etc.
Fix 4. Disable Overclocking
Many people may like to overclock their CPUs and Memory components, especially gamers. However, do you know overclocking may reduce the stability of accessories and shorten their service life?
Sometimes, Windows 7 won’t boot, just because of improper overclocking. To solve this problem, you can disable the overclocking. If you use software for overclocking, uninstalling the program can solve the problem.
If you use BIOS settings for overclocking, please refer to the following brief tutorial to disable it:
- Restart your PC and press the BIOS key during the booting process. This will make you enter BIOS (firmware).
- Navigate to overclocking configuration page. It may be named Overdrive or AI Tweaker. Expand CPU Configuration and Memory Configuration to disable Speed Step and set performance memory profiles as XMP. Or, you can navigate to Exit page and select Load Setup Defaults, because overclocking is usually disabled in BIOS by default.
- Save changes and exit.
Is Overclocking Safe? Whether to Overclock or Not? Look Here
Fix 5. Run Startup Repair
To run Windows 7 Startup Repair, you should enter WinRE or WinPE. Here are 3 ways to access Startup Repair:
- Way 1: Restart your PC and then press F8 to enter Advanced Boot Options. Then, select Repair Your Computer to get System Recovery Options. In this page, click Startup Repair to check errors.
- Way 2: Continuously make your PC fail to boot for 3 times and it will also make you access the Startup Repair option.
- Way 3: Use Windows 7 installation disk. This way requires you to connect the disk to PC, boot into BIOS, and change the boot order to make the PC boot from this disk. Then, choose Repair PC, not PC installation.
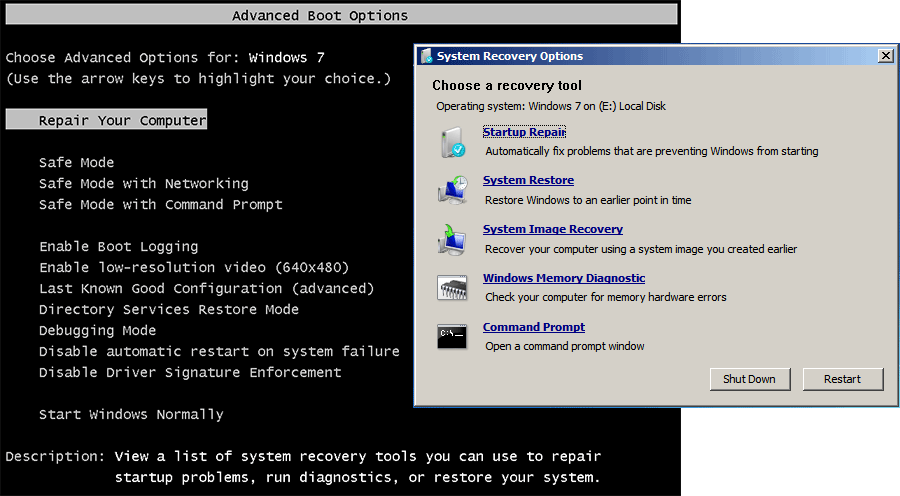
After enabling Startup Repair, it will check and fix errors.
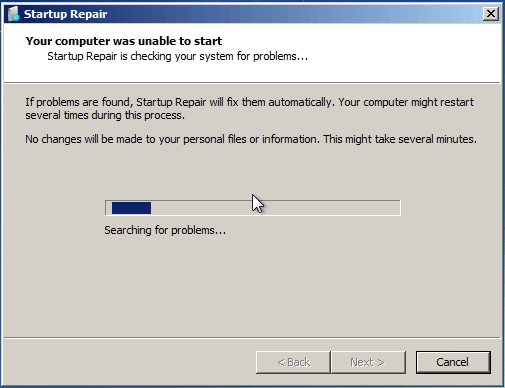
If the Startup Repair can’t solve the “computer won’t boot Windows 7” problem, you can try other Windows 7 repair tools.
Fix 6. Diagnose Memory
If the RAM bar has something wrong, the Windows 7 also won’t boot. Please check memory for errors. Please go to Advanced Boot Options > System Recovery Options again, and then select Windows Memory Diagnostic. Please pay attention to its Status to see whether there are errors detected.
If it detects errors, you should search online for solutions, or you should replace the RAM with a new one.
4 ways to Open Windows Memory Diagnostic to Check Memory
Fix 7. Repair System Files
If some system files are corrupt, causing Windows 7 not to boot, you can use SFC command to repair these system files. Here is the guide:
- Go to System Recovery Options and choose Command Prompt.
- Type command “sfc /scannow” and press the Enter key.
Once the process ends, restart your PC to see whether the problem is solved.
Fix 8. Update Drivers
Sometimes, outdated drivers may not make CPU and devices like hard drive, RAM, and other parts communicate smoothly, cause “Windows 7 won’t boot” problem. In this case, you can update these drivers to solve this problem. Here is the guide:
- Go to Advanced Boot Options and choose Safe Mode with Networking (if you can’t boot into Safe Mode, you can’t update drivers).
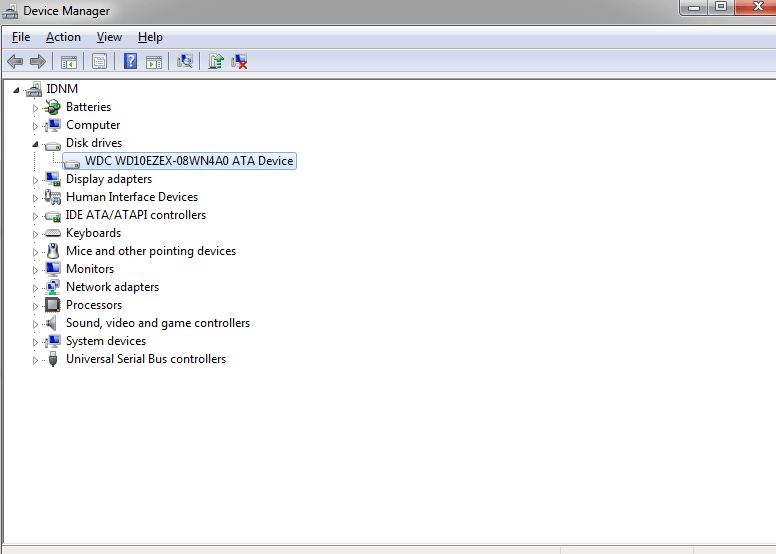
- Click the Start button and search Device Manager to open it.
- Expand every directory to see whether there is a yellow warning mark. If there is, you should update the drive. If there is no yellow, you can also try updating drivers of hard drive, system devices, processor, etc.
Fix 9. Rebuild MBR
MBR (Master Boot Record) is the first sector on the hard drive accessed by a computer in booting process and it records the relevant information about the hard disk itself and the size and location information of each partition on the hard disk.
If MBR is corrupt, Windows 7 won’t boot, too. In this case, you can rebuild MBR through commands. But to rebuild MBR, you should enter WinPE (not WinRE) and then open the command prompt. Then, you should run the following commands one by one.
- bootrec /fixmbr
- bootrec /fixboot
- bootrec /rebuildbcd
Step-by-Step Guide to Repair and Fix MBR Windows 7/8/8.1/10
Fix 10. System Restore or System Image Recovery
If all above methods don’t work for you, you can use this method. The problem is that you may haven’t created a system restore point or a system image. To create system restore points or system images needs you to open system protection.
If the system protection is enabled, it is usually configured that the restore points are created automatically when you install a new app, driver, or update.
If there are system restore points or system images, you can revert your computer to a state before the “Windows 7 won’t boot” issue occurs. In general, the system restore feature won’t affect your personal files, but it will remove apps, drivers, and updates installed after the restore point was created.
But if you use system image recovery option, all files in your PC including personal files, apps, system information, etc. will be restored to the state when the system image is created. That means you may lose data.
Fix 11. Reinstall System
If the above method also fails to repair your PC, you can also try reinstalling your PC. Please note that this method may cause personal files on desktop and in C drive to be lost. If there are important files, please back up them in advance.
Detailed Steps and Instructions to Reinstall Windows 10
Fix 12. Check Bad Sectors
If there are many bad sectors on the system partition, this may also cause Windows 7 not boot. To check bad sector, you can use the following way:
- Boot into Safe Mode.
- Open Windows Explorer.
- Right-click C drive select Properties.
- Navigate to Tools tab and click Check Now button in Error-checking box.
- Check two disk options and click Start button.
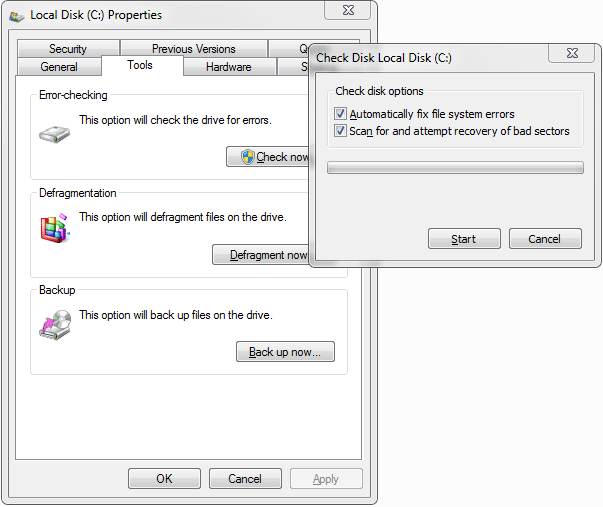
The above method can only check logical bad sectors. If you want to check physical bad sectors, please use MiniTool Partition Wizard. Here is the guide:
Step 1: Make a USB bootable media with MiniTool Partition Wizard.
- Connect a USB drive to a Windows PC that runs normally still.
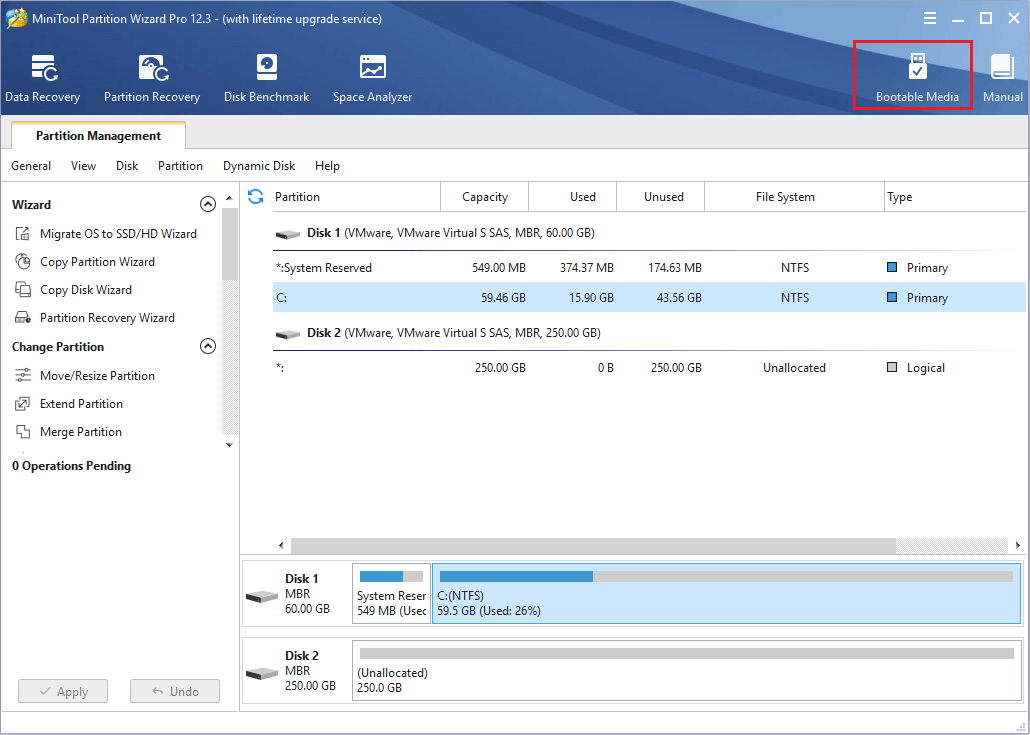
- Launch MiniTool Partition Wizard on this PC and click Bootable Media.
- Follow the on-screen instructions to make a USB bootable media.
Step 2: Connect the bootable media to your Windows 7 PC. Power on the PC and then press the BIOS key when booting, so that you can enter the BIOS. Then, in the firmware, set the USB drive/removable device as the first boot device. Then, save and exit. This time, the PC will boot from the bootable media.
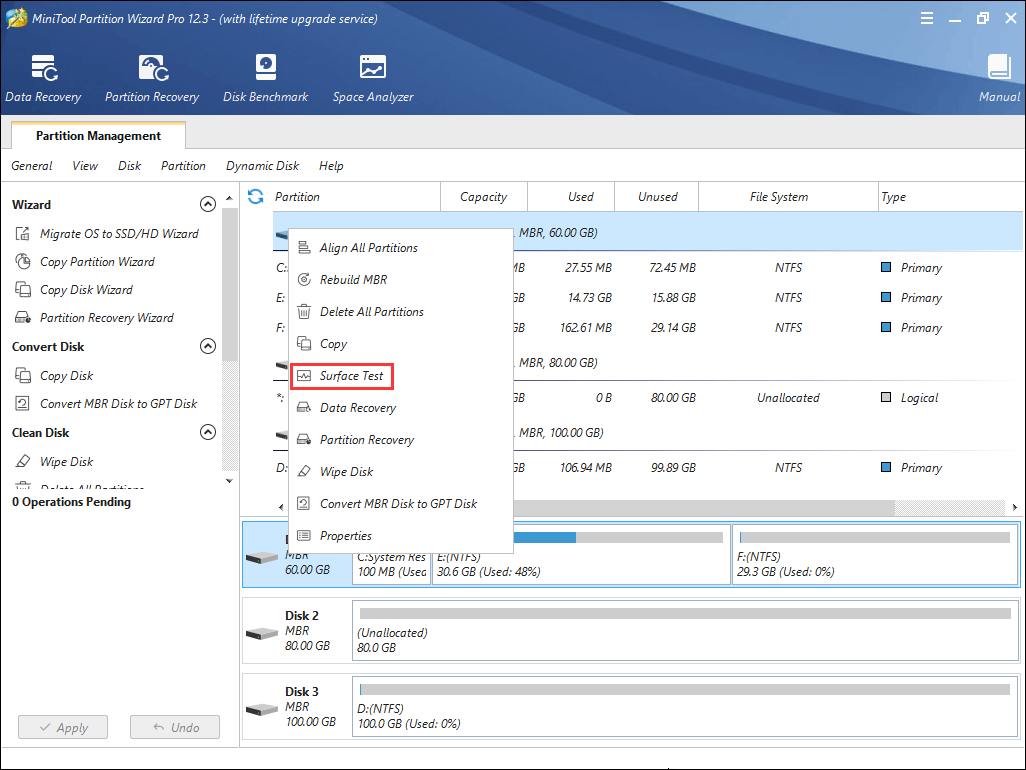
Step 3: Wait until MiniTool Partition Wizard opens automatically. Then, right-click on the system disk and choose Surface Test.
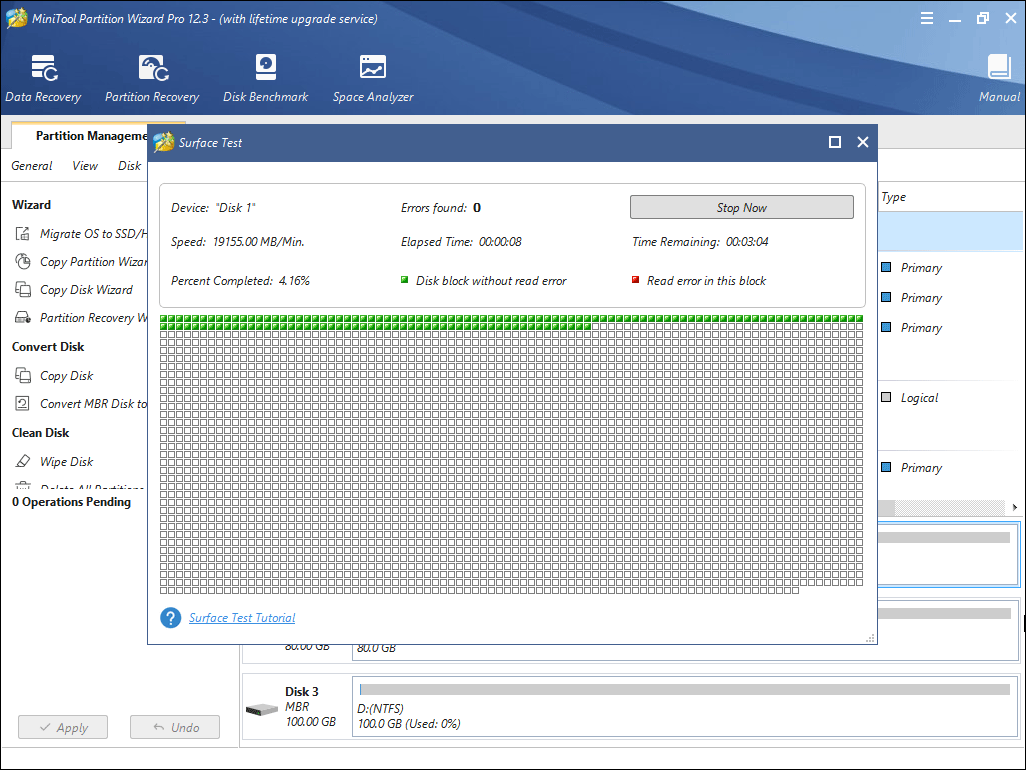
Step 4: On the new window, click Start Now button. MiniTool Partition Wizard will start checking the drive for bad sectors. Once bad sectors are detected, they will be marked as red blocks. If there are many red blocks on the drive, you may need to replace the drive.
Please note that if you have tried all methods but the computer won’t boot Windows 7 still, I recommend you get the PC repaired in professional repair stores.
Recover Data
If you have repaired your PC but you find some important files are lost, you can use MiniTool Partition Wizard to recover these files. In addition, if you can’t fix your PC, and need to recover data when Windows 7 won’t boot, you can also use MiniTool Parttition Wizard to recover data (in bootable media mode). Here is the guide:
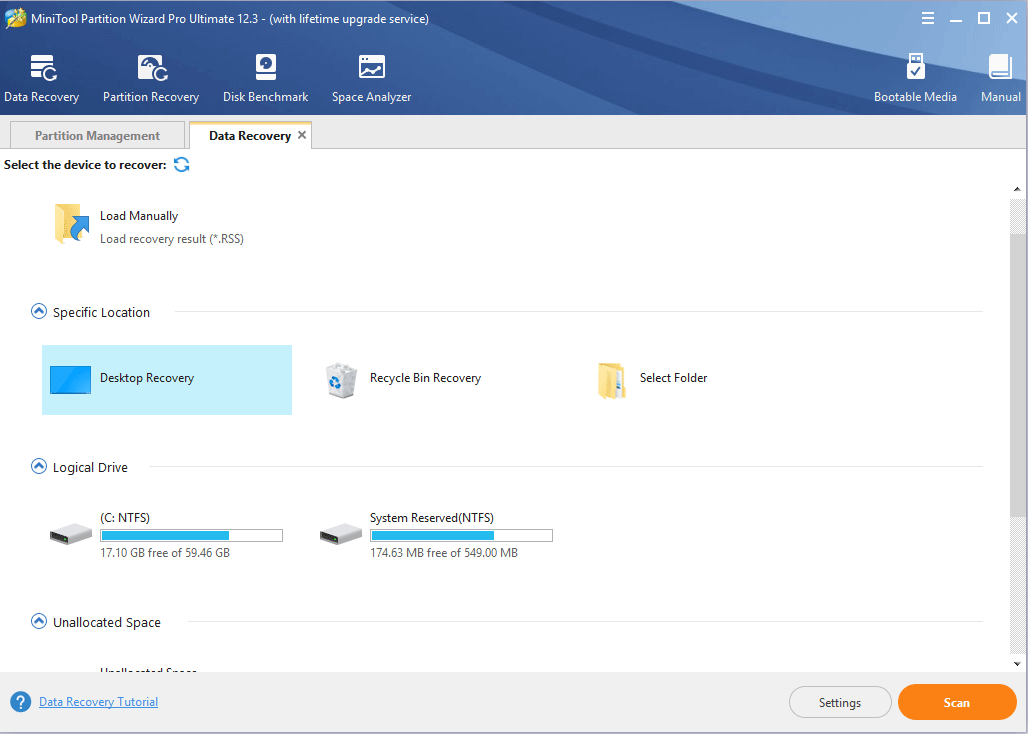
Step 1: Launch MiniTool Partition Wizard and click Data Recovery on the toolbar. On the Data Recovery tab, choose the place (desktop, recycle bin, folder, or drive) where you want to recover data and click Scan.
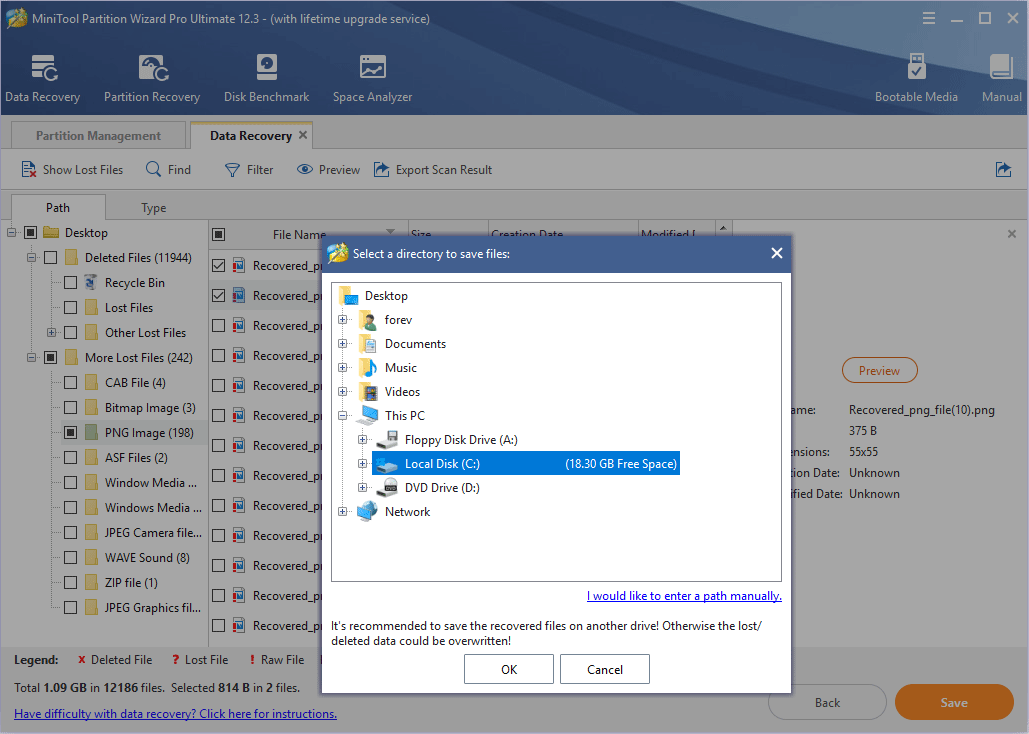
Step 2: After the scanning process is completed, choose the files you want to recover and click Save (in this step, you can preview these files). Then save them on a safe place.
Bottom Line
Is this post useful to you? Do you have other methods to fix the “computer won’t boot Windows 7” problem? Please leave comments in the following zone for sharing. In addition, if you have difficulty in recovering data, please feel free to contact us via [email protected]. We will reply to you as soon as possible.
