This post from MiniTool introduces 2 tools for you to back up Windows Server 2022 files. Besides, you can learn how to restore Windows Server files with them. Now, keep on your reading.
Losing data can be costly, so creating backups of your files is crucial. Servers are important components of any organization as they collect and serve files or information requested by users. By backing up data, organizations can ensure they won’t be lost in the event of an incident, ransomware, or failure.
In this article, we will teach you how to back up Windows Server 2022 files with Windows Server Backup and MiniTool ShadowMaker.
How to Back up Windows Server 2022 Files
Way 1: Via Windows Server Backup
First, you can use Windows Server’s built-in tool – Windows Server Backup. You can use the Windows Server Backup service to back up the entire server, system status, selected volumes, and specified files and folders as long as the data size is under 2 TB.
Windows Server Backup is an installable feature. To use it, you need to install it first. Therefore, we will show you how to install Windows Server Backup and how to use it to back up Windows Server 2022.
Install Windows Server Backup
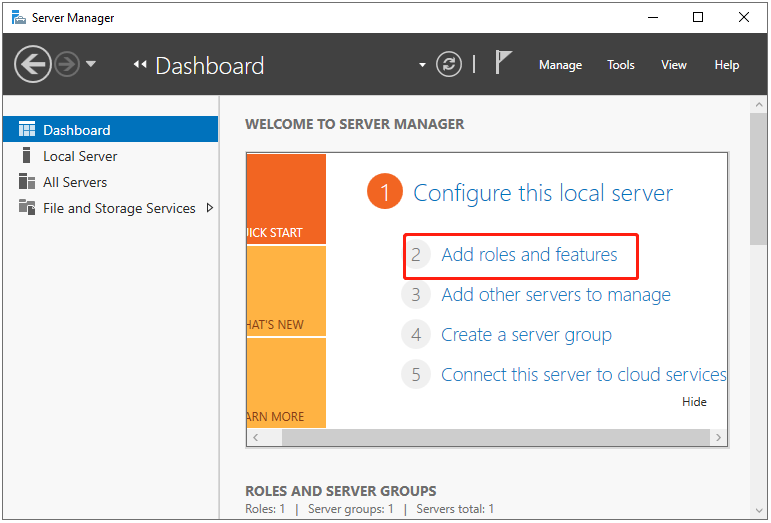
Step 1:Open Server Manager and click Add roles and features. Then, click Next.
Step 2:Now, choose the installation type section. You need to choose the Role-based or Feature-based installations option and click Next.
Step 3:Select a server from the server pool or select a virtual hard disk. Then, click Next.
Step 4: Under Select server roles, click Next.
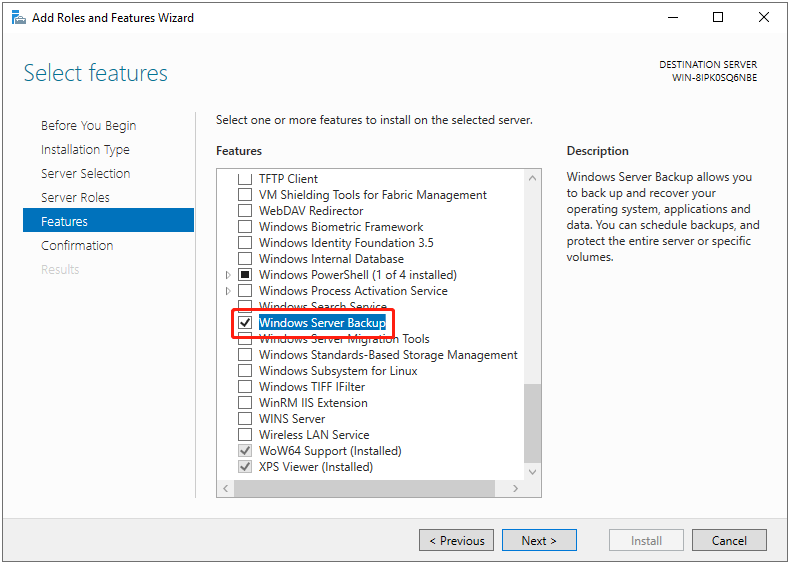
Step 5:Under the Features section, check the Windows Server Backup feature and click Next.
Step 6: It will ask you to confirm the operation and you need to click Install. Now the Windows Server Backup feature installation will begin. Wait for it to be completed.
Back up Windows Server 2022 Files
Step 1: Type Windows Server Backup in the Search box and open it.
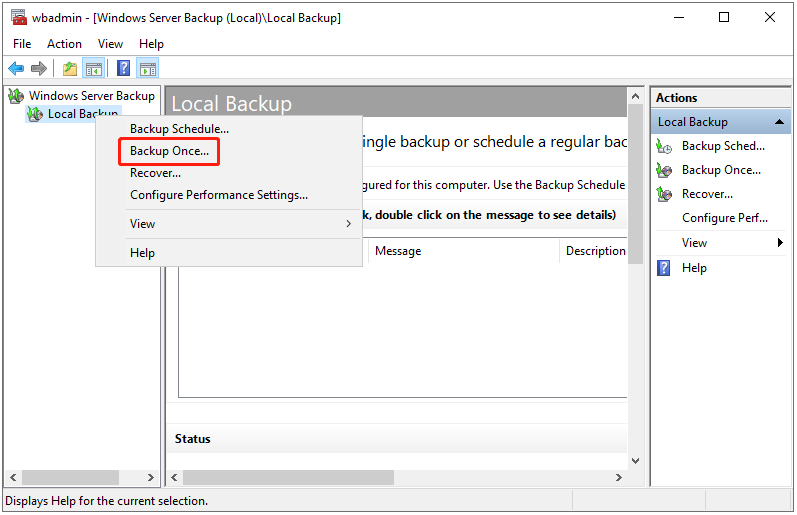
Step 2: Right-click Local Backup and then select Backup Once….
Step 3: Under Backup Options, select Different options, and click Next. Choose this option if you have not created a scheduled backup or want to specify a location or items for this backup that are different from the scheduled backup.
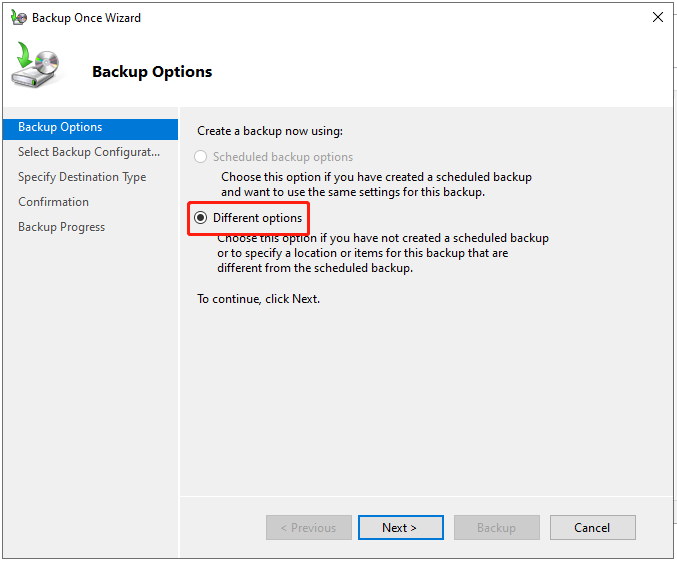
Step 4: Select the type of configuration you want to schedule: Full server (recommended) or Custom. The full server backup will back up all your server data, applications, and system state. Since you want to back up Windows Server 2022 files, you can choose the Custom option and click Next.
Step 5: Then, you can choose Add Items and choose the files that you want to back up. Click Next to continue.
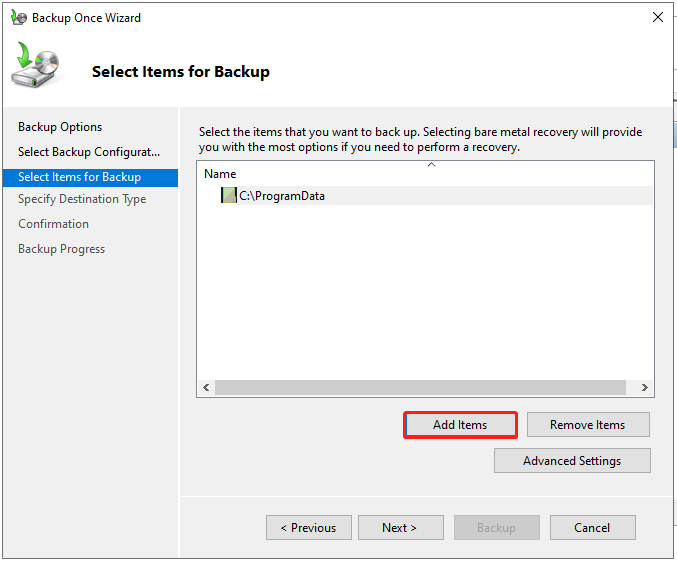
Step 6: Under Specify Destination Type, choose the type of storage to back up, and click Next. There are two options available: Local drives or Remote shared folders.
Step 7: If you choose Local drivers, in the next screen, you need to click the drop-down menu to choose the backup destination. Click Next.
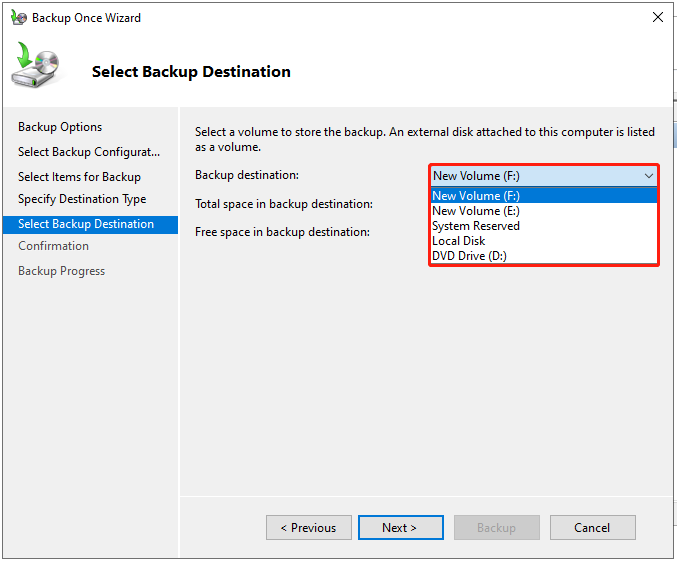
Step 8: Now, you can click Backup to start the backup task. Once the backup is done, you will see the status message: Successful.
Scheduled backups are convenient, and ensure that your data is regularly backed up without requiring manual intervention. To create a backup schedule, you should decide what to back up, when, and how often to back up your server, and where to store the backups. Here is how.
Step 1: Type Windows Server Backup in the Search box and open it.
Step 2: Right-click Local Backup and then select Backup Schedule…. Click Next.
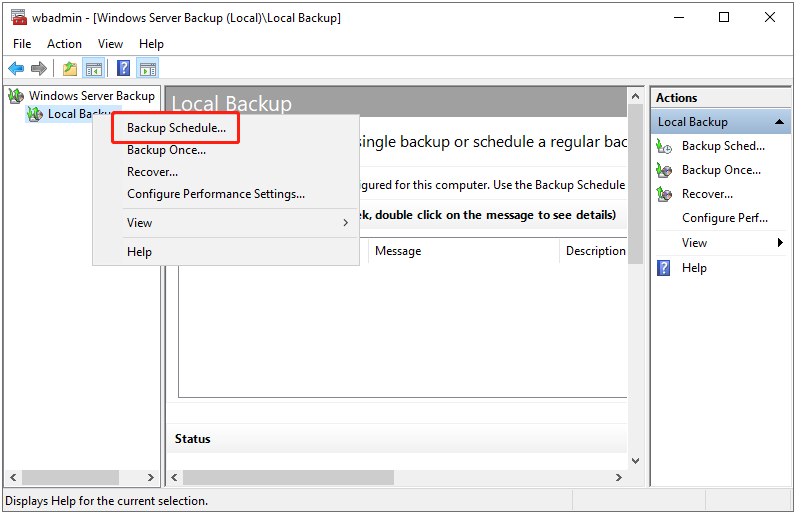
Step 3: Select the type of configuration you want to schedule and click Next.
Step 4: Under How often and when you want to run backups, you can click Once a day, and then click Next. You can also choose whether you want to run a backup more than once a day. And you need to add the available time to the scheduled time.
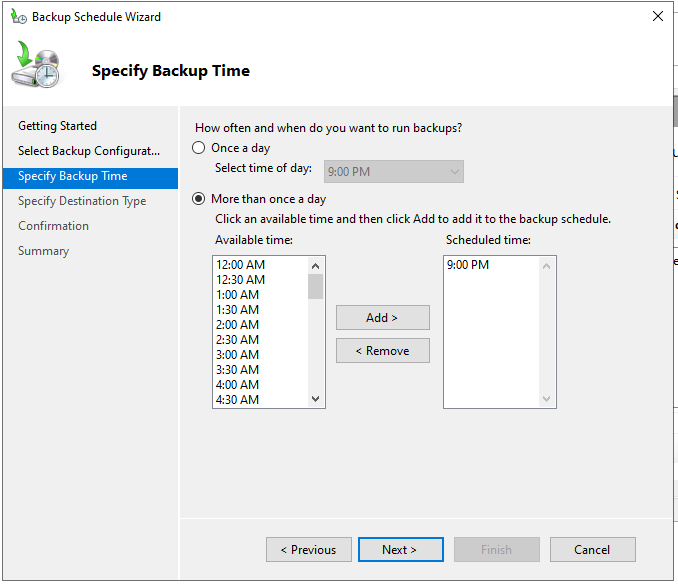
Step 5: Under Specify Destination Type, you can choose the following three and click Next.
- Back up to a hard disk that is dedicated to backups (recommended)
- Back up to a volume
- Back up to a shared network folder
Step 6: Under Confirmation, click Finish. Click Close to close the window. You will see that a new scheduled backup is configured on the server.
Way 2: Via MiniTool ShadowMaker
As to backing up Windows Server, the free Windows Server Backup alternative – MiniTool ShadowMaker is competent. It is a piece of Server backup software, that provides an all-in-one backup and recovery solution. It supports Windows Server 2008/2012/2016/2019/2022.
MiniTool ShadowMaker provides data protection services and disaster recovery solutions for PCs, Servers, and Workstations. It is designed to back up the operating system, disks, partitions, files, and folders.
Besides the Backup feature, it is a clone tool, allowing you to clone SSD to larger SSD, and move Windows to another drive.
Now, we will show you how to use MiniTool ShadowMaker to back up Windows Server.
Step 1: Download it from the following button.
MiniTool ShadowMaker TrialClick to Download100%Clean & Safe
Step 2: Install and launch it. Then click Keep Trial to enter its main interface.
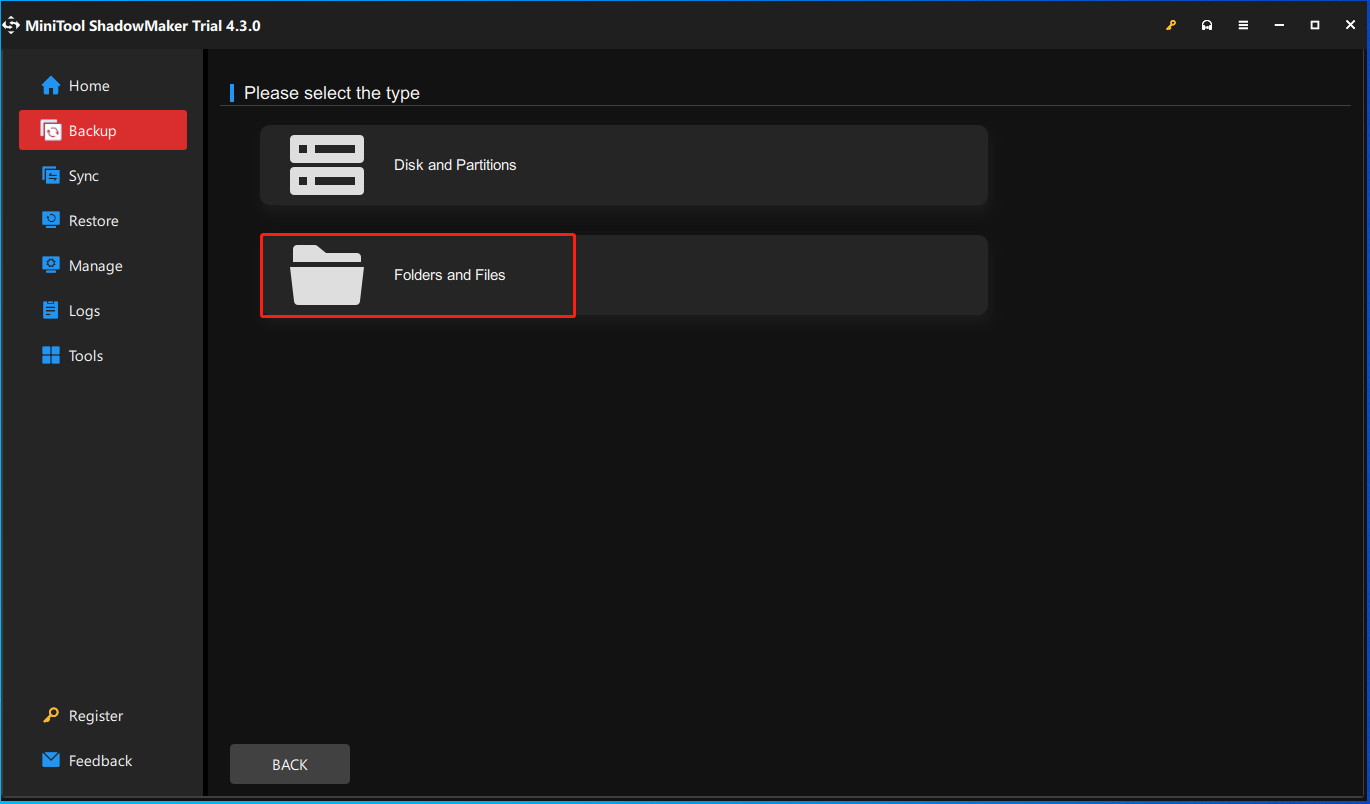
Step 3: Go to the Backup page. MiniTool ShadowMaker chooses the operating system as the backup source by default. To back up Windows Server 2022 files, click SOURCE > Folders and Files. Check the files you want to back up.
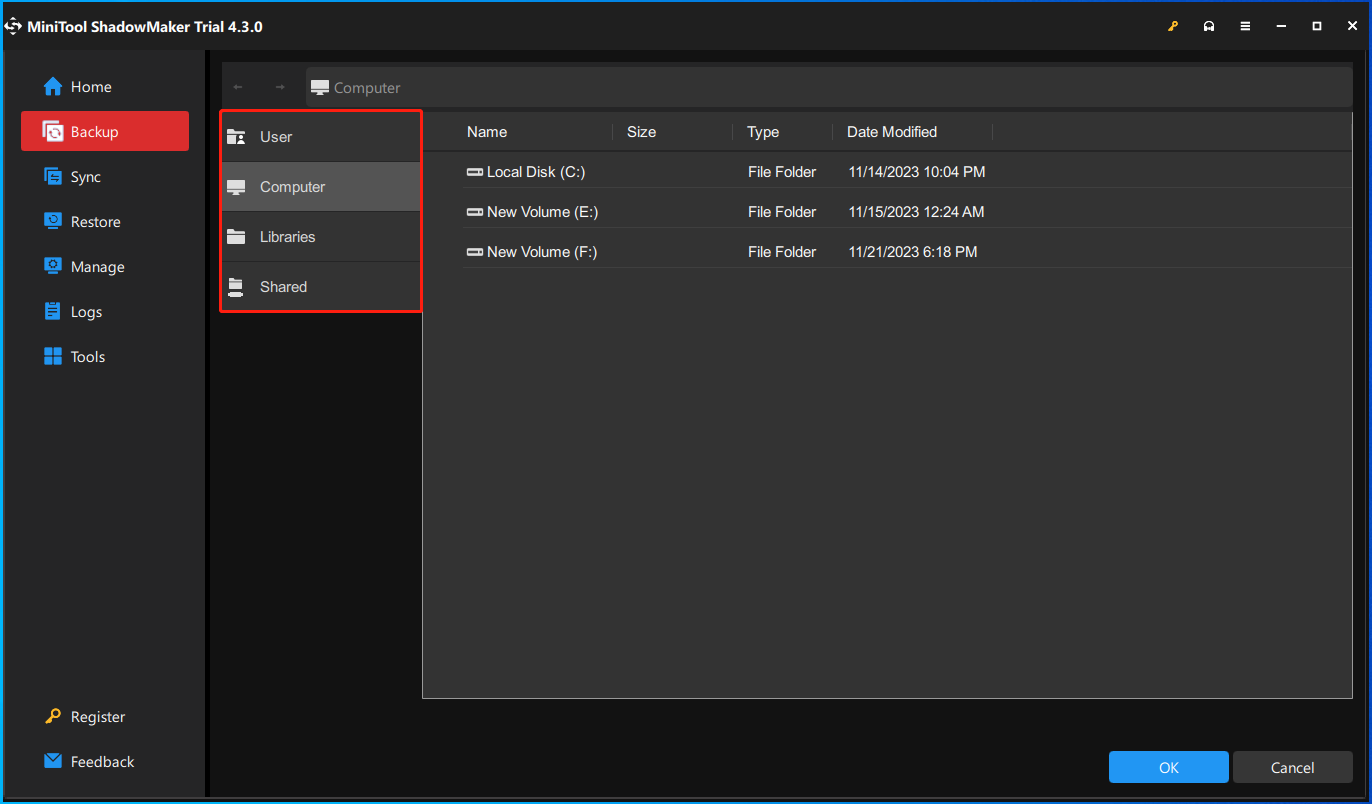
Step 4: Then click DESTINATION to choose a target disk to save the backup image. There are 4 paths available – User, Computer, Libraries, and Shared.
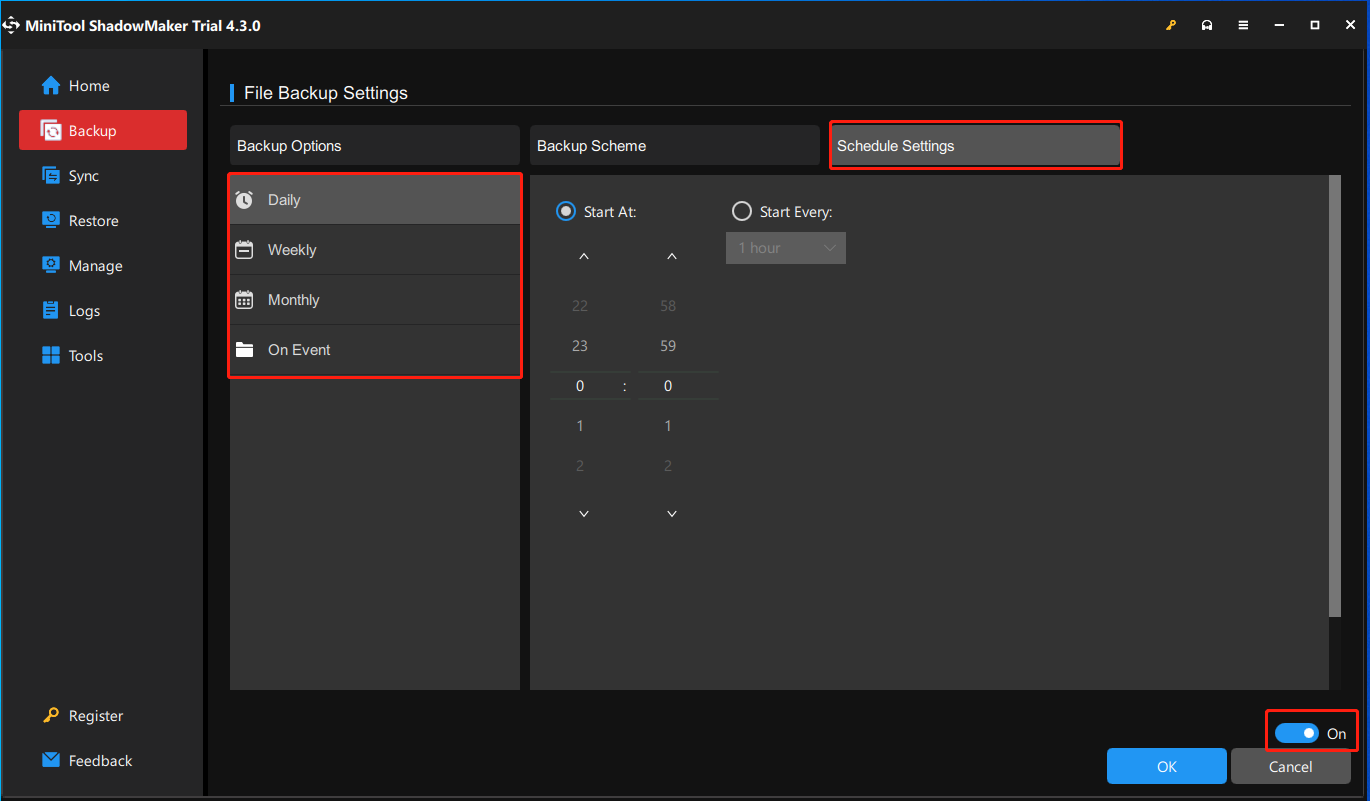
Step 5: When clicking Options > Schedule Settings, you see this feature is disabled by default. Just enable it by switching the button to On. Then you see MiniTool ShadowMaker offers four ways to customize schedule backup, they are:
- Daily – Set some particular time points to execute the scheduled backup task each day.
- Weekly – Choose a day/days in each week to back up at a specific time.
- Monthly – Run a backup task at the specified time point on the chosen day(s) in a month.
- On Event – Run the backup based on specified events.
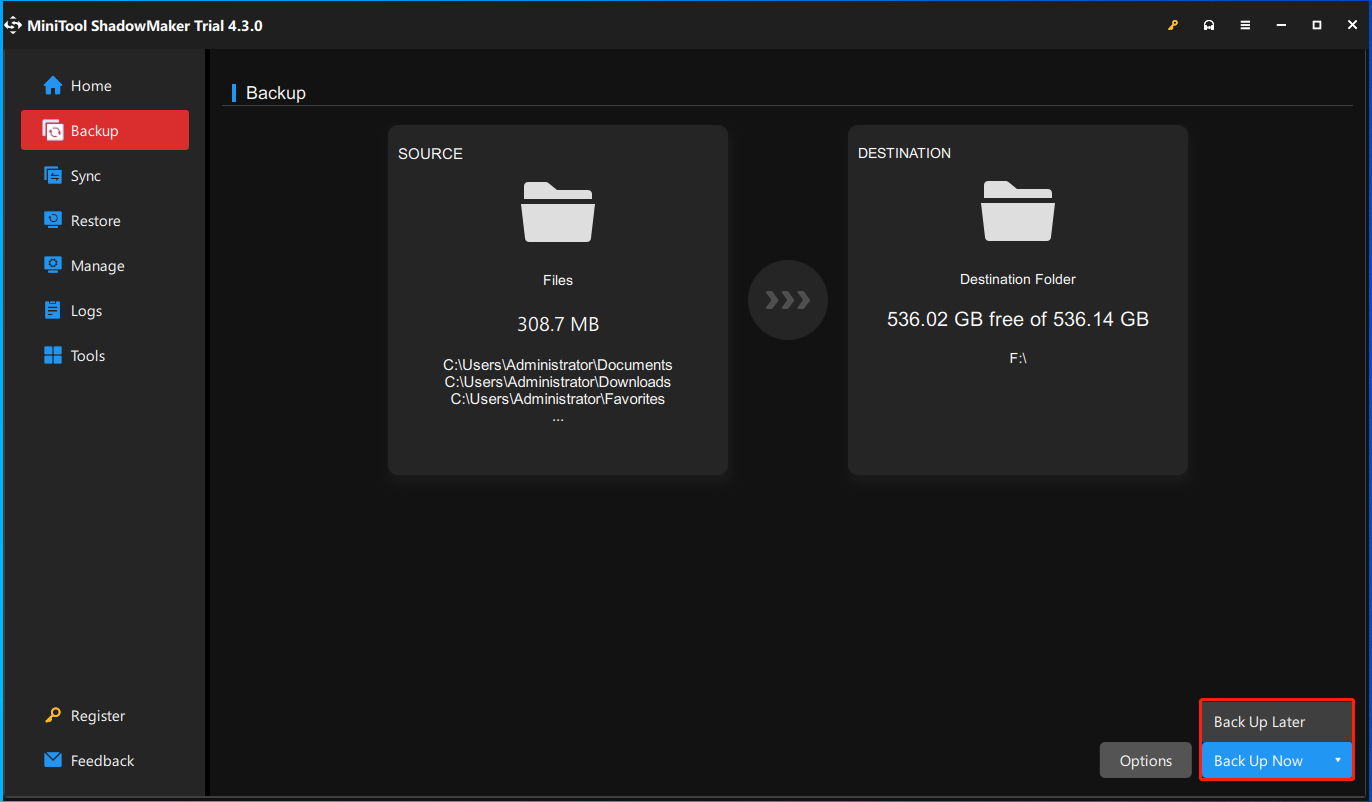
Step 6: Then click Back up Now to start the Windows Server backup process. Or, you can click Back up Later to delay the backup task. Then, you can find the task on the Manage page.
How to Restore Windows Server 2022 Files
Way 1: Via Windows Server Backup
Here is how to restore Windows Server 2022 files with Windows Server Backup.
Step 1: Launch Windows Server Backup and choose Local Backup.
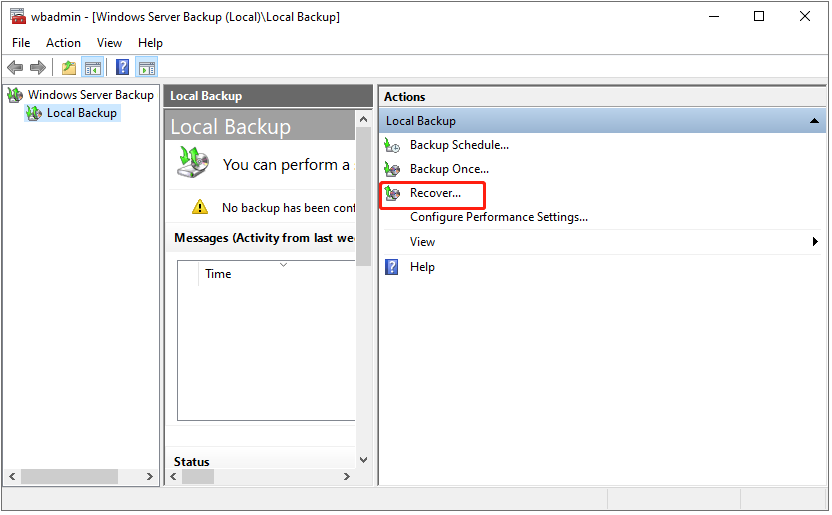
Step 2: In the Action section, select Recover… to open the Recovery Wizard.
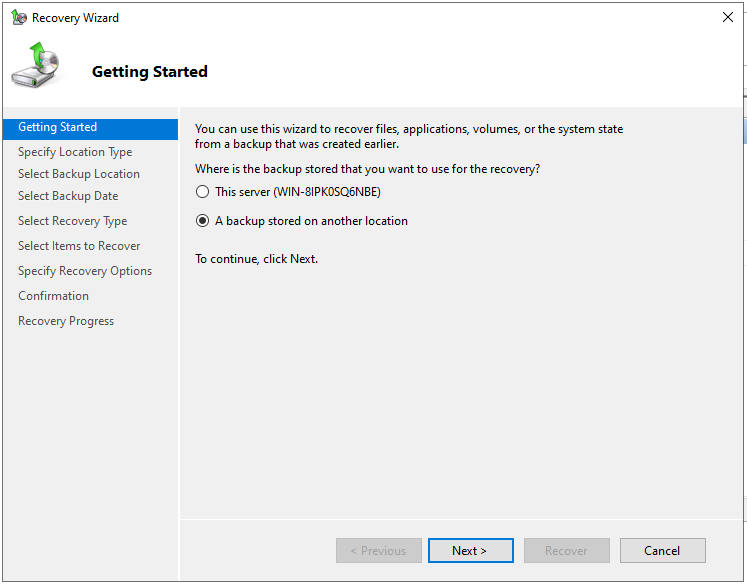
Step 3: Then, you will be prompted to choose where to restore the data from. Either from the local server or another server.
- If it was stored on a local server, choose This server and select the server. Click Next to recover from the local server.
- If the data is being restored from another server, choose A backup stored on another location and click Next. In the Specify Location Type window, choose Local drives or Remote shared folder, then click Next.
Step 4: Now, in the Select Backup Date section, select the backup of the backup you want to recover and click Next.
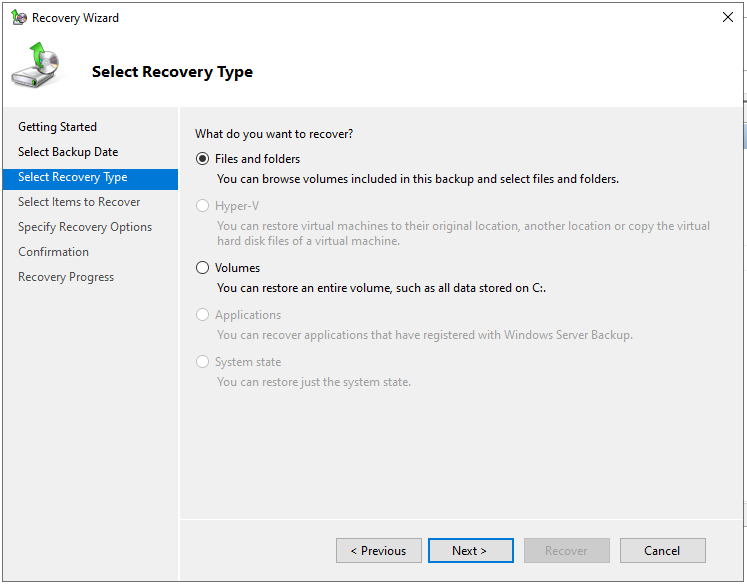
Step 5: In the Select Recovery Type section, choose Files and folders, or Volumes, or Application or System state based on the actual and click Next.
Step 6: Now, you can select the items to recover and click Next.
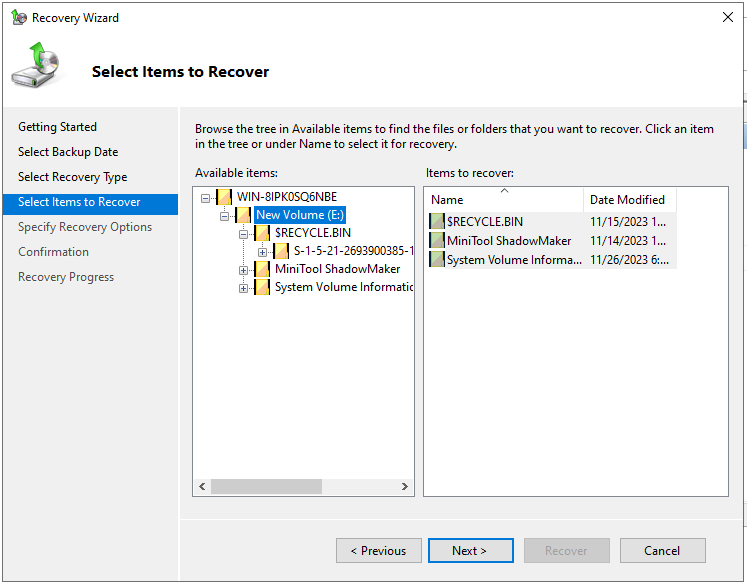
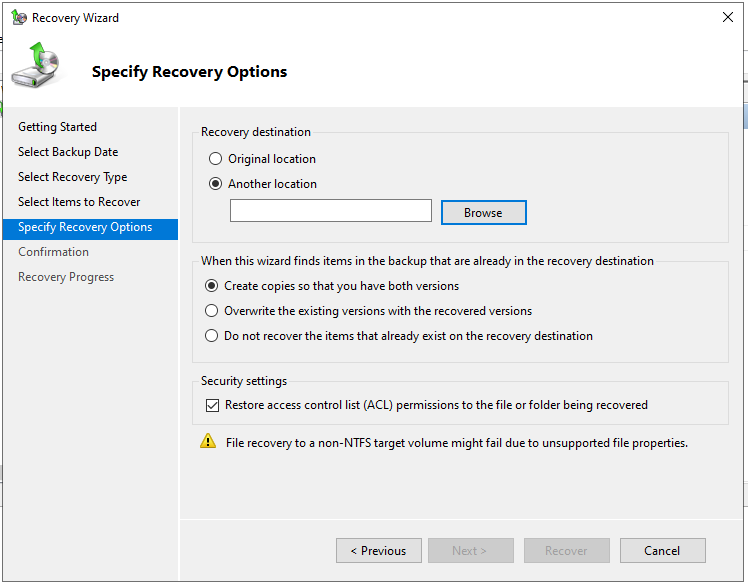
Step 7: Now in the Specify Recovery Option section, select where you want to restore the data and click Next.
- Select Original location if you want to restore the data directly to the original location. When selecting this option, all the databases that were backed up will be restored to their original locations.
- Choose Another location to select and restore databases and their files individually to another location.
Step 9:In the Confirmation section, confirm the recovery settings, and click Recover. You can view the progress of the recovery in the Recovery Progress section.
Way 2: Via MiniTool ShadowMaker
Now, let’s see how to restore Windows Server 2022 files with MiniTool ShadowMaker.
Step 1: In the Restore tab, select the file backup image you want to restore and click the Restore button. If the desired backup is not listed here, click Add Backup located at the top right corner to select the file backup image manually.
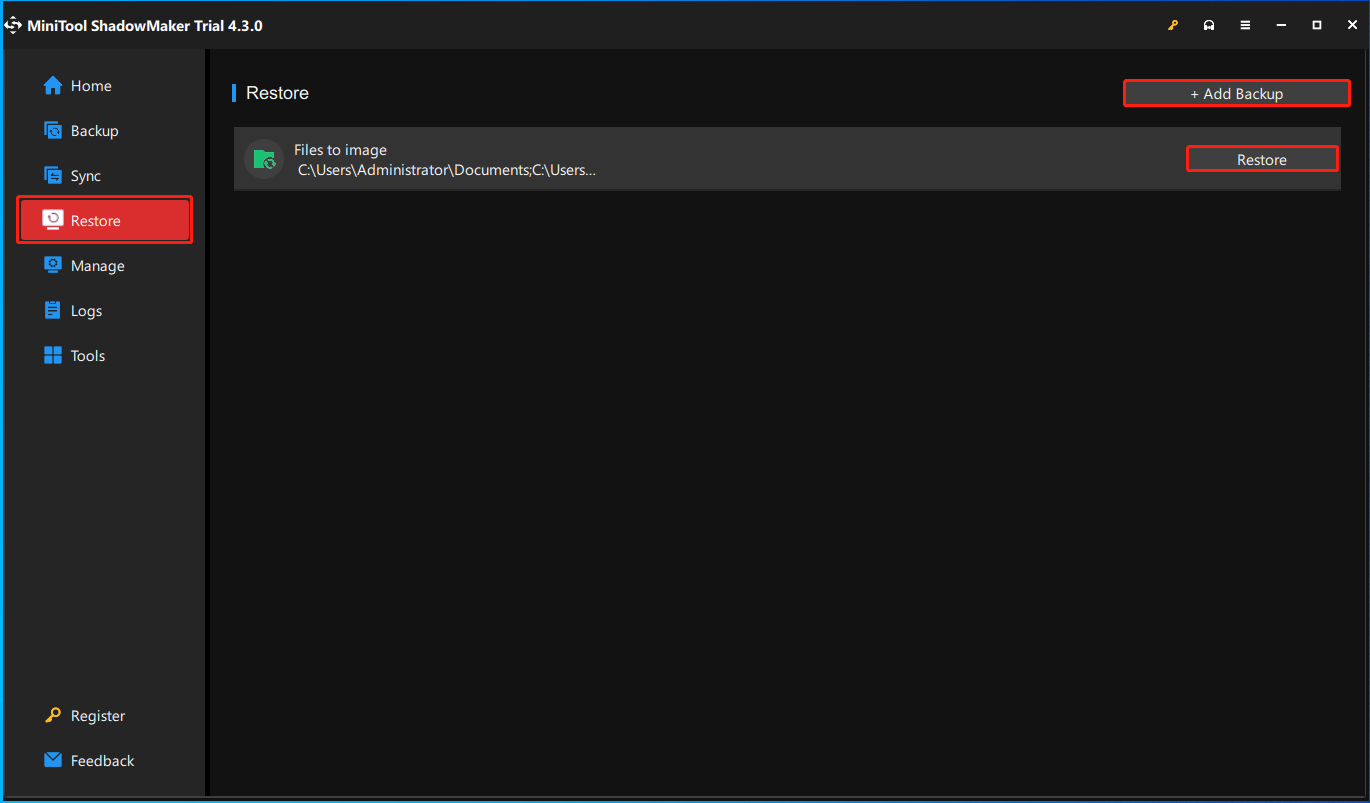
Step 2: In the pop-up window, select the file restore version and click Next.
Step 3: Then choose the files/folders to restore and click Next.
Step 4: Click Browse to choose a destination location to save the restored files. Then, click Start to begin the operation. MiniTool ShadowMaker will perform file image restoration quickly and show you the result.
Windows Server Backup vs MiniTool ShadowMaker
In the above part, you can learn how to back up Windows Server 2022 with Windows Server Backup and MiniTool ShadowMaker. There is no doubt that there are some differences between them. The following is about their similarity and difference. You can know which one is more suitable for you.
Similarities:
- Both of them can be used to back up the Server, restore backup images, and create a scheduled backup.
- Both of them can save image files to shared folders.
Differences:
- MiniTool ShadowMaker has more simple steps than Windows Server Backup.
- MiniTool ShadowMkaer can back up Windows 11/10/8/7 and Workstation while Windows Server Backup cannot.
- MiniTool ShadowMaker enables you to back up images to a USB flash drive. Windows Server Backup can’t do that.
- MiniTool ShadowMaker provides three backup schemes – full backup, incremental backup, and differential backup, while Windows Server Backup only can create a full backup.
- MiniTool ShadowMaker provides more features, such as Sync, Media Builder, Disk Clone, Universal Restore, Backup Compression, etc.
So, MiniTool ShadowMaker would provide you with more powerful features with easy steps. Download it and have a try.
MiniTool ShadowMaker TrialClick to Download100%Clean & Safe
Bottom Line
To sum up, this post has shown how to back up Windows Server 2022 files with Windows Server Backup and MiniTool ShadowMaker. If you have any problem with this post or MiniTool ShadowMaker, you can feel free to contact us via [email protected] and we will reply to you as soon as possible.
