Windows 11 Lag/Slow
As the successor to Windows 10, Windows 11 brings brand new designs and new & improved features. Of course, the system requirements of this new operating system are stricter. Before upgrading to or installing Windows 11, you need to perform a compatibility check using the PC Health Check app to make sure your PC is compatible with Windows 11.
If your computer meets the minimum system requirements of Windows 11, you choose to install this new OS. However, after using the PC for some time, Windows 11 gets slow. On slightly older PCs and devices with low configuration, Windows 11 runs a lot slower.
The reasons for Windows 11 lag are various, for example, an outdated operating system, insufficient RAM, usage of HDD instead of SSD, conflicts in security programs, low disk space, and more.
Fortunately, you can try some tips to make Windows 11 faster to get the best performance. Go to find what you should do from the following part.
How to Make Windows 11 Faster
Check for Windows Updates
This is an easy way you can try to speed up Windows 11 and follow the instructions below.
Step 1: Launch Windows 11 Settings by pressing Win + I.
Step 2: Navigate to the Windows Update page and click Check for updates to see if there are some available updates. If yes, download and install them on your PC. You are required to restart the PC several times to finish updates.
Disable Visual Effects
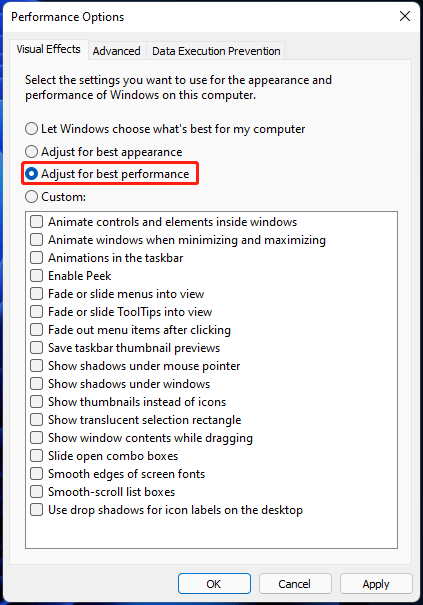
Windows 11 comes with many visual effects. But sometimes this can slow down the PC speed if the GPU is low-end. If you are using an old PC or a device with low configuration, disabling visual effects is a good way to fix the Windows 11 lag problem.
Step 1: Type advanced in the search box of Windows 11 and click View advanced system settings.
Step 2: Click Settings under the Performance section.
Step 3: Check the box for Adjust for best performance.
Step 4: Click Apply and OK. After changes take effect, visual effects will be adjusted or disabled according to the need for the best performance.
Disable Startup Programs
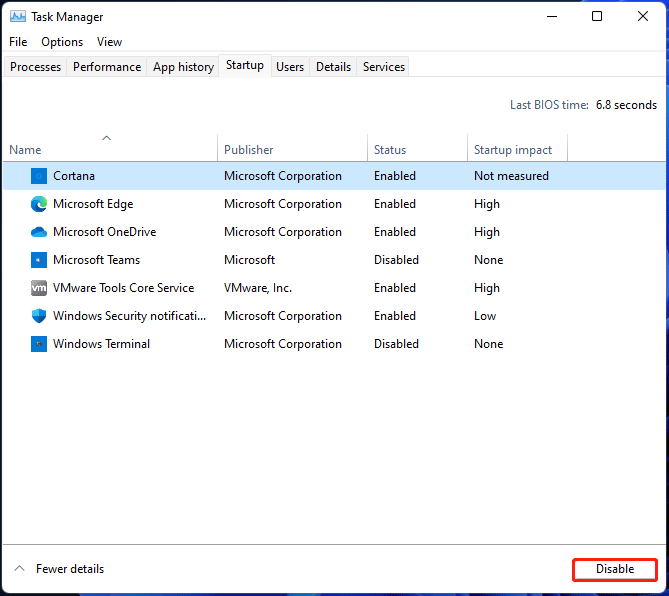
There may be many unnecessary programs running in the background when starting up Windows 11, which can eat up most of the memory and slow down the boot speed. To speed up Windows 11 boot, you can choose to turn off startup apps from Task Manager.
Step 1: Right-click on the Start button and choose Task Manager.
Step 2: Under the Startup tab, click the app and choose Disable.
Alternatively, you can disable startup apps to make Windows 11 faster by going to Settings > Apps > Startup.
Use High Performance Power Plan
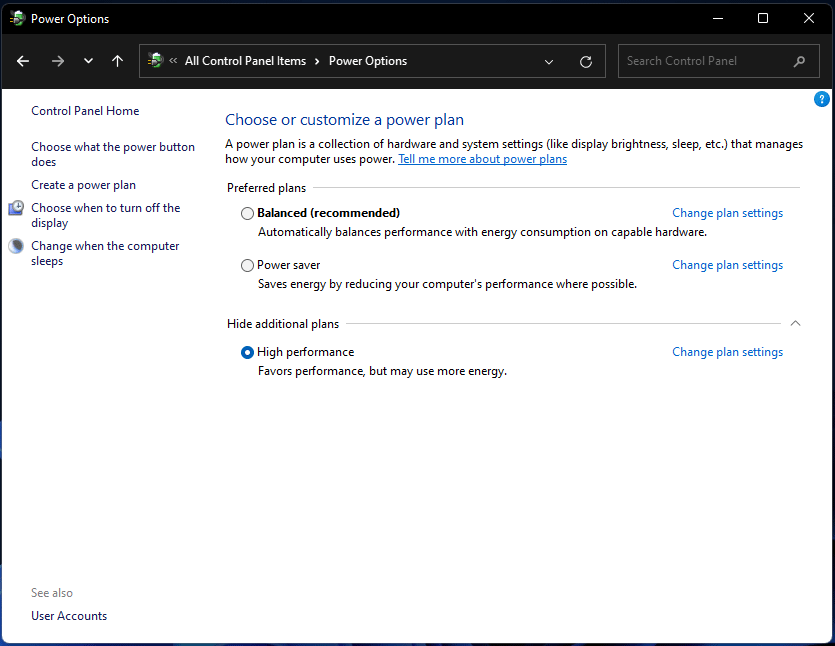
By default, the power plan is set to Balanced to keep the battery life. If you don’t care about the battery life, you can change the power plan to High performance to get the best PC performance.
Step 1: Open Control Panel in Windows 11 via the search box.
Step 2: Click Power Options.
Step 3: In the pop-up window, select High performance.
Run a Disk Defrag
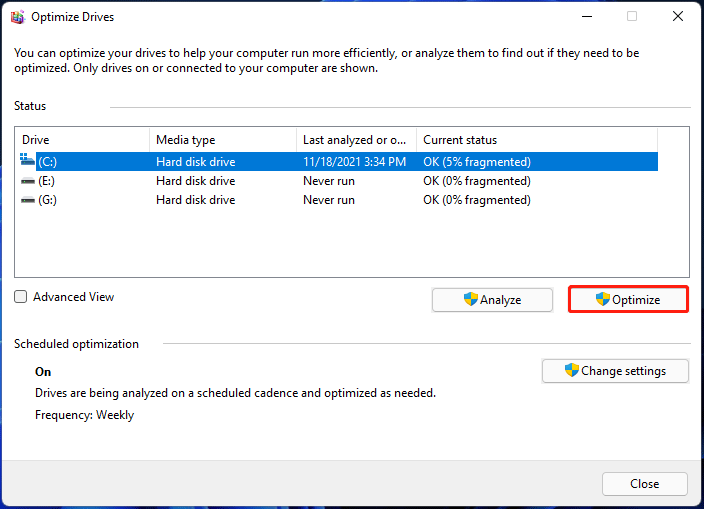
On a computer, files on the hard disk can become scattered and there are more and more fragments with time, which forces the hard disk to do additional work. As a result, the running speed of your computer gets slow. To make Windows 11 faster, you need to perform a disk defrag by following the instructions.
Step 1: Click the search button, type defragment and click Defragment and Optimize Drives.
Step 2: Choose the drive you want to defragment and click the Optimize button to start the process.
Remove Temporary Files
As time goes on, your PC may be cluttered with many temporary files like thumbnails, previous version files, delivery optimization files, update logs, downloads, cache, feedback diagnostics, temporary internet files, and more. These files can let your device run at a slow speed.
You can choose to clear these junk files to make Windows 11 faster for the best performance.
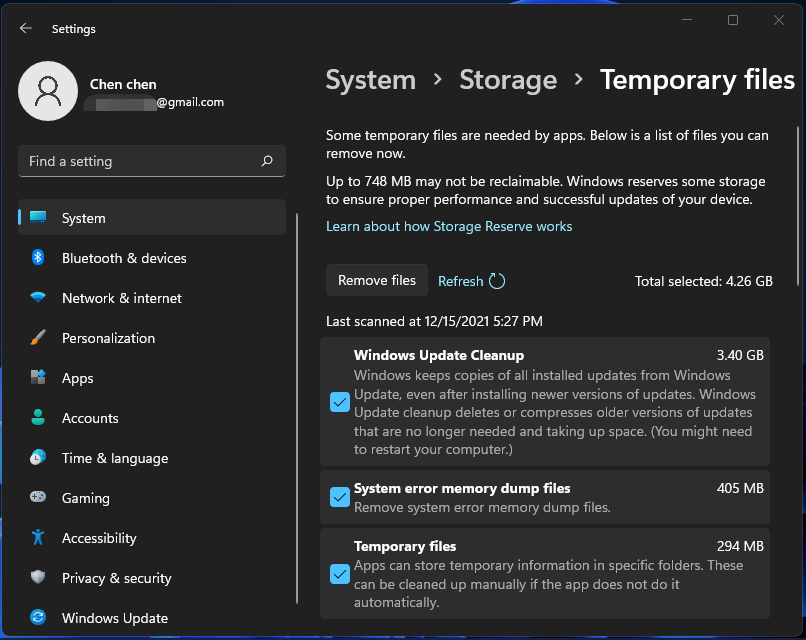
Step 1: Launch the Settings app and go to the System tab.
Step 2: Click Storage > Temporary files. Windows will take some time to scan the temp files
Step 3: Check the boxes of items you want to delete and click Remove files.
Besides, you can press Win + R, type %temp%, and click OK to open the Temp folder. Press Ctrl and A to choose all the items and delete them. Click Continue to confirm the deletion. If some files are in use, skip them. You can check the box of Do this for all current items and continue.
Enable Storage Sense
To free up disk space to make Windows 11 faster, here is another way you can have a try and it is to enable Storage Sense. This feature can help to delete unnecessary files and temporary files and automatically keeps the disk space free from junk files.
Follow these steps:
Step 1: Navigate to Settings > System.
Step 2: Click Storage and go to Storage Sense to enable this feature.
Disk Cleanup
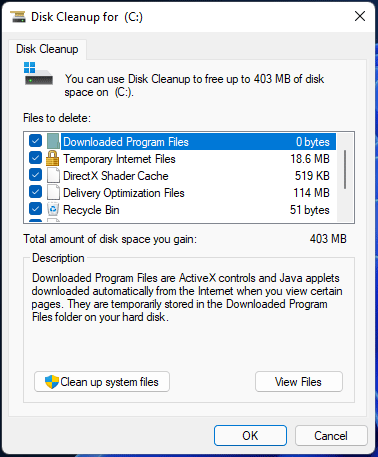
To clear unnecessary files and temporary files, you can also run Disk Cleanup to make Windows 11 faster if the PC runs slowly.
Step 1: Type cleanmgr in the search box and click Disk Cleanup to run this app.
Step 2: Choose the drive you want to clean up and click OK.
Step 3: Check the boxes of files to delete and click OK.
Uninstall Unnecessary Programs
On your computer, you may install many programs and apps. Some are useful and some are unnecessary. To speed up Windows 11, you can choose to uninstall unused software since the PC becomes slower when the load is more.
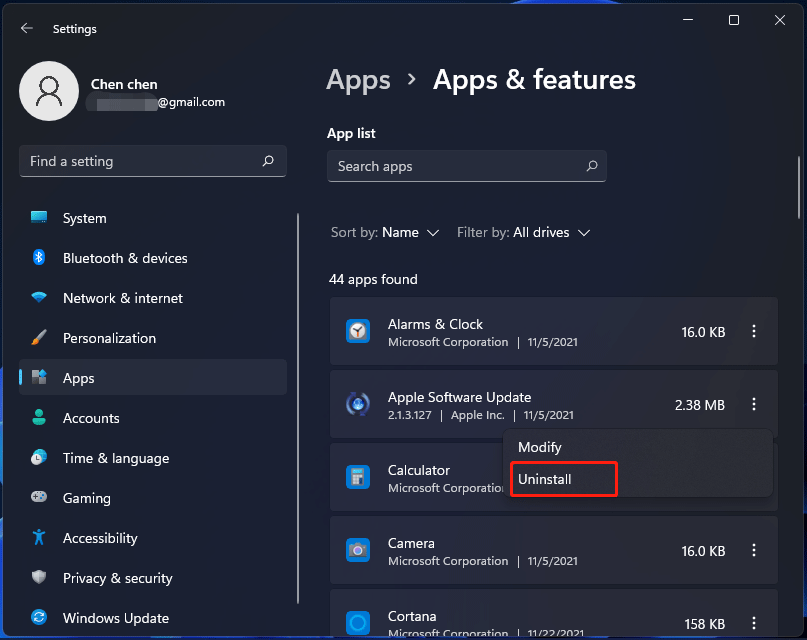
Step 1: Go to Settings > Apps.
Step 2: Click App & features and you can see a list of apps that have been installed on your PC.
Step 3: To uninstall unnecessary programs, go to each app, click the three-dots menu and choose Uninstall.
Alternatively, you can open Control Panel, click Uninstall a program, right-click on a program and select Uninstall. In addition, there are some other ways to remove unnecessary apps and you can refer to this related article – Four Perfect Ways – How to Uninstall Programs in Windows 10/11.
Update Drivers
When talking about Windows 11 lag problem, you should also consider driver update. If the drivers are outdated, the system may be slow. To speed up Windows 11, make sure your drivers are upgraded to the latest version, especially the graphics card driver.
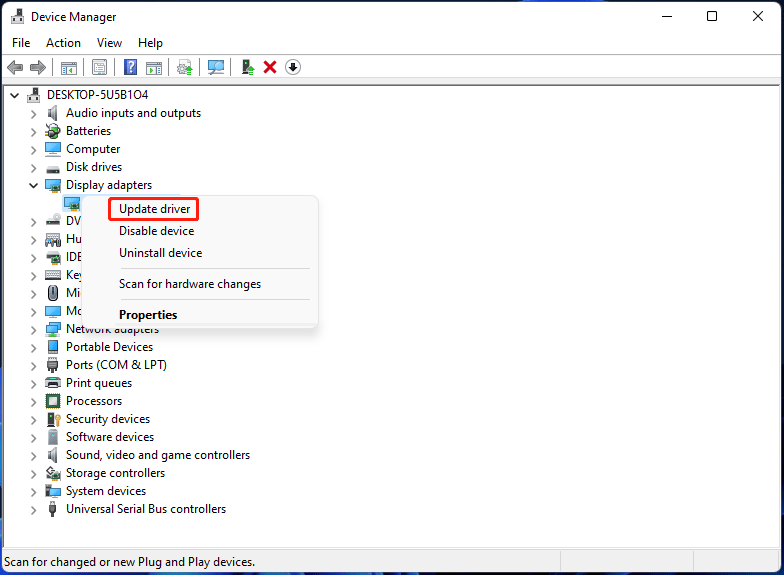
Step 1: Launch Device Manager in Windows 11 via the WinX menu.
Step 2: Expand Display adapters, right-click on the GPU driver and choose Update driver.
Step 3: Click the first option to let Windows automatically search for an available update and install it on your computer.
Eliminate Boot Menu Time-out
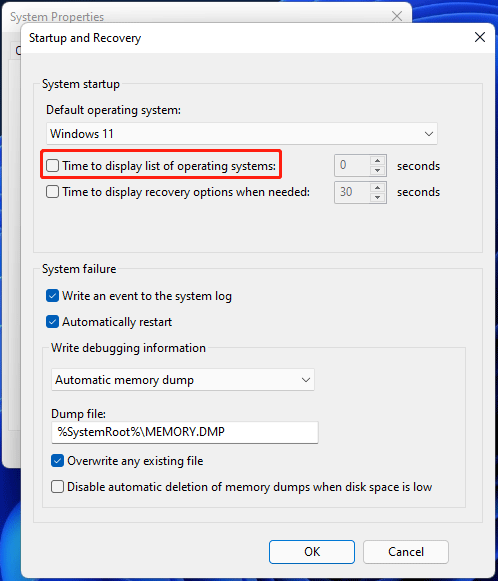
After booting the Windows, the PC can enter to an interface – Boot Menu Time-out that can determine how long the boot menu is displayed before loading the default boot entry. By default, the time-out is 30 seconds. To speed up Windows 11 boot, you can choose to disable Boot Menu Time-out.
Step 1: Type View advanced system settings to the search box and click the result to control the System Properties window.
Step 2: Click Settings under the Startup and Recovery section.
Step 3: Uncheck the box of Time to display list of operating systems.
Turn off Notifications
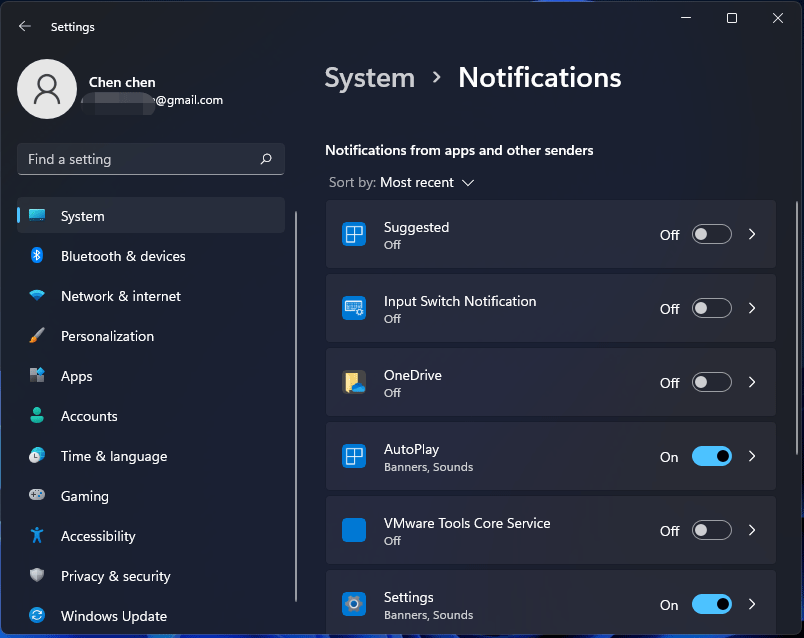
Windows 11 will send constant notifications to you and this process needs to continuously scan your computer, affecting the PC performance. To make Windows 11 faster, you can choose to turn off notifications.
Step 1: Go to Settings > System > Notifications.
Step 2: Disable notifications for unwanted applications. Besides, you can scroll down to uncheck the boxes for Offer suggestions on how I can set up my device and Get tips and suggestions when I use Windows.
Add More Memory to Your PC
If there is not insufficient RAM, Windows 11 can run slowly. To speed up the system for a long time, the best way is to add more memory to your computer or perform a memory upgrade. Here are two related articles for you:
- How to Add RAM to a Laptop? See the Simple Guide Now!
- How to Upgrade Or Replace The RAM On Your Computer
Migrate Windows 11 to SSD
If your Windows 11 system is installed on an HDD instead of an SSD, the boot time is longer, and the running speed is slower. To fix the Windows 11 lag problem and make Windows 11 faster, you can migrate Windows 11 to an SSD. Compared to an HDD, an SSD is faster.
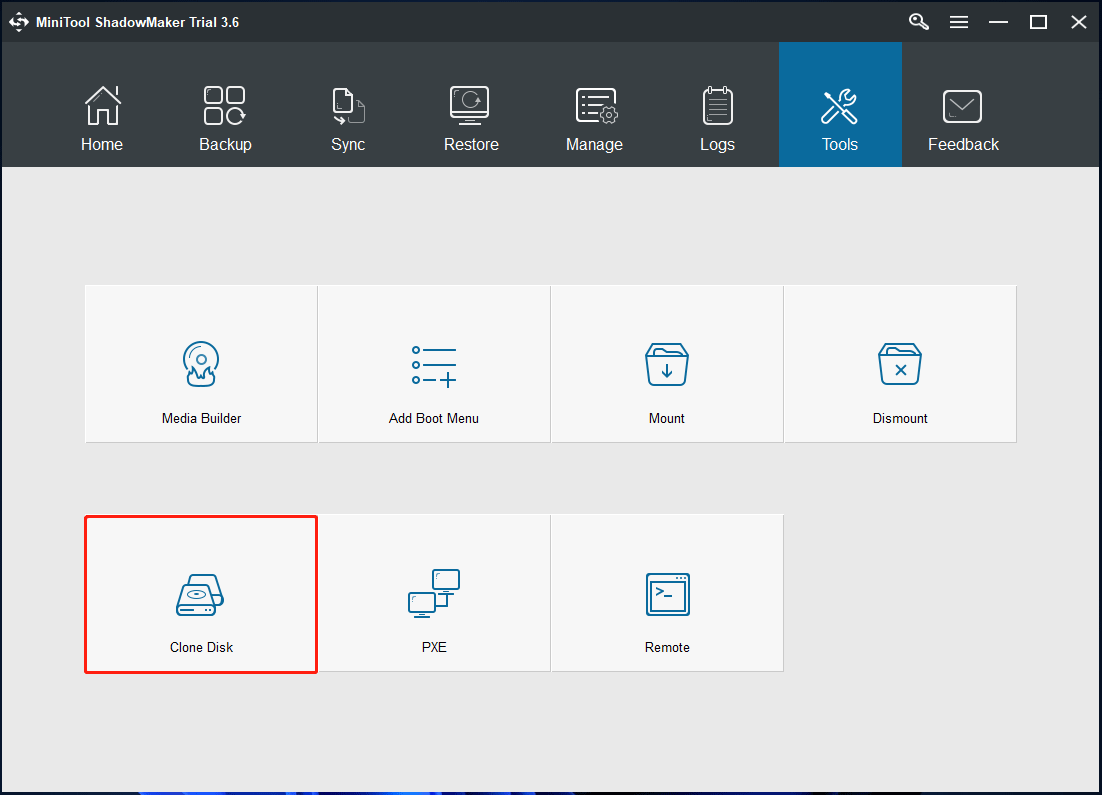
How to transfer Windows 11 to an SSD? A professional system migration tool is necessary and you can run MiniTool ShadowMaker. With its clone disk feature, you can easily clone the system disk to your SSD and the target disk can be bootable. After migration, replace the HDD with the SSD and you can enjoy the fast speed offered by the SSD.
MiniTool ShadowMaker TrialClick to Download100%Clean & Safe
Step 1: After downloading and installing MiniTool ShadowMaker on your PC, launch this cloning software.
Step 2: Click Keep Trial to continue.
Step 3: Go to the Tools page, click Clone Disk.
Step 4: Select the source disk and target disk and then click OK.
Step 5: The cloning process starts. After that, remove the HDD and put the SSD into the original place on your computer.
In addition to MiniTool ShadowMaker, you can use another Windows migration tool – MiniTool Partition Wizard. It has a feature called Migrate OS to SSD/HD Wizard that can be used to only transfer the system to another hard drive. Besides, you can also use its Copy Disk feature to clone the entire disk to an SSD. To deal with the Windows operating system, you need to get the Pro Edition or an advanced edition.
MiniTool Partition Wizard DemoClick to Download100%Clean & Safe
Tips to Make Windows 11 Faster for Gaming
If you are a player, how to make Windows 11 faster for gaming? There are some things you should do to optimize Windows 11 for gaming:
- Upgrade Windows 11 to the latest version
- Update the graphics card driver
- Delete temporary files
- Uninstall unnecessary apps
- Set the power plan to High Performance
- Run Disk cleanup
- Turn off hardware acceleration
- Turn on Game Mode in Windows 11
- Turn Off Xbox Game Bar
- More…
Final Words
How to make Windows 11 faster if the system goes slow? After reading this post, you find some useful tips Just try them and you can easily fix the Windows 11 slow issue to get the best performance. If you have other methods to optimize Windows 11, let us know in the comment section below.
