File/Folder In Use on Windows 10/11
The “File In Use” or “Folder In Use” error always happens when you want to delete, cut, or rename a file or folder on your Windows 10/11 computer. Usually, this error is used to remind you that the file or folder you want to transfer, edit, or delete is opened by another application or user. If you want to transfer a file or a folder, you need to close it beforehand.
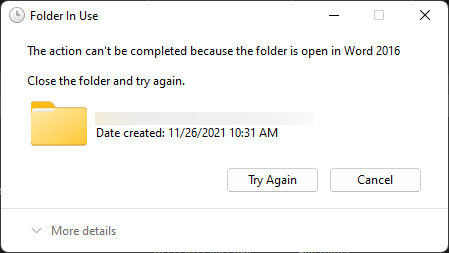
However, there are abnormal situations. That is, you keep receiving this error message even you have closed the target file or folder. This issue is annoying. But you can use the methods mentioned in this article to remove this File In Use or Folder In Use error on Windows 10/11.
How to Fix File In Use/Folder In Use on Windows 10/11?
If you want to remove the File In Use or Folder In Use error from your computer, you can uninstall the problematic third-party application or use other methods to delete the file or folder you can’t delete.
We collect some useful methods to help you remove the File In Use or Folder In Use error.
How to Remove File In Use or Folder In Use Error on Windows 10/11?
- Remove the problematic application
- Close all running applications
- Delete the file or folder in Safe Mode
- Use Command Prompt
- Modify the file extension of the problematic file
- View files or folders in Details
- Turn off thumbnail generation
- Obtain the right to delete the file or folder
- Remove the virtual hard drive
- Close the file using Resource Monitor
Method 1: Remove the Problematic Application from Your PC
Some users reflect that the third-party application Virtual Clone Drive is the cause of the File In Use or Folder In Use error. After uninstalling it from the computer, they can successfully transfer files and folders without disturbing by File In Use or Folder In Use. So you can also try this method to help you out.
Here are the methods to uninstall programs on Windows 10 and Windows 11: How to Uninstall Programs on Windows 10/11?
Method 2: Close All Running Applications
Usually, the issue occurs because the target file or folder is open by another application. At times, you think you have closed the application. But it is not like that. So, you can close all the running applications on your computer and then check when the error can disappear.
You can do this job using Task Manager.
- Right-click on the Start button in the taskbar and select Task Manager to open it.
- Click More details.
- Right-click the running application and select End task. Repeat this step to close all running apps.
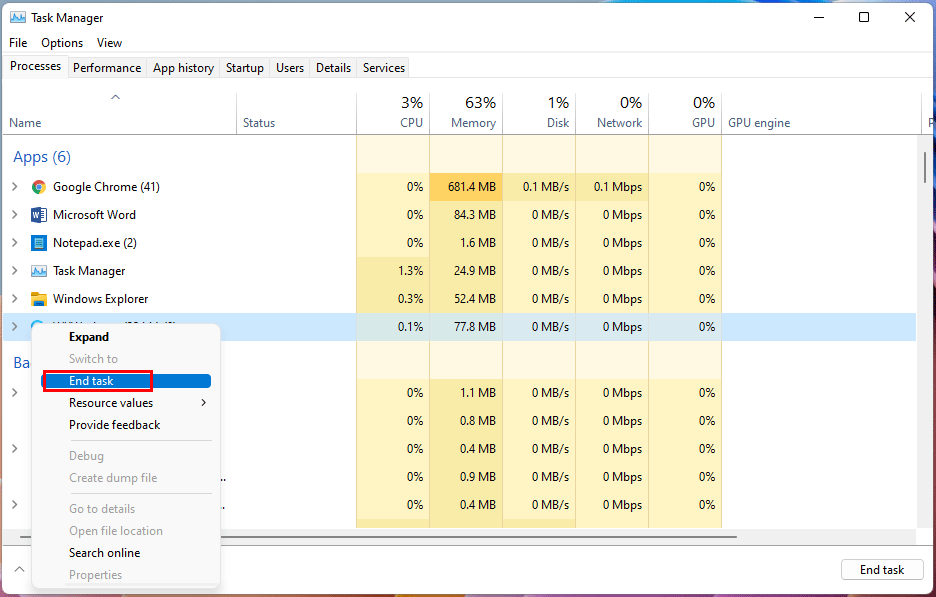
After closing all running applications, you can go to edit or delete the file or folder to see if the error goes away.
Method 3: Delete the File or Folder in Safe Mode
- Start your computer into Safe Mode.
- Find the target file or folder and then delete, cut, or rename it. You can check whether you can do it successfully.
If this method can’t solve your issue, you can try the next one.
Method 4: Use Command Prompt
If you want to delete a file but you can’t do it due to File In Use error, you can use Command Prompt to force delete it.
- Click the Search icon in the taskbar and type cmd.
- Right-click the first result and select Run as administrator to run Command Prompt as administrator.
- Right-click the file you want to delete and select Copy as path.
- Type del into Command Prompt and then paste the file path. You should not press Enter button.
- Open Task Manager and force close Windows Explorer.
- Switch to Command Prompt.
When the process ends, you can go to check if the target file is successfully deleted.
Method 5: Modify the File Extension of the Problematic File
Some users just remove the File In Use error by changing the file extension of the target file. You can also try this method.
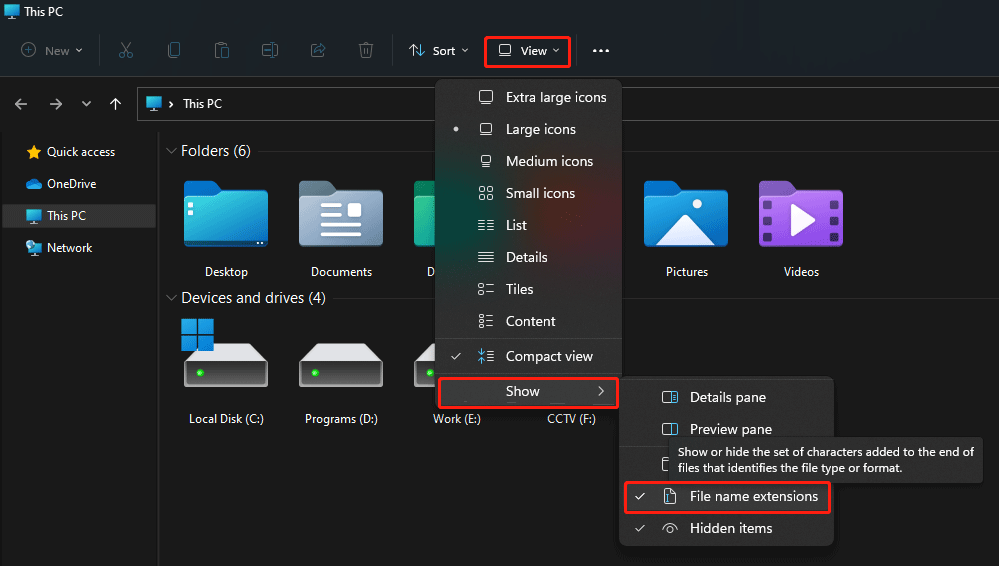
If you want to change the file extension, you need to make sure you can see the file extension. If not, you need to show file extension in advance.
Step 1: Show File Extension on Windows 10/11
How to Show File Extension on Windows 10?
- Open File Explorer on Windows 10.
- Click View from the top ribbon.
- Select File name extensions from the expanded menu.

How to Show File Extension on Windows 11?
- Open File Explorer on Windows 11.
- Go to View > Show > File name extensions. Make sure the File Name extensions option is selected.
Step 2: Change the File Extension for the Target File
- Right-click the target file and select Rename.
- Select the extension section and change it.
![]()
After changing the file name extension for the target file, you can go to check whether you can delete it successfully.
Method 6: View Files or Folders in Details
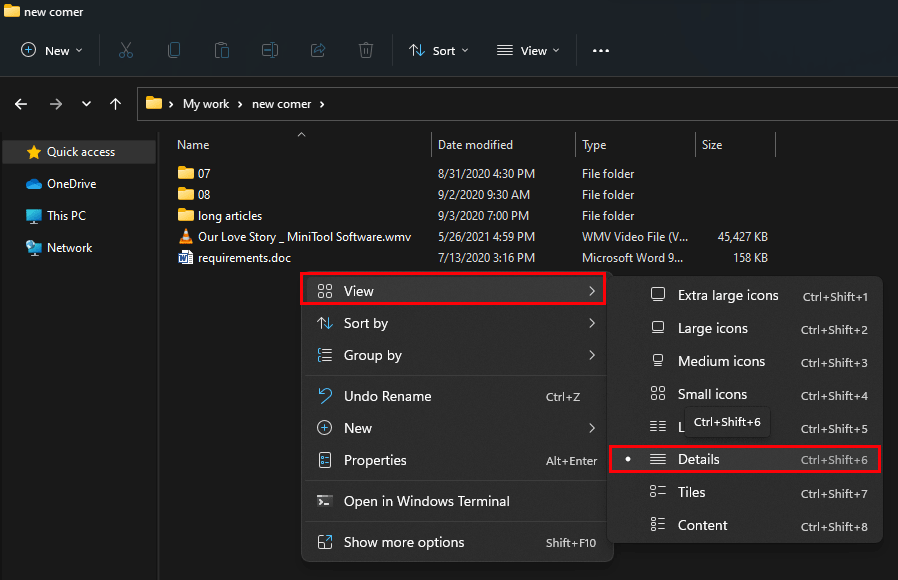
This method is strange. But some users say the File In Use or Folder in Use error disappears after they set to view files or folders in Details.
It is easy to do this. You can open the file location, right-click the empty space, and go to View > Details. Then, the files and folder on that location will be displayed with details. After that, you can take action to the target file or folder to see if the error goes away.
Method 7: Turn off Thumbnail Generation
How to Turn off Thumbnail Generation Using Local Group Policy Editor?
If you are using Windows 10/11 Pro or advanced edition, you can use Local Group Policy Editor to turn off thumbnail generation.
- Click the search icon in the taskbar and search for gpedit.msc.
- Select the first result to open Local Group Policy Editor.
- Go to this path: User Configuration > Administrative Templates > Windows Components > File Explorer.
- Double-click Turn off caching of thumbnails in hidden thumbs.db files to open it.
- Select Enabled.
- Click Apply.
- Click OK.
How to Turn off Thumbnail Generation Using Registry Editor?
If you are using Windows 10 Home or you can’t open Local Group Policy Editor on your computer, you can use Registry Editor to disable thumbnail generation.
Here is a guide:
- Click the search icon in the taskbar and type regedit.
- If you see the User Account Control interface, click Yes to continue.
- Select the first result to open Regedit Editor.
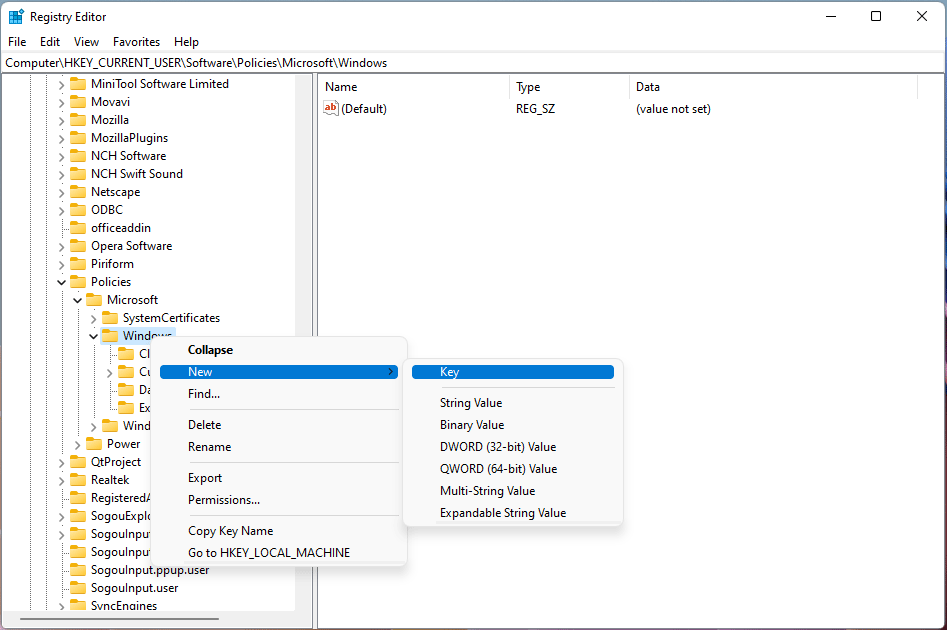
- Navigate to: HKEY_CURRENT_USER > SOFTWARE > Policies > Microsoft > Windows.
- Right-click the Windows folder (key). Then, go to New > Key.
- Name the new key Explorer.
- Click the new Explorer key. Then, right-click the empty space in the right panel.
- Go to New > DWORD (32-bit) Value.
- Name the new DWORD DisableThumbsDBOnNetworkFolders.
- Double-click the new DWORD to open it.
- Change its value to 1.
- Click OK to save the change.
- Click Registry Editor.
- Restart your computer.
Method 8: Make sure You Have the Right to Edit the File or Folder
If you want to delete, cut, rename, or transfer a file or folder, you need to make sure that you have the right to do this.
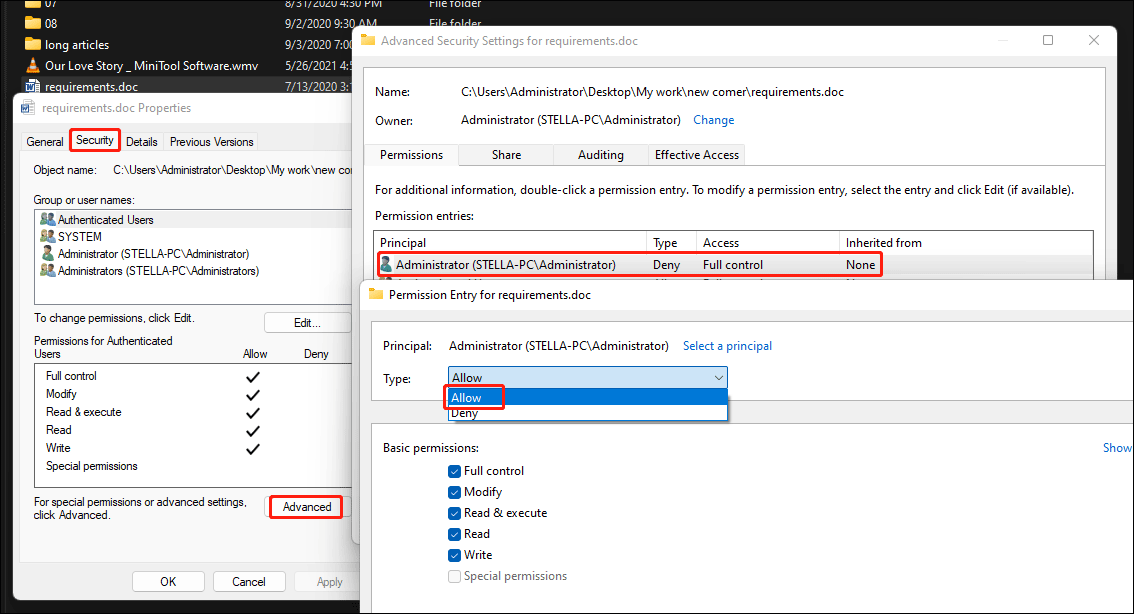
- Right-click the target file and select Properties.
- Switch to the Security tab.
- Click your user name under the Group or user names section.
- Check if you have the permissions to control the file. If not, you need to click the Advanced button to continue.
- Double-click your user name under the Permission section.
- On the pop-up interface, select Allow for Type.
- Click OK.
- Click Apply.
- Click OK.
- Click OK.
Now, you can try to delete, cut, rename, or transfer the file again to see if the error windows disappear.
Method 9: Uninstall the Virtual Hard Drive
If you encounter Folder In Use or File In Use error on Windows 10/11 when you want to delete virtual hard drive files, you can uninstall the virtual hard drive on your computer and then check if you can delete that file.
- Right-click Start in the taskbar and select Disk Management from the WinX menu to open it.
- Find your virtual hard drive, right-click it, and select Detach VHD.
- Click OK when you see the confirmation.
Now, you can try to delete that virtual hard drive file to see whether you can do it successfully.
Method 10: Close the File Using Resource Monitor
- Click the search icon in the taskbar and type resmon.
- Select the first result to open Resource Monitor.
- Switch to the CPU tab.
- Expand the Associated Handles section.
- Enter the name of the target file in the Search Handles field. Then, you can see a list of the associated application.
- Right-click the related application and select End Process.
After these steps, you can go to check whether you can delete that file without the File In Use error.
Bonus Tip: Recover Your Mistakenly Deleted Files Using MiniTool
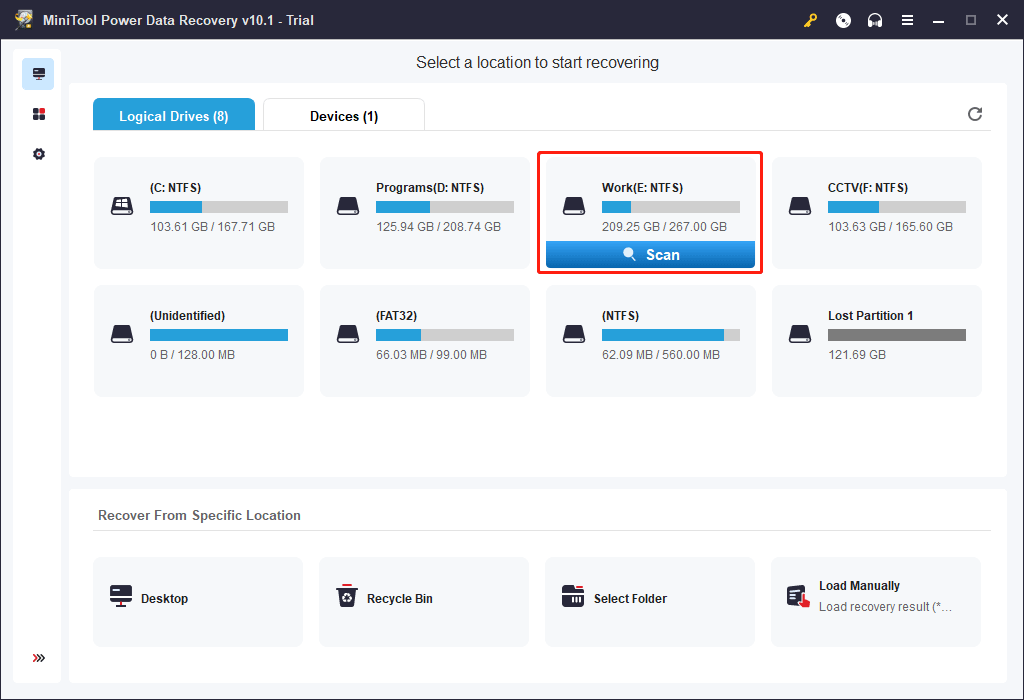
If you delete a file or folder by mistake, and you want to get it back, you can try a professional data recovery software like MiniTool Power Data Recovery.
This free file recovery tool is specially designed to recover all kinds of files from different types of data storage devices like computer hard drives, memory cards, SD cards, pen drives, and more. It works on Windows 11, Windows 10, Windows 8.1/8, and Windows 7.
This software has a trial edition. You can use it to scan the drive you want to recover data from. If you can find your needed files from the scan results, you can use a full edition of this software to recover all your needed files without limits.
MiniTool Power Data Recovery TrialClick to Download100%Clean & Safe
Bottom Line
Bothered by the File In Use or Folder In Use error when you want to delete, cut, rename, or transfer a file or folder on your Windows 10/11 computer? You can just try the methods mentioned in this post to help you out.
Should you have any other related issues, you can let us know in the comment or contact us via [email protected].


![How to Recover Lost and Deleted Files in Windows 11? [6 Ways]](https://mt-test.minitool.com/images/uploads/2021/08/how-to-recover-deleted-files-windows-11-thumbnail.jpg)