Shared network drives help users to share and edit files simultaneously. However, since this network drive doesn’t belong to your local drive, the deleted files will disappear from your computer directly. How to recover deleted files from a network drive? Is it possible to restore files from the network drive? This post on MiniTool will tell you the answers.
A network drive is one type of computer drive that is shared on another computer on the same network. In fact, a network drive is quite useful both at home and at work. You can get the same content from different devices on the same network and are able to edit, view, and delete files without saving them to the current computer. However, using a network drive to edit files still has some disadvantages. One of them has troubled many people: How to recover deleted files from a network drive?
So it seems I've accidentally deleted a backend file of the current access database I've been working on which was apparently stored on a shared Network drive. The files were not sent to my recycling bin and I unfortunately didn't have anything set up to restore previous versions. – TRCvicanswers.microsoft.com
Where do Files Deleted from a Network Drive Go
As TRCvic said, why don’t the files deleted from the shared network drive go to the Recycle Bin? If they are not in the Recycle Bin, where do they go?
When you try to delete files from a network drive, you will receive a prompt window that asks whether you want to permanently delete this file/folder, even though you try to perform a simple delete. This is because when you press the Delete key on the shared network folder, Windows sends a message to the network operating system to delete the chosen file. The file is not deleted by your computer; thus, there is no deleted file in your Recycle Bin.
How to Enable Recycle Bin in Network Drive
But you can make the Recycle Bin coverage include the Network Drive. After this, you are able to recover deleted files from a network drive Recycle Bin.
Step 1: Map a network drive to the network share. You should make sure that the drive is connected when logging in.
Step 2: Press Win + E to open File Explorer, then go to Local disk (C:) > Users > username.
Step 3: Right-click on any folder and choose Properties from the context menu.
Step 4: Switch to the Location tab.
Step 5: Choose Move, then click the Select Folder button when you find the drive you mapped in step 1.
Step 6: Select OK > Yes in sequence.
You should repeat all the above steps for every user on the computer.
How to Recover Deleted Files from a Network Shared Folder
Since many people are not used to backing up files or extending the Recycle Bin coverage when working with network drive shared folder, they can’t find the deleted files on the local computer. Is it possible to recover deleted files from a network shared folders? The answer is positive.
Here are three methods for you to recover data from the remote drive.
Way 1: Recover Files by Restoring to Previous Versions from the Remote Drive
This method only works when you have backed up files by using File History or the Windows 7 backup and restore tool. Then, you can recover files by restoring them to the previous version.
Step 1: Press Win + E to open File Explorer.
Step 2: Find the target folder that contains the lost files and right-click on it.
Step 3: Choose Restore previous versions from the context menu.
Step 4: Select a proper version and click on the Restore button.
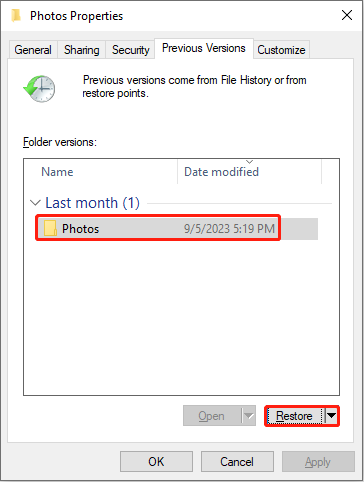
Step 5: In the prompt window, click Finish to complete the process.
After this, you can open the folder to check whether the deleted files are restored.
Way 2: Restore Files from the Recycle Bin of the Remote Drive
As explained before, deleting files from a network drive doesn’t operate by the local computer. Therefore, the Recycle Bin doesn’t store the deleted files. But you can find the files from the Recycle Bin of the remote drive (the lead drive).
Step 1: Double-click on the Recycle Bin icon on the lead drive.
Step 2: Find and select the deleted files you need to restore.
Step 3: Right-click on them and choose Restore from the context menu.
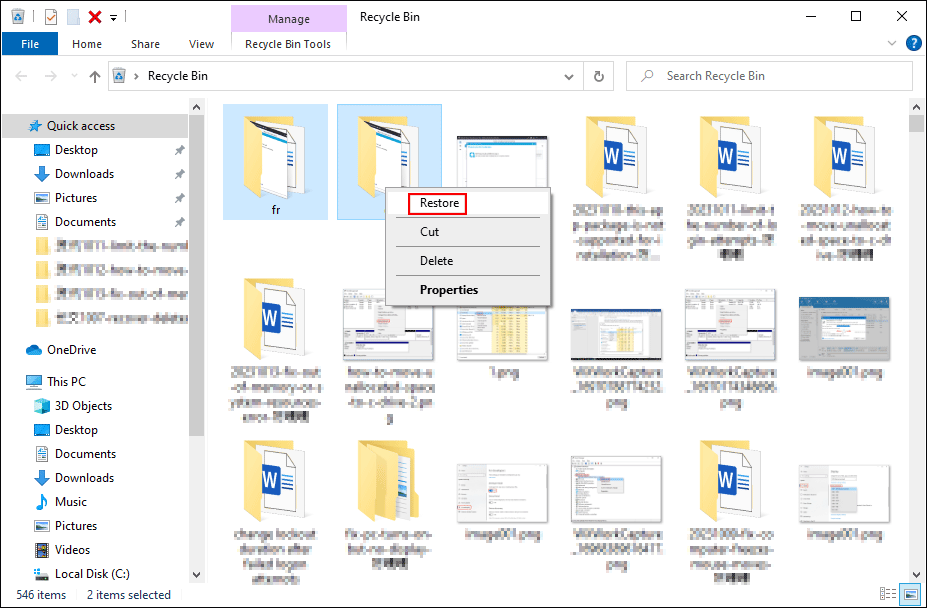
Then, you can check whether the files are stored in the network shared folder. If not, please move on to the next method.
Way 3: Recover Files with MiniTool Power Data Recovery on Remote Drive
This is the most effective way that you can successfully retrieve files in many cases. MiniTool Power Data Recovery specializes in recovering deleted files, photos, videos, audio, and other types of files. You can save the restored files to where you want; thus, these files can be easily found.
Besides, MiniTool Power Data Recovery also works well in external hard drive recovery, SD card recovery, USB data recovery, and more. This free file recovery software provides a secure data recovery service that causes no damage to your original files.
MiniTool Power Data Recovery FreeClick to Download100%Clean & Safe
Step 1: Download and install MiniTool Power Data Recovery on the remote drive.
Step 2: Launch the software to enter the main interface. You should choose a partition that includes the shared folder to scan.
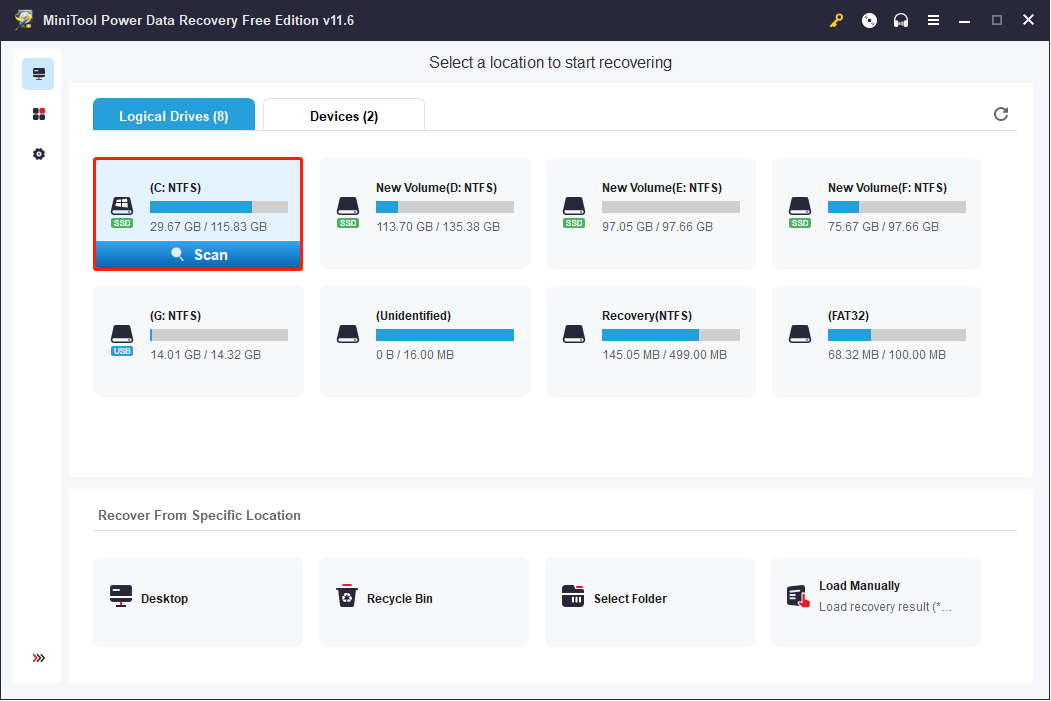
Step 3: Wait for the scan process to complete. The found files will be divided into three folders according to their existing type: Deleted Files, Lost Files, and Existing Files. You can expand different paths to find the wanted files. Or you can try some practical features to quickly locate files.
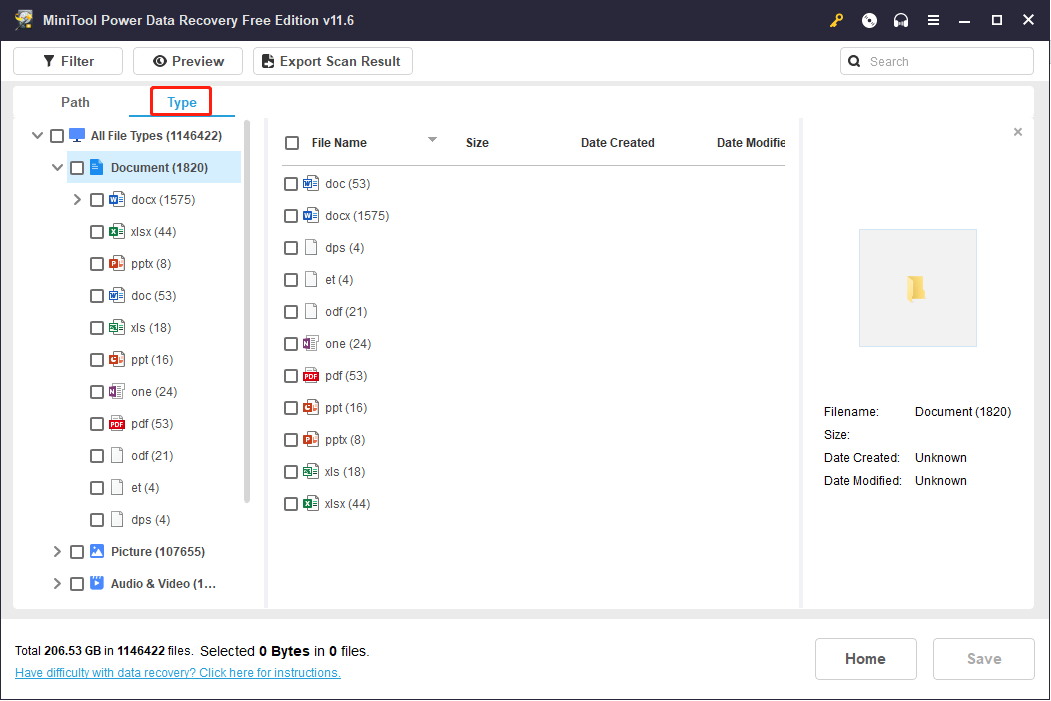
Type: The Type category list displays files according to their different types. This function reduces searching time significantly when you only need to retrieve a certain type of file, like documents, pictures, archives, etc.
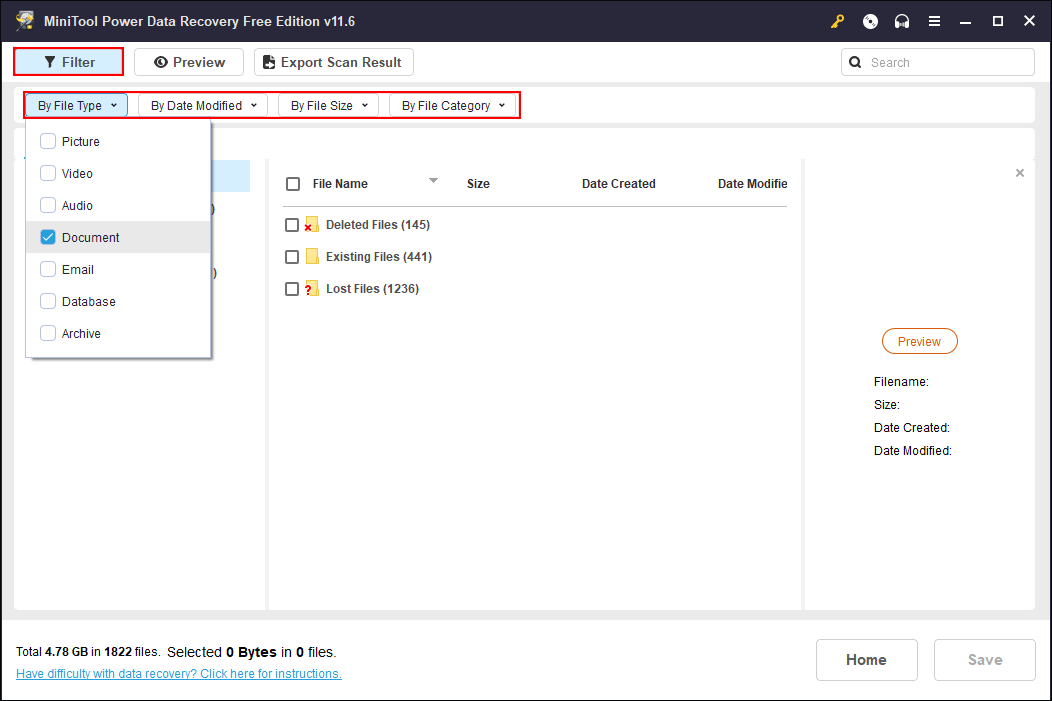
Filter: You can filter out unwanted files by setting some filter criteria, including file size, file type, file category, and file modified date. This is a more personalized feature that allows you to narrow down the file list based on your demand.
Search: If you remember the partial or full name of the file/folder you need to recover, input it into the search box. The matched files will be listed on the search result page. This function helps you to find a specific file effectively.
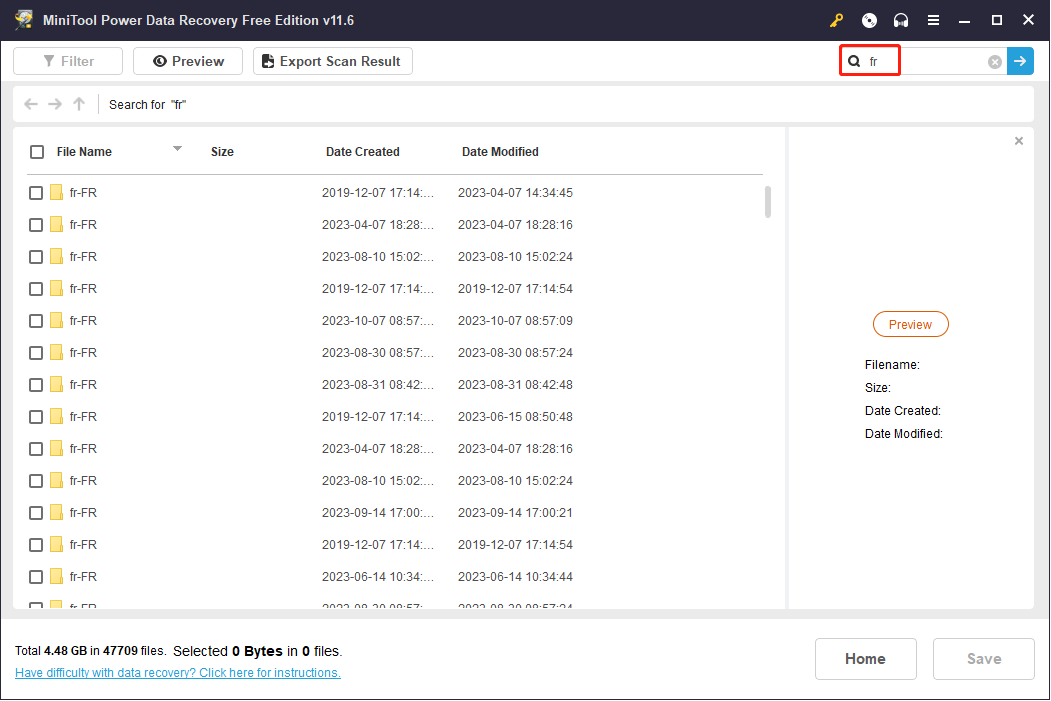
Besides, you can make use of the Preview function when checking the correction of the chosen file by clicking on the Preview button on the top toolbar or on the right-side pane. This feature allows you to preview photos, videos, documents, and audio files, while the previewed video and audio files should be less than 2GB in size.
Step 4: Add check marks in front of the files you want to restore, then click on the Save button.
Step 5: Choose an appropriate path to save files and click OK to confirm. To avoid data recovery failure due to data overwriting, do not save files to the original path.
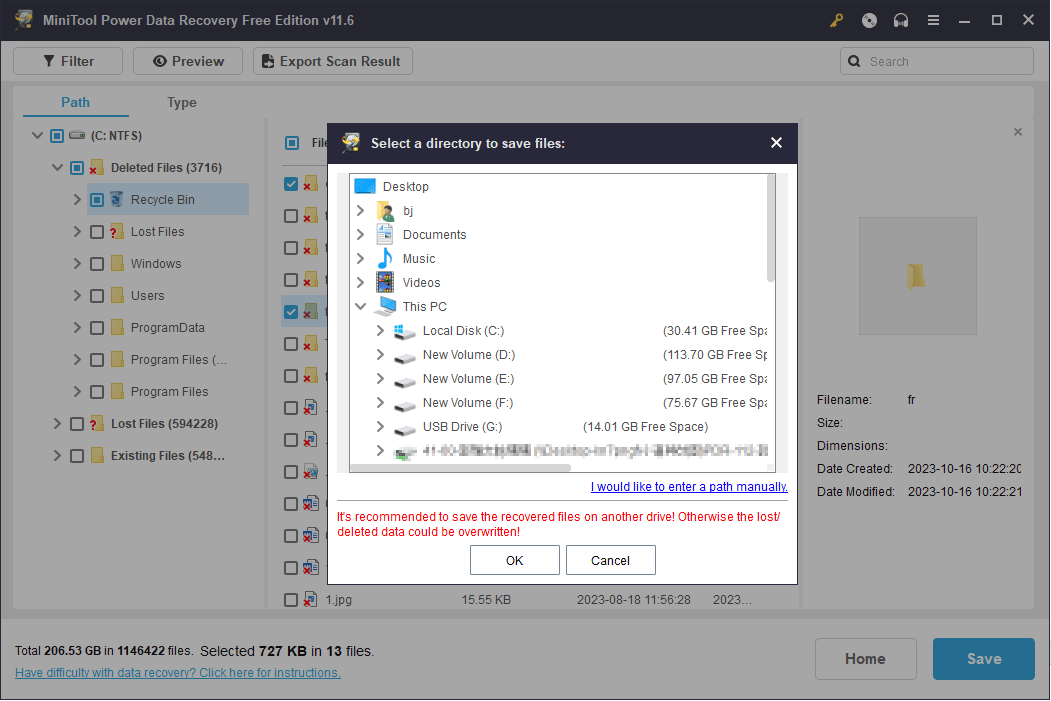
When the data recovery process is completed, you can go to the chosen destination to check the restored files, then move them to the network shared folder.
Bonus Tip: How to Protect Files in Network Drive
Same as we stored data on other devices, backing up files is always the safest way to protect files from mistaken deletion or unexpected loss. But most of you don’t have the habit of backing up. You can back up the network drive to the local computer which will not only protect data but also allow you to work with these files without the internet.
Step 1: Press Win + E to open the File Explorer.
Step 2: Find the network drive and double-click to open it.
Step 3: Select the folder you want to back up to the local computer, then copy and paste it to the location you want to store.
This is the only way for you to back up files on a network drive.
But it is more important to back up files on the shared drive. Apart from using Windows built-in tools, you can also use third-party software to help you back up files automatically and periodically.
MiniTool ShadowMaker is a professional free backup tool. You can use this software to back up files, folders, partitions, and disks. Furthermore, it allows you to perform incremental and differential backups to avoid duplicate files and set backup cycles based on your needs.
You can try the free edition of MiniTool ShadowMaker and back up files for free for 30 days.
MiniTool ShadowMaker TrialClick to Download100%Clean & Safe
How to Map a Network Drive
Mapping a network drive allows you to access files quickly from File Explorer, without typing network address every time. Here I’ll briefly introduce you to how to map a network drive on your computer.
Firstly, you should ensure that your computer has enabled network discovery.
Step 1: Press Win + S and type Control Panel into the search bar.
Step 2: Click on View network status and tasks under the Network and Internet option.
Step 3: Select Change advanced sharing settings on the left pane.
Step 4: Choose Turn on network discovery and click Save changes.
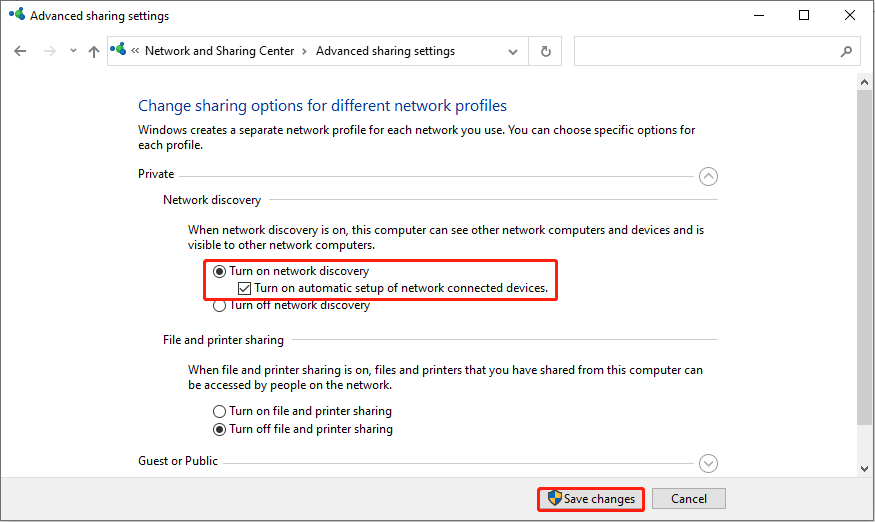
Secondly, follow the next steps to map a network drive.
Step 1: Press Win + E to open File Explorer.
Step 2: Choose This PC on the left pane, then select the Computer tab.
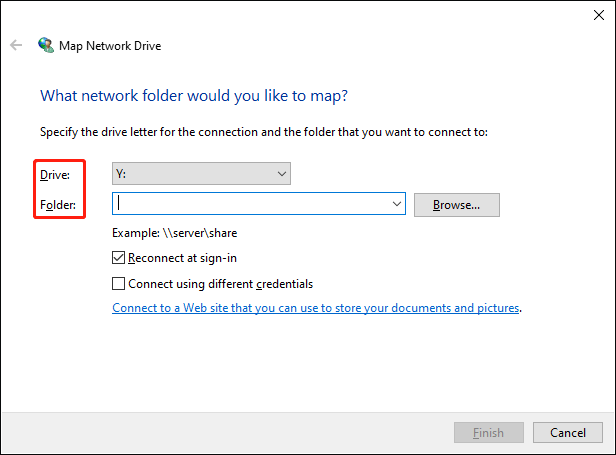
Step 3: Choose Map network drive from the drop-down menu of the Map network drive option.
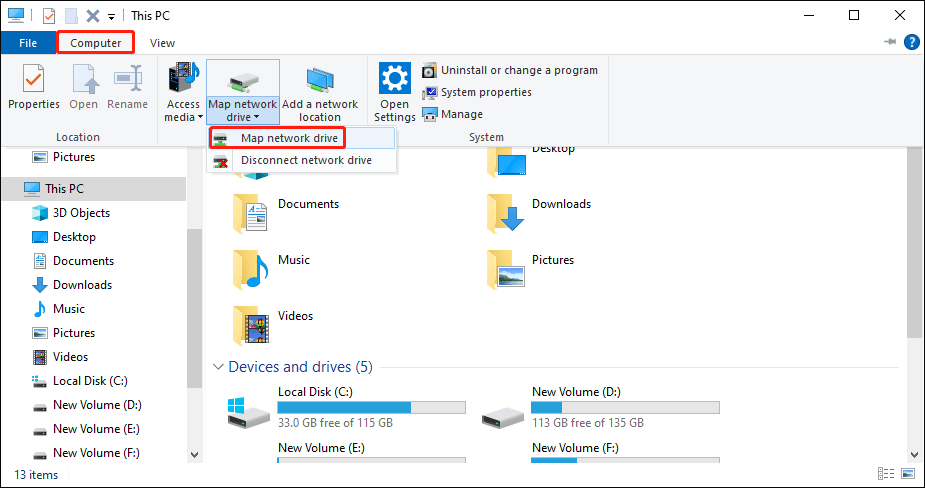
Step 4: In the popup window, you can choose a drive letter you like, then select the shared folder. You can type the folder path as the Example shown into the text box or click on the Browse button to choose files from listed devices.
Final Words
A network drive makes it easier for multiple people to work on the same folder. Besides, it also helps save computer space. But it comes with a higher risk of losing files if you don’t back up the shared folder files. This post shows you several methods to recover deleted files from a network drive, and using MiniTool Power Data Recovery is the quickest and safest way to restore files.
MiniTool Power Data Recovery FreeClick to Download100%Clean & Safe
Hope this post provides useful information for you to restore files. Please feel free to contact us via [email protected] when you encounter problems with our software.
Recover Deleted Files from Network Drive FAQ
There are two methods for you to recover files from a network drive. Firstly, you can recover files from the backups or restore the folder to the previous version with File History. Secondly, make use of data recovery software. You can use third-party data recovery software to recover data from the remote drive directly.
![[Full Review] Windows 10/11 Backup Options of File History](https://mt-test.minitool.com/images/uploads/2021/05/windows-10-backup-options-thumbnail.png)
