What if recording files disappeared after hours of work on OBS? Is it possible to recover OBS recordings that are deleted, lost, or unfinished? This post on MiniTool will walk you through a full guide to recover deleted OBS recordings and repair corrupted ones separately.
About OBS Recording Recovery
Open Broadcaster Software, shortened as OBS, is a free and open-source application used to record videos or do a live stream. This software is available for Windows, Mac, and Linux. With professional features, you can create and edit your videos from different aspects, such as scene transitions, audio mix, and more.
After recording videos on OBS, it will automatically save video files on your computer. By default, those files are stored in the Videos folder for Windows users and in the Movies folder for Mac users. You can find and change the save file path with the following steps.
Step 1. Open OBS on your computer.
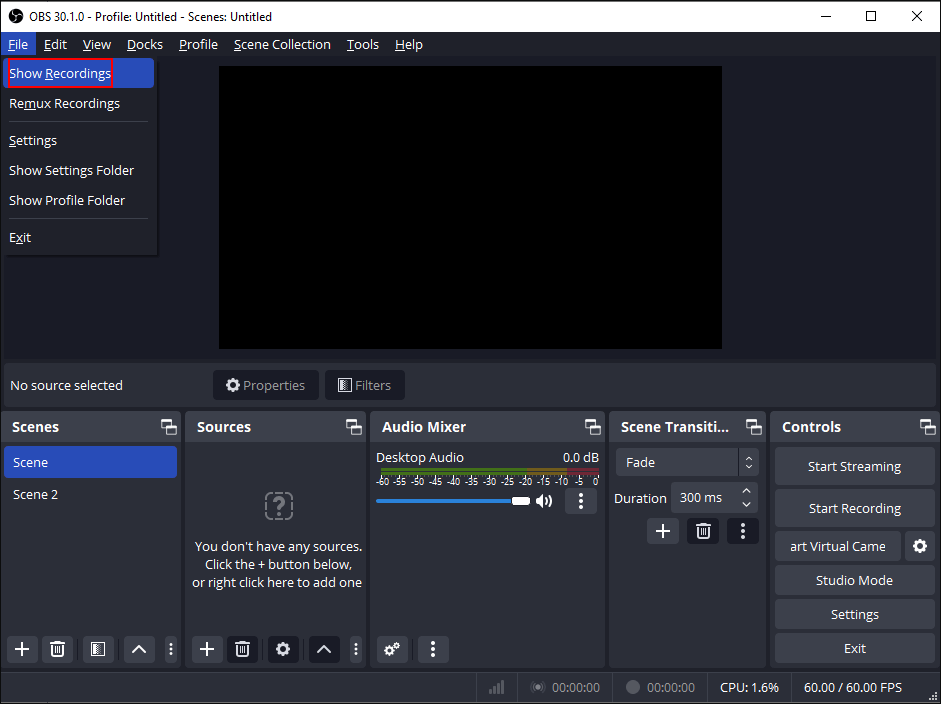
Step 2. Select File > Show Recordings to directly only the Videos folder on your computer.
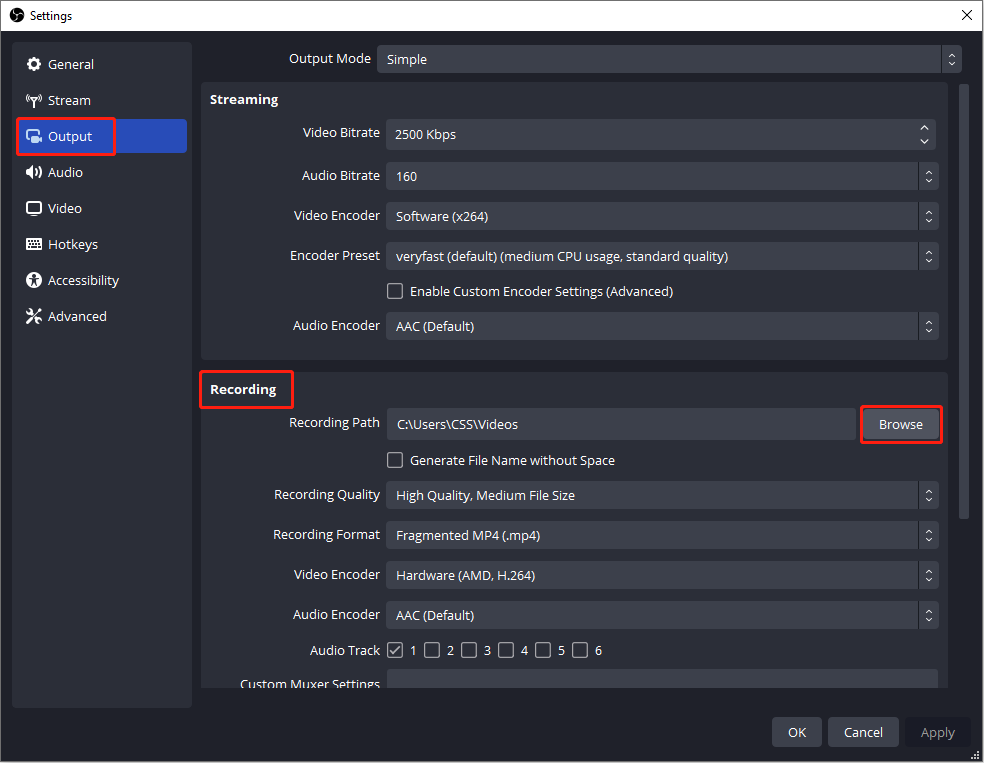
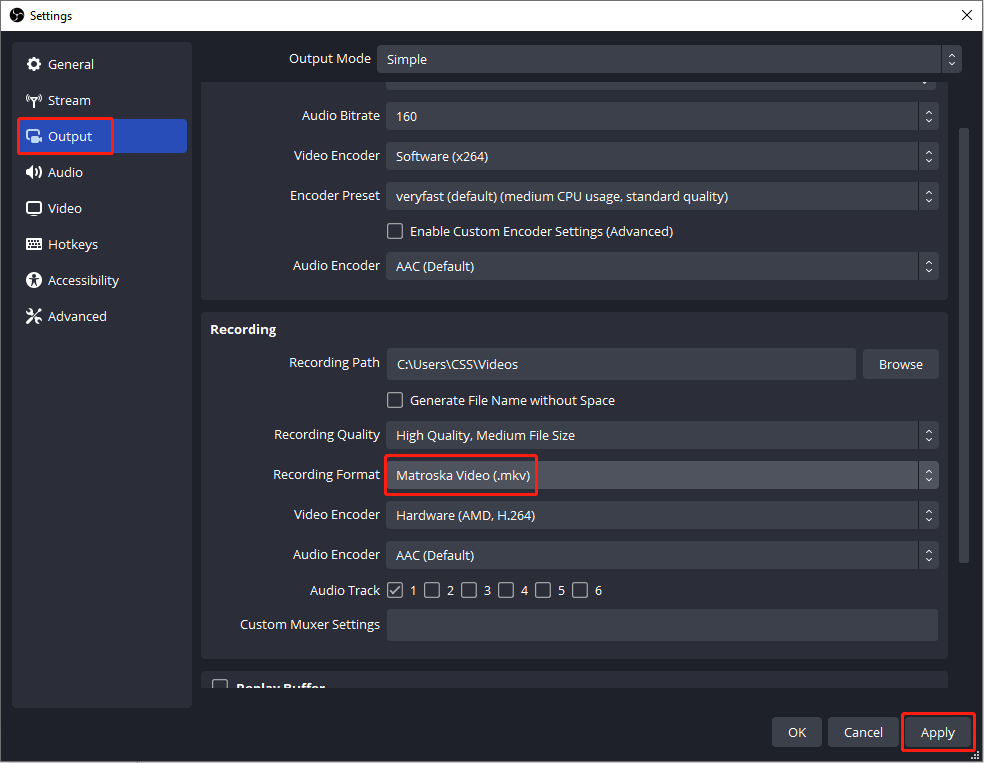
Step 3. Optionally, you can click on the Settings option at the bottom right. Switch to the Output tab to locate the Recording section. To change the save path, you can click on the Browse button to choose a preferred path. Afterward, click Apply to save your change.
How to Recover Deleted OBS Recordings
Data loss always happens suddenly without any signs, probably due to human errors, software glitches, device crashes, etc. No matter for what reasons, you should carry out measures to recover lost OBS recordings as soon as possible. Here are some solutions for you to recover OBS recordings on your computer.
#1. Restore OBS Recordings from the Recycle Bin/Trash
Recovering deleted files from the Recycle Bin or Trash is the go-to choice for common computer users. It is easy to complete a Recycle Bin recovery; thus, I will briefly introduce the recovery steps to you:
For Windows users: Double-click on the Recycle Bin icon on the Desktop > find and right-click on the required recording file > choose Restore from the context menu to recover the file to its original path.
For Mac users: Double-click on the Trash icon to open it > look through the file list to find the demand recording > right-click on it and choose Put Back.
#2. Recover Deleted OBS Recordings with MiniTool Power Data Recovery
In case no wanted files are stored in the Recycle Bin, professional data recovery software plays a crucial role in helping you get lost OBS recordings back. Taking price, compatibility, functions, and support into account, MiniTool Power Data Recovery is heartily recommended.
This free file recovery software supports recovering types of files including documents, photos, videos, audio, databases, etc. As long as the lost files are not overwritten, you can get this data recovery tool to have a try. Therefore, when finding your OBS recordings are lost in the saved folder, you should stop saving any new video files to the folder.
MiniTool Software provides several editions with different technique supports. You can get MiniTool Power Data Recovery Free by clicking the download button below to scan your computer and recover lost recordings if found.
MiniTool Power Data Recovery FreeClick to Download100%Clean & Safe
Step 1. Scan the target partition to find files.
After installing MiniTool Data Recovery Software on your computer, launch it to enter the main interface. If you haven’t changed the recording save path, you can choose the C drive under the Logical Drives tab to scan the partition.
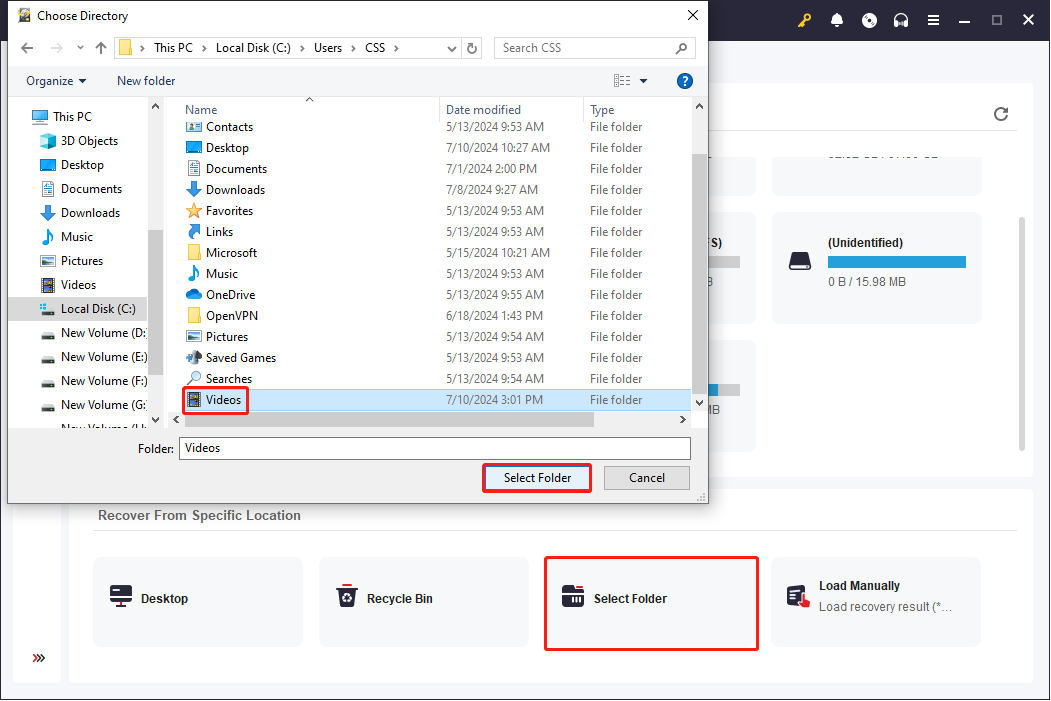
To shorten the scan process, scanning the specific save folder is a good choice. Click Select Folder at Recover From Specific Location, then navigate to the Videos folder and click Select Folder to confirm your choice. The scan process will start automatically.
Step 2. Find and verify files with multiple features
During the scan process, you can browse the found files. But for the best data recovery outcome, you should not stop the scan process in the mid-way. When the scan process is completed, you can expand different folders to find the required recording file. Here are some tips for you to enhance the efficiency of locating files:
Change to the Type tab and expand the Audio & Video option. You can choose the MP4 file format to only look through files in this format.
Click on the Filter button at the top toolkit, then set corresponding filter conditions to filter out unwanted items.
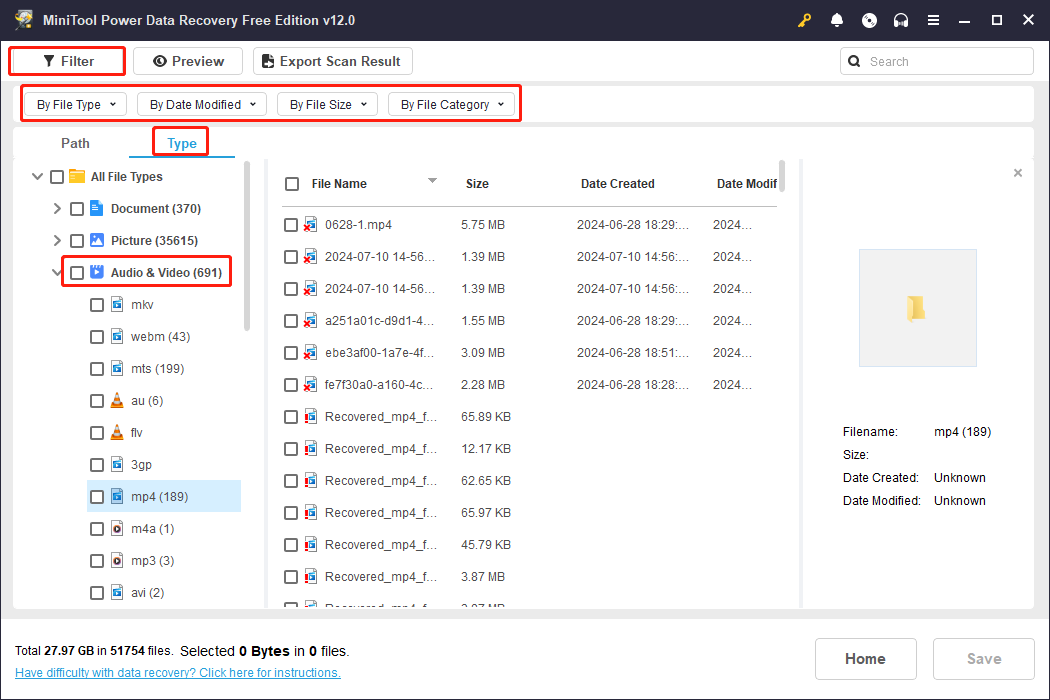
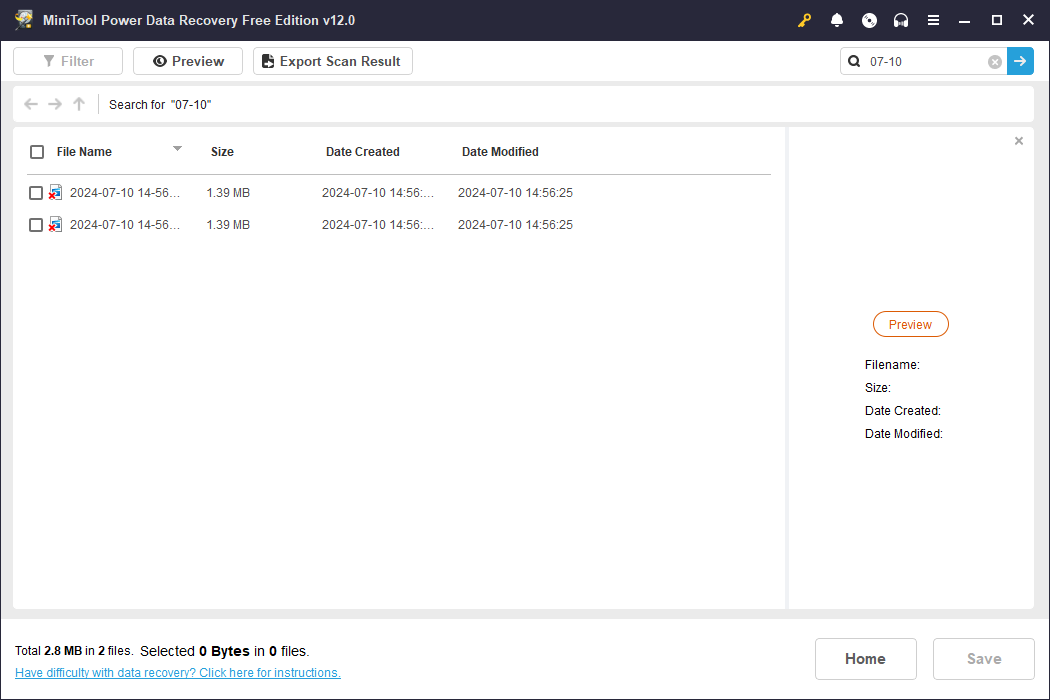
Type the file name into the search box at the top right corner and hit Enter to find matched files. For example, if you don’t change the recording name, you can type the recording date, 07-10, into the search bar.
Step 3. Restore the found recording
To verify if the found or selected file is the one you need, the Preview function matters. You can select the recording and click on the Preview button. The software allows you to preview documents, pictures, videos, and audio files without exceeding 2GB.
Tick the required recording file and click the Save button. In the small prompt window, choose a new path to save the restored recording. Do not save files to their original path, which may lead to data recovery failure due to data overwriting.
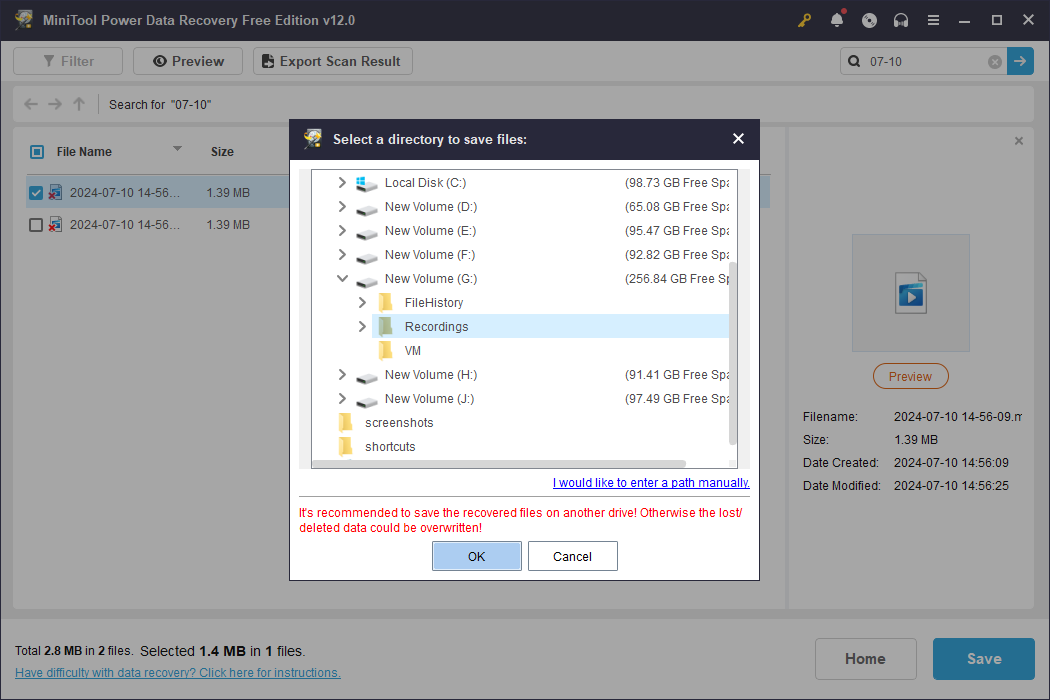
Please note that MiniTool Power Data Recovery Free only allows you to recover 1GB of files for free. To obtain an unlimited data recovery capacity, you can update to an advanced edition. Go to this page to find one that suits you best.
#3. Recover Deleted OBS Recordings from Previous Backups
Recovering files from backups is the quickest approach when you lose your OBS recordings. In addition to manually backing up files to external devices, Windows has built-in tools to back up your files, such as File History.
File History is a free backup tool that should be enabled manually. Once it is enabled, this utility will back up files in the Documents, Music, Picture, Videos, and Desktop folders on your computer automatically. OBS recordings are saved in the Videos folder by default. Thus, if you have enabled File History, you have a chance to get backups of your lost OBS recordings. Work with the following steps to recover OBS recordings from File History.
Step 1. Type Control Panel into the Windows search bar and hit Enter to open it.
Step 2. Select Large icons from the dropdown menu of View by, then you can choose File History from the list directly.
Step 3. Choose Restore personal files from the left side pane.
Step 4. You will find several backup versions of those folders. Navigate to the version where the lost OBS recordings still exist and opt for the Videos folder.
Step 5. Find and select the required videos and click the green restore button to recover lost videos.
To prevent OBS recordings from being deleted or lost, you are advised to back up recordings regularly. Though File History automatically backs up the Videos folder on your computer, several people can’t find available previous versions. You can try other professional backup software, like MiniTool ShadowMaker, which ensures integrity file backups on your device. Additionally, this software enables you to set backup schemes and choose different backup types based on your demands. If needed, you can use this tool to back up OBS recordings and experience those backup features for free within 30 days.
MiniTool ShadowMaker TrialClick to Download100%Clean & Safe
How to Recover Unfinished OBS Recordings
Apart from losing OBS recordings due to mistaken deletion or other reasons, your recordings may be lost due to a software crash or device unexpected shutdown. Generally, those situations happen without advanced signs; thus, you are at risk of losing unfinished OBS recordings. Do you have a chance to recover unfinished OBS recordings? The answer is positive but this method is not always working satisfactorily.
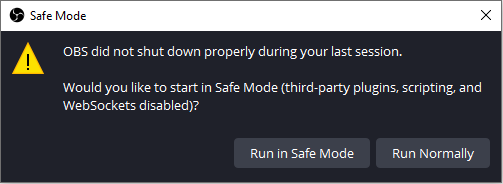
You can reopen OBS on your device directly. A small window will prompt up to inform you of the improper shutdown. To restore the unsaved OBS recording, you need to choose Run in Safe Mode. The application will recover your last session. You can continue your editing or save it to the Videos folder.
How to Repair Corrupted OBS Recordings
Why do your OBS recordings get corrupted? According to the OBS users’ responses, recordings become corrupted usually due to the storage device getting full during recording or the device or software becoming corrupted.
Based on the recovery experience of OBS users, we have compiled several feasible repair solutions for you. Please pay attention to some additional conditions when you carry out the corresponding method below.
Method 1. Repair Corrupted MKV Recordings with Remux Recordings
Remux Recordings is an embedded utility of OBS. When your recording is forcefully terminated due to OBS crashes, you can try to use this utility to repair the corrupted MKV recording.
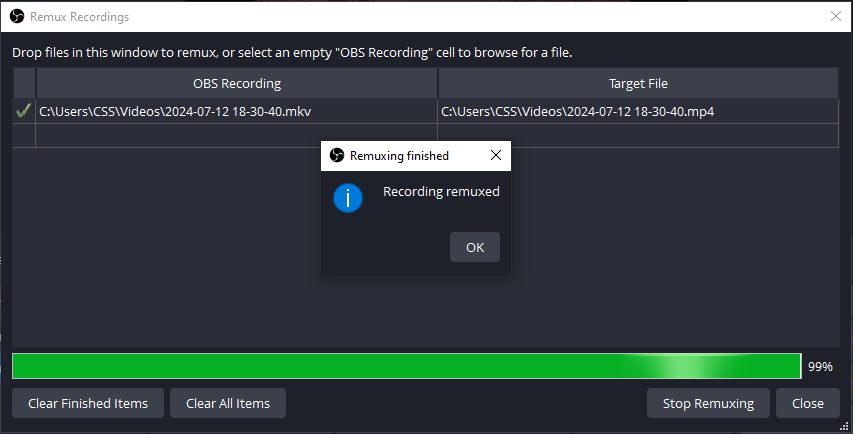
You can open OBS and click File at the top toolkit, then select Remux Recordings. Under the OBS Recording section, click the three-dot icon to choose the corrupted MKV recording and click Remux. The remuxed recording will be output in the MP4 file format and be stored in the Videos folder as well.
A small window will prompt up to inform you that the remuxing process is complete. You can close the software and go to check whether the remuxed video can play well.
Method 2. Repair Corrupted OBS Recordings Using the CHKDSK Command
If your computer crashes or the device forcibly reboots, the unsaved recording is usually lost and leaves you with a 0KB file. This is probably due to file system errors. According to the OBS forum users, they have successfully repaired their 0KB files by running the CHKDSK command line. Here is how to do it.
Step 1. Press Win + R to open the Run window.
Step 2. Type cmd into the dialog and press Shift + Ctrl + Enter to run Command Prompt as administrator.
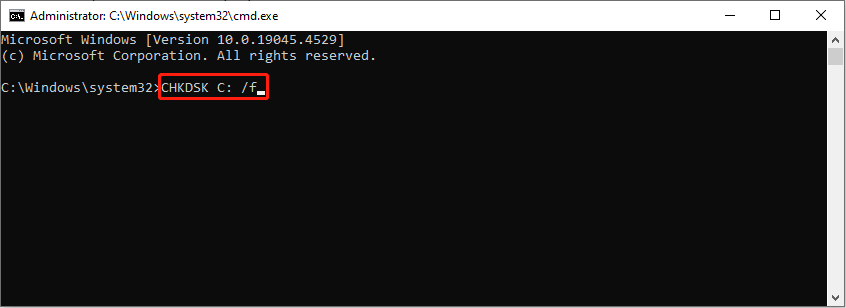
Step 3. Type CHKDSK X: /f and hit Enter to execute the command line. You should replace X with the drive letter where you save the OBS recording (C drive by default).
You are highly recommended to change the recording format from MP4 to MKV or FLV to minimize the chances of file corruption. To configure the file format settings, you can open OBS and select Settings at the bottom right > choose the Output tab > select Matroska Video (.mkv) from the dropdown menu of Recording Format > click Apply to save the change.
Final Words
OBS is a popular live-streaming and recording application for Windows, Mac, and Linux users. It could be a frustrating experience to find recordings lost or corrupted after hours of working. This post shows you methods to recover OBS recordings that are deleted, unfinished, and corrupted separately. According to your situation, read the corresponding section and try the introduced approach.
To recover deleted OBS recordings with the highest success rate, MiniTool Power Data Recovery can be your prior option. If you have any problems using MiniTool software, feel free to let us know via [email protected].
