About BIOS Update
Before going any further to methods for ASUS motherboard BIOS updates, I’d like to introduce BIOS to you briefly.
What Is BIOS
The full name of BIOS is Basic Input/Output System, which is pre-installed and essential firmware stored in a ROM chip on the PC motherboard. BIOS is mainly responsible for performing hardware initialization during the PC booting process and providing runtime services for operating systems and programs.
How to Check for a BIOS Update
Step 1: Check the BIOS version on your computer: press Win + S > type System Information and hit Enter > find BIOS Version/Date option.
Step 2: Visit your manufacturer’s official website (or contact tech support) > search for your motherboard model > check whether there’s a new firmware update available.
Risks of BIOS Update
Making changes to your Windows BIOS could be risky. There are also some reasons to explain why you shouldn’t do ASUS update BIOS.
- The motherboard will be damaged and you won’t be able to boot your computer if the update process failed.
- The new version of BIOS may not support your exact hardware.
- Different motherboard model requires different BIOS versions. Problems may be caused even if the new BIOS version is slightly different.
- You may probably meet some new bugs with the new version of the BIOS even if it’s the correct one.
If you still want to make an ASUS BIOS update, there are different ways for you in the following sections.
Method 1: Update BIOS in Windows
The following content will show you how to update ASUS BIOS in Windows 10.
Part 1: Download BIOS Update Utility
You can either download the BIOS update utility from MyASUS or the ASUS support site.
Download the Update Utility from MyASUS
Step 1: Press Win + S and type MyASUS into the search box.
Step 2: Hit Enter to open the MyASUS window.
Step 3: Select Customer Support > Live Update > Latest. If you can’t find the Live Update tab, it means your computer doesn’t support this feature. Please try the second method.
Step 4: Locate the BIOS Update (Windows) section, then find the BIOS Update for Windows file and click on the download icon after it to get the ASUS BIOS Installer.
Download the Update Utility from the ASUS Support Site
Step 1: Go to the official ASUS support site.
Step 2: Type the model name of your computer into the search bar. (Don’t include ASUS; the name should be 4~5 letters/numbers.)
Step 3: Locate the BIOS Update (Windows) section on the support page.
Step 4: Look for the BIOS Installer for Windows file and click on the DOWNLOAD button.
Step 5: You can also locate the BIOS-Utilities section and download the Windows BIOS Flash Utility (WinFlash) if you can’t find the BIOS installer.
If there is no choice of either BIOS Installer for Windows or BIOS Update for Windows, please refer to the next method.
Part 2: Update BIOS with the Utility You Downloaded
Update BIOS with the BIOS Installer
Step 1: Navigate to the BIOS Installer file and right-click on it.
Step 2: Select Extract All from the context menu and click Browse to specify a destination.
Step 3: Click Extract and wait.
Step 4: Go to the destination and double-click on the BIOS Update (or BIOS Installer) application file.
Step 5: The setup wizard will appear: click Next > check I accept the agreement and click Next > click Next > click Install > check Yes, restart the computer now, then click Finish.
Step 6: Wait for the BIOS update process to finish.
Update BIOS with the WinFlash
Step 1: Navigate to the Winflash file and right-click on it.
Step 2: Select Extract All, then specify a destination and click Extract.
Step 3: When the extraction is completed, please go to the destination.
Step 4: Double-click on the Setup file to see the WinFlash setup wizard.
Step 5: Follow the on-screen instructions to install WinFlash properly.
Step 6: Double-click on the WinFlash application file.
Step 7: Click Next in the WinFlash app to continue.
Step 8: Select Get BIOS from the Web or Get BIOS from Device, and click Update.
Step 9: Click on the Exit button and your computer will restart automatically to continue the updating process.
Method 2: Update BIOS in BIOS Utility (with EZ Flash)
This part shows you how to use the USB drive and the ASUS EZ Flash to update your ASUS BIOS. You’d better save the BIOS file to a USB drive.
Part 1: Download the BIOS File
Download the BIOS file from MyASUS:
Step 1: Search MyASUS by using the Windows search feature.
Step 2: Go to Customer Support > Live Update > Latest.
Step 3: Look for BIOS for ASUS EZ Flash Utility or BIOS version under the BIOS section.
Step 4: Click on the download icon and wait.
Download the BIOS file from the ASUS support site:
Step 1: Visit the ASUS support site.
Step 2: Type the computer’s model name > click Driver & Utility > shift to BIOS & FIRMWARE.
Step 3: Search for the BIOS for ASUS EZ Flash Utility file or the BIOS version file under BIOS on the support page.
Step 4: Click DOWNLOAD and save the file to your USB drive.
Part 2: Update BIOS with EZ Flash
Update BIOS ASUS in UEFI Mode
Step 1: Insert the USB drive and extract the BIOS file you downloaded.
Step 2: Restart your ASUS computer and press the DEL key to enter the BIOS Utility.
Step 3: Click Advanced Mode and shift to the Tool tab.
Step 4: Select ASUS EZ Flash 3 Utility on this interface.
Step 5: Choose the disk where the BIOS file is saved, then choose the file.
Step 6: In the popup window, choose Yes.
Step 7: Click Yes again to confirm the BIOS information and update.
Wait for the process to finish. Then, your computer will be restarted automatically.
Update BIOS ASUS in Legacy Mode
Step 1: Insert the USB drive and extract the BIOS file.
Step 2: Restart your PC to enter the BIOS Utility.
Step 3: Shift to the Advanced tab.
Step 4: Navigate to ASUS EZ Flash 3 Utility and press Enter.
Step 5: Select the target storage device and choose the BIOS file.
Step 6: Navigate to Yes and press Enter to continue.
When the process of BIOS update is finished, your PC will auto-reboot.
Method 3: Update BIOS Using AI Suite 3 (EZ Update)
Step 1: You can get the BIOS file with the steps in Method 2.
Step 2: Extract the file to your USB.
Step 3: Download and install AI suite3.
Visit the ASUS Download Center > enter the model name > click Driver & Utility > select Drivers and Tools > select the operating system > look for the AI Suite 3 file under Software and Utility > click DOWNLOAD.
Step 4: Extract the AI Suite 3 file to your USB.
Step 5: Find and double-click on the AsusSetup.exe file, then click Install to install AI Suite 3.
Step 6: After restarting the computer, run the EZ Update to update the BIOS.
Click on the Start icon > select EZ update from the left pane > click on the three dots icon under Manually update boot logo or BIOS > select the extracted BIOS file > click Update > click Flash > click OK > restart the ASUS computer > the EZ Flash interface appears > wait for the update to complete > restart the computer again.
Method 4: Update BIOS Using USB BIOS FlashBack
There’s a special way to update BIOS ASUS: update under the Shutdown or Uninstall CPU Status (USB BIOS FlashBack).
This method is only available for some models of the ASUS computer. If you want to figure out whether your motherboard can support the USB BIOS FlashBack function and how to use BIOS FlashBack™ in detail, please refer to this ASUS support page.
Rescue Data on ASUS Computer with MiniTool Power Data Recovery
You should be careful when trying to update BIOS with the steps above. If, unfortunately, the BIOS update failed, your computer may encounter boot issues. When your computer can’t boot up normally, please rescue your files from this problematic computer. In this case, you need to search for help from third-party data recovery software.
MiniTool Power Data Recovery, the best free data recovery software, is able to restore files under various data storage devices, including formatted USB flash drives, inaccessible SD cards, unbootable computers, etc. Besides, this software can recover types of files, like pictures, archives, files, videos, and so on.
Recover Files from an Unbootable ASUS Computer
If you want to use MiniTool Power Data Recovery to rescue important files from the problematic computer, you need to prepare a USB flash drive (the size is between 4GB and 64GB) and find a well-performing computer. Then, you can create a bootable disk with a snap-in WinPE Bootable Builder in MiniTool Power Data Recovery. After that, use this created bootable media to recover files from the unbootable computer. For specific steps, please keep reading.
Part 1: Create a Bootable Media
Step 1: Download and install MiniTool Power Data Recovery on a well-performing computer.
MiniTool Power Data Recovery FreeClick to Download100%Clean & Safe
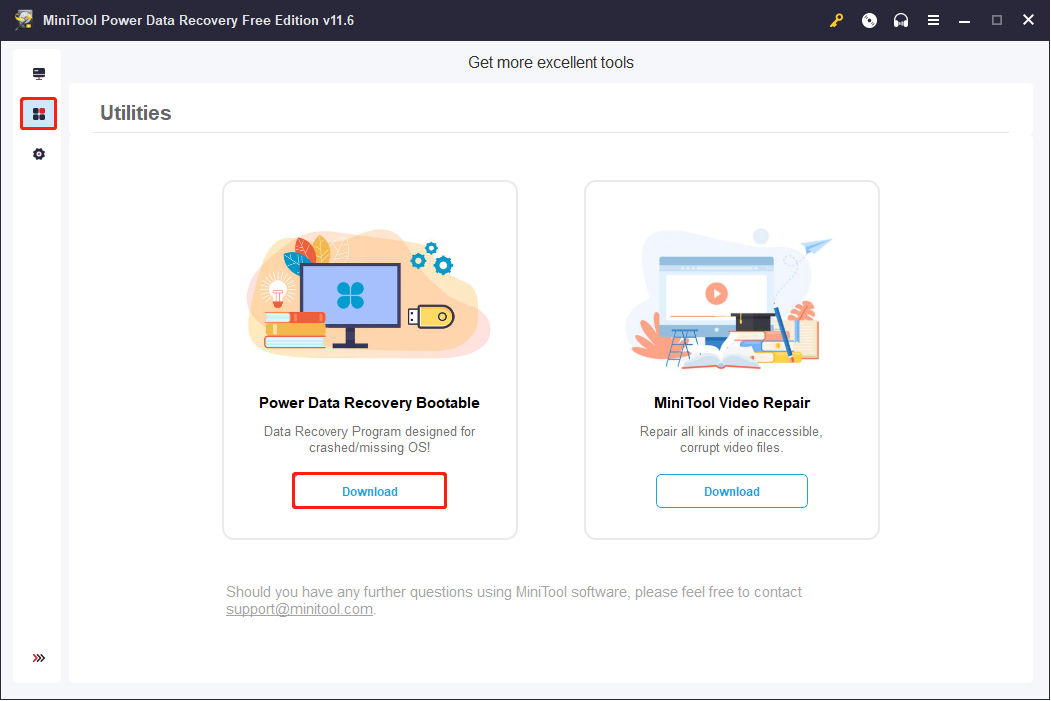
Step 2: Launch the software and click on the Utilities button on the left sidebar.
Step 3: Click on the Download button under the Power Data Recovery Bootable section. Then, you need to update the edition. Please be careful when choosing an advanced edition. You need to select one that contains a snap-in WinPE Bootable Media Builder.
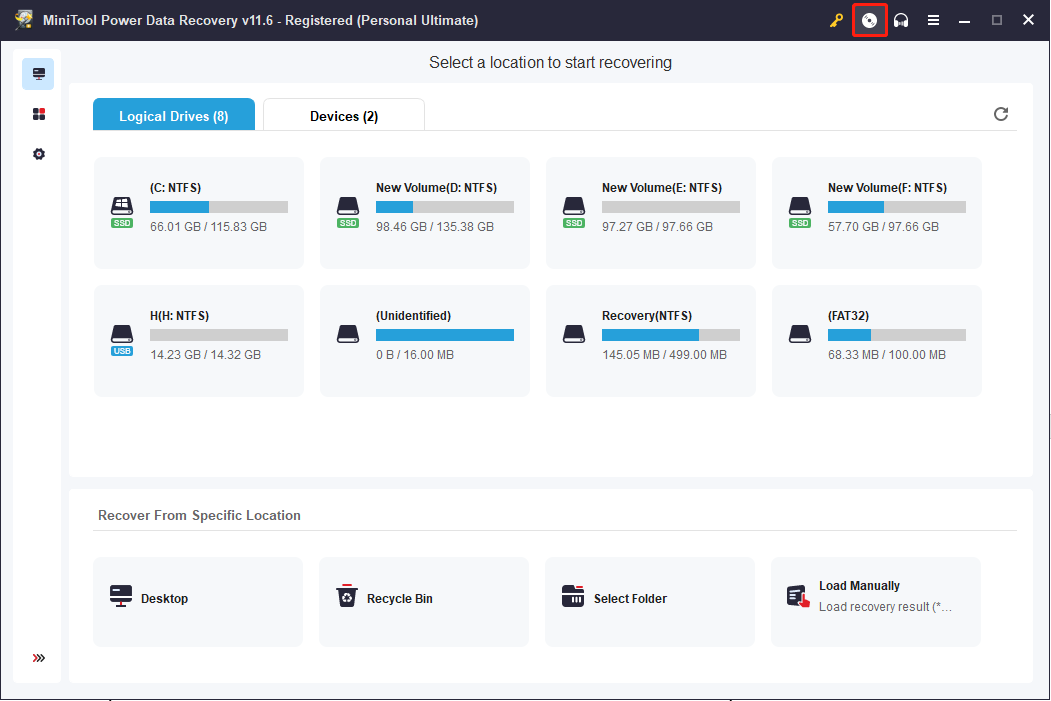
Step 4: Back to This PC interface, then click on the key icon and input your registry key. The registry key will send to you by email after updating the software.
Step 5: Connect the prepared USB drive to the computer and click on the Refresh button.
Step 6: Choose Bootable Media on the top right to open MiniTool Media Builder.
Step 7: Follow the on-screen instruction to create a bootable media.
Step 8: Click Finish when the file preparation process is completed.
Part 2: Recover Data from an Unbootable Computer
Step 1: Plug the USB drive into the problematic computer.
Step 2: Restart your computer and press and hold F2 to enter the BIOS menu.
Step 3: Adjust the boot order to make your computer boot from the created bootable disk.
Step 4: Click F10 to save the change and hit Enter to exit the BIOS menu.
Step 5: After the computer restart, you can find the MiniTool PE Loader window on your screen. Wait for a few seconds. It will open MiniTool Power Data Recovery automatically.
Step 6: Choose a partition where you want to recover files from and click on the Scan button.
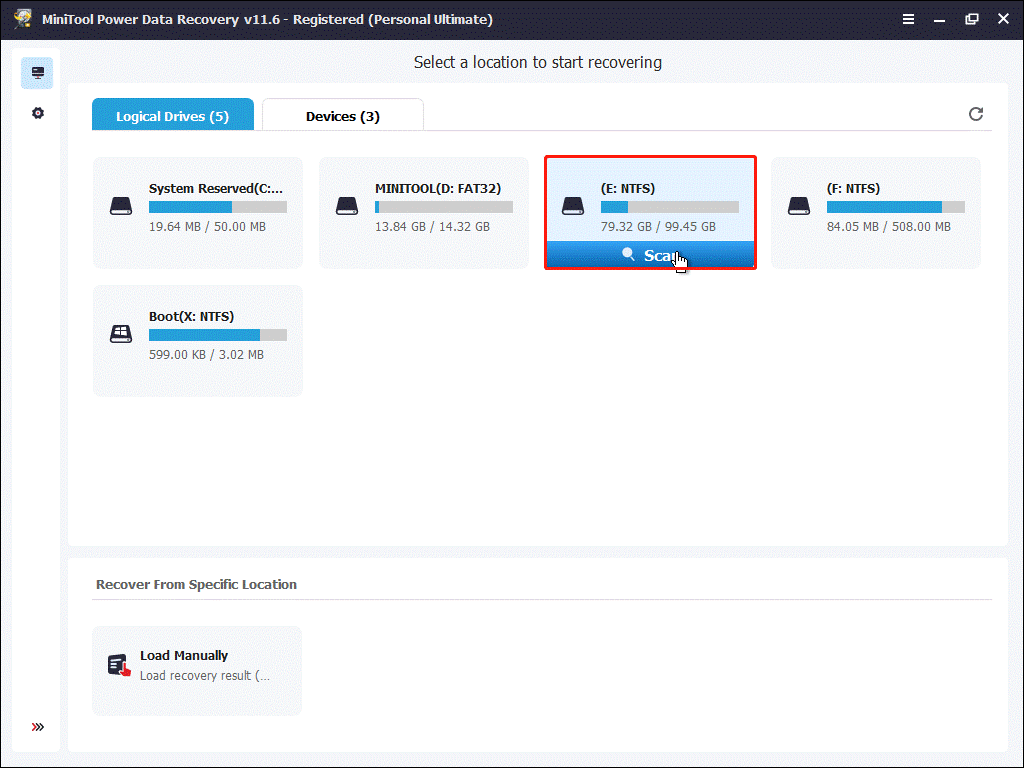
Step 7: Wait for the process to finish. You can browse the result page to find the wanted files. Since there might be numerous files, you can use Filter, Type, and Search functions to filter the desired files. Then, use the Preview feature to check the correction of the selected file.
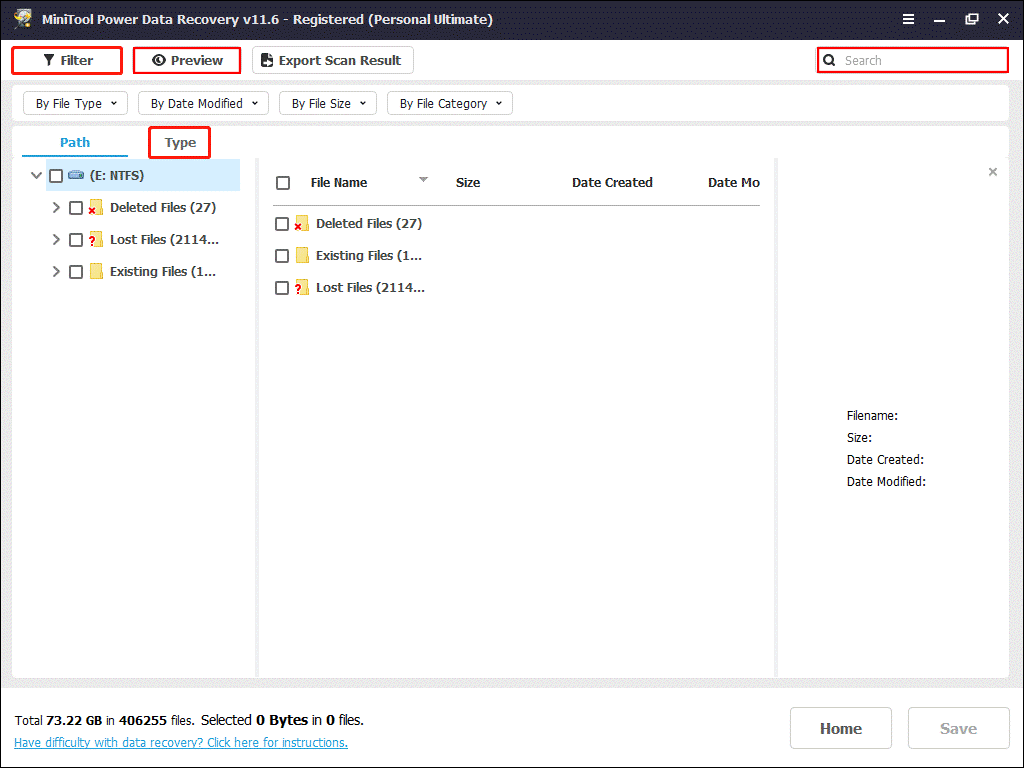
Step 8: Check all the files you wanted and click on the Save button.
Step 9: Choose a proper path to store the files and click OK to confirm.
Recover Files from Bootable ASUS Computer
If you successfully update the BIOS, you can check whether your files are lost. If yes, you can recover lost files with MiniTool Power Data Recovery as well. The free edition allows you to make a deep scan of your drive and recover up to 1GB of files. If you prefer a large recovery capacity, you can go to this site to find a suitable advanced edition. For personal users, the Personal Ultimate edition is highly recommended.
MiniTool Power Data Recovery FreeClick to Download100%Clean & Safe
Conclusion
This article introduces how to process ASUS BIOS updates in four useful methods. You can also recover your files with MiniTool Power Data Recovery even if the ASUS computer fails to start up. If you have any problems with MiniTool software, please connect with us via [email protected].

