It’s annoying to be bothered by constantly emerging unnecessary notifications. The Do not disturb feature is capable of keeping from distraction. Then how to enable Do not disturb mode on Windows 11. MiniTool will show you some considerably user-friendly steps.
What Is Do Not Disturb for?
When you are studying or working on screen share in Windows, a notification comes to disturb you. In most cases, notifications come from the system, applications, and some emails. Turning on Do not disturb can solve this trouble very well.
It is because the Do not disturb feature will remove all notifications and alerts before appearing on the screen. And you don’t need to worry that you may miss some important information. In fact, those pop-up messages have all been recycled to the notification center. Thus, you can check them later.
This tutorial aims to teach you how to enable Do not disturb mode on Windows 11, enhancing your working efficiency.
Also read: How to Stop Pop ups on Windows 10 Through 6 Ways
Turn on Do Not Disturb on Windows 11
After you turn on Do not disturb, it’s easy to take control of your Windows notifications.
There are three ways to enable/disable Do not disturb Windows 11.
Way 1: Enable in Settings
Step 1: Press the Win + I keys to open Settings.
Step 2: Click System from the left pane and then choose the Notifications option.
Step 3: Do not disturb is turned off by default. Toggle on the switch. And you can turn it off by following the same steps whenever you want.
Way 2: Turn on in Notification Center
Step 1: Press Win + N together to launch the Notification Center.
Step 2: Click on the bell icon on the top right corner to turn on the Do not disturb feature which is off by default. After that, you will view the message “Do not disturb is on” and you’ll only see banners for priority notifications and alarms. Besides, taking the same steps can also disable it if you want.
Way 3: Enable Automatic Rules
Step 1: Go to Settings by pressing Win + I together.
Step 2: Choose System and click on Notifications.
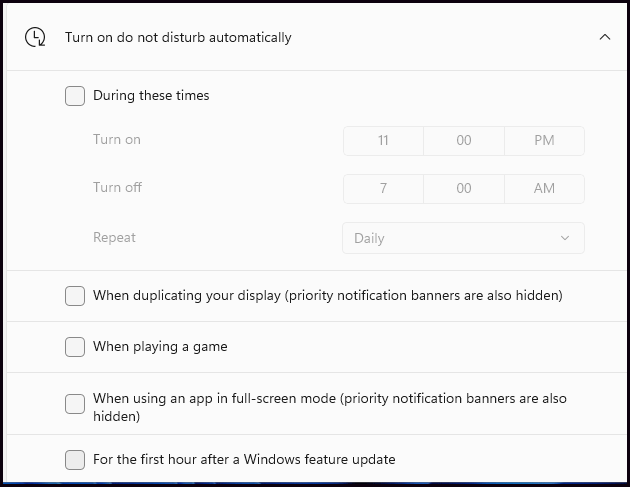
Step 3: Click Turn on do not disturb automatically.Thenit will expand several options.
- During these times: You can choose a certain period to enable Do not disturb automatically and how often this setting is repeated.
- When duplicating your display (priority notification banners are also hidden): If you enable this setting, it can curb notifications when duplicating your display.
- When playing a game: When you are playing a full-screen game, it will not reveal notifications to interrupt your journey.
- When using an app in full-screen mode (priority notification banners are also hidden): It will help you hide notifications when using an app in full-screen mode.
- For the first hour after a Windows feature update: It will hide notifications within the first hour after a feature update is finished on Windows.

Step 4: You can turn on the notification settings (off by default) depending on your preference. If you like, just disable Do not disturb Windows 11 in the same way.
Do not disturb won’t block important system notifications, safety warnings, emergency warnings, etc. In addition, notifications for specific programs that users set themselves will not be blocked, for instance, available Windows updates, schedule reminders, or backlogs.
MiniTool ShadowMaker TrialClick to Download100%Clean & Safe
Bottom Line
You can tell how to enable Do not disturb mode on Windows 11 and how to disable it from this post. In this way, it’s easier to silence notification banners on your desktop and concentrate on your work or study. Anyway, we hope you find this guide helpful.


