What Is IgfxCUIService.exe
IgfxCUIService.exe is an executable file associated with the Intel Graphics Control Panel. It runs in the background and is responsible for managing and controlling the graphics functions of Intel-integrated graphics. What’s more, it provides various functions related to the Intel Graphics Control Panel, such as allowing users to customize display settings, adjust color profiles, and manage multiple monitors.
If you also use an external graphics card, you may see an error message saying that this executable file is missing or has crashed. In this case, removing or disabling igfxCUIService.exe is generally not recommended as it may result in losing important graphics-related functionality. The following methods can help you fix the igfxCUIService.exe crashing Windows 10 issue. Keep reading!
How to Fix IgfxCUIService.exe Crashing Windows 10
Fix 1: Run Hardware and Devices Troubleshooter
Diagnosing hardware problems is a critical part of maintaining system reliability and uptime. In this case, you can run the Hardware and Devices troubleshooter to achieve your goal. Here is how you can run this feature.
Step 1: Type Command Prompt in the Windows search box and right-click on the best match to select Run as administrator.
Step 2: When prompted by UAC, click on Yes to continue.
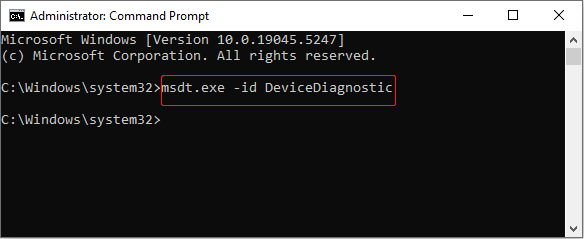
Step 3: Type msdt.exe -id DeviceDiagnostic in the window and press Enter to invoke Hardware and Devices troubleshooter.
Step 4: In the Hardware and Devices window, click on Advanced, check Apply repairs automatically, and click on Next.
Step 5: After detecting problems, click on Apply this fix to restart your computer.
Fix 2: Disable Intel HD Display Manager
Intel has a control panel for managing the graphics settings of the hardware on your computer, called “Intel HD Display Manager or Intel HD Graphics Control Panel”. You can easily find it in Services and disable it when it is up and running to see if the problem of igfxCUIService.exe causing crashes can be solved. Here are the steps.
Step 1: Type Services in the Windows search box and press Enter.
Step 2: Find and right-click on Intel(R) HD Graphics Control Panel Service and choose Properties.
Step 3: In the General tab, click on Stop under Service status and choose Disabled from the Startup type list.
Step 4: Finally, click on Apply > OK.
Fix 3: Update the Graphics Driver
A good driver can ensure better computer performance. An outdated driver can also be one of the causes of the igfxCUIService.exe crashing issue. Here is how you can update it.
Step 1: Go to the Intel Driver & Support Assistant website and click Download to get the tool.
Step 2: Double-click the downloaded file and click on Install.
Step 3: When the installation completes, restart your computer.
Step 4: Once the computer starts, type Intel Driver & Support Assistant in the Windows search box and press Enter.
Step 5: A list of available driver updates will show up and click on Download for each update or Download All.
Step 6: Click on Install to install the driver. Then follow the on-screen instructions to complete the process.
Fix 4: Repair Corrupted System Files
A corrupted file system can cause damage to the hardware running on your computer, including igfxCUIService.exe. Therefore, you need to check and repair the damaged system files to solve this problem. The repair steps are as follows.
Step 1: Open the Command Prompt with administrative privileges and click on Yes in the UAC window.
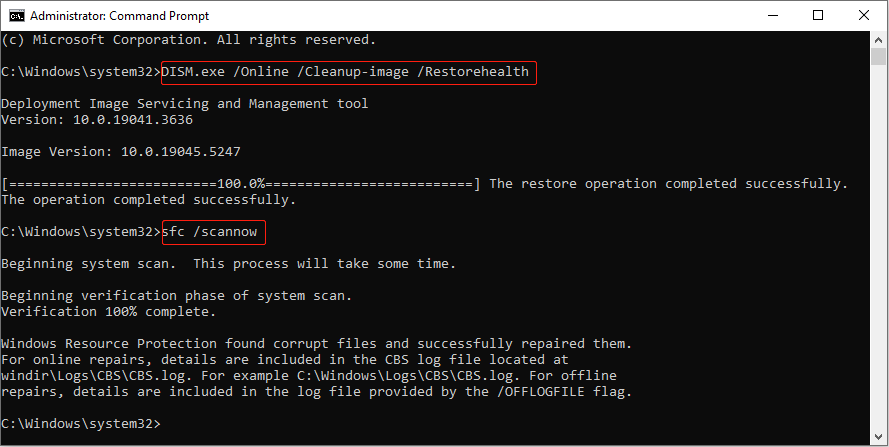
Step 2: Type DISM.exe /Online /Cleanup-image /Restorehealth in the window and press Enter.
Step 3: Wait for the process to be completed, type sfc /scannow,and press Enter.
Fix 5: Perform a Clean Boot
A clean boot will start Windows with only necessary system services and drivers, disabling all non-essential programs and applications. This can help you detect if any background programs are causing the problem. Work with the following steps.
Step 1: Right-click on the Start button and choose Run to open the Run dialog.
Step 2: Type msconfig in the box and hit Enter.
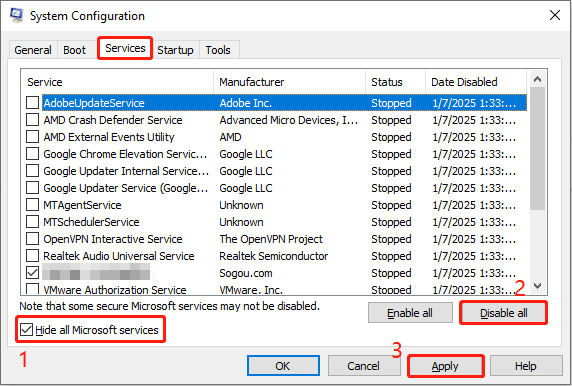
Step 3: Switch to the Services tab, check the box for Hide all Microsoft services, and click Disable all > Apply.
Step 4: Go to the Startup tab, click on Open Task Manager, and select each item to choose Disable. After that, close the window.
Step 5: Click on Apply > OK, close the window, and choose Restart to apply the changes.
After your computer starts, open each app you just closed one by one to see which one caused the igfxCUIService.exe crashing issue. Once you find it, remember to disable it.
MiniTool Power Data Recovery FreeClick to Download100%Clean & Safe
Final Thoughts
That’s all the information about how to fix igfxCUIService.exe crashing. Hope these workarounds in this post can be beneficial for you.

