What Is Ucx01000.sys BSOD
Ucx01000.sys is an important part of the Windows operating system. It is specifically related to USB 3.0 drivers and functionality. This file allows the computer to communicate with USB 3.0 devices and for the USB ports to function properly.
Ucx01000.sys bluescreen errors are related to the USB Type-C Connector System Software Interface (UCSI) driver in the Windows operating system. This driver is responsible for managing the USB Type-C ports and the devices connected to them. When the Ucx01000.sys file encounters problems or becomes corrupted, a BSOD error may occur.
How to Fix Ucx01000.sys BSOD
Fix 1: Repair Corrupted System Files
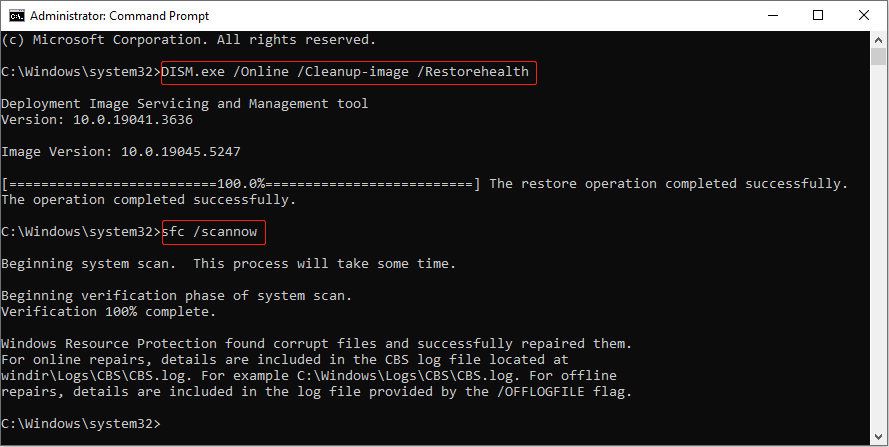
When critical Windows system files are missing or corrupted, some Windows features may stop working properly, or Windows may stop responding completely. The blue screen is one of the faults. You can use administrative tools (DISM) and the System File Checker tool (SFC) to scan system files and repair corrupted files. Here are the steps.
Step 1: Type cmd in the search bar, right-click on Command Prompt, and choose Run as administrator.
Step 2: When prompted by UAC, click on Yes to continue.
Step 3: Type DISM.exe /Online /Cleanup-image /Restorehealth in the window and hit Enter.
Step 4: This process will take some time. When it ends, type sfc /scannow and hit Enter.

Related Post: The Detailed Information about System File Checker Windows 10
Fix 2: Run an Antivirus Scan
Malware on your computer can cause ucx01000.sys BSOD. Moreover, it can also cause file loss. In this case, you need to run an antivirus scan to troubleshoot the malware as well as viruses. Here is how you can do it.
Step 1: Press the Win + I keys to open the Settings app.
Step 2: Click on Update & Security > Windows Security > Virus & threat protection.
Step 3: Under Current threats, click on Scan options.
Step 4: Click on Full scan and hit Scan now. This process will take some time. Wait for it to be completed.
MiniTool Power Data Recovery FreeClick to Download100%Clean & Safe
Fix 3: Run a Memory Test
A faulty RAM module can cause random crashes, making ucx01000.sys BSOD Windows 10. You can run a memory test to detect problems with your RAM. The memory test results will show you if your RAM has any errors or defects. Work with the following steps.
Step 1: Right-click on the Start button and choose Run to open the run dialog.
Step 2: Type mdsched.exe in the box and press Enter.
Step 3: You will be asked if you want to restart your PC and run the test immediately, or schedule the test to run the next time you start your PC. Select the option you want and wait until the restart process ends.
If it shows a message indicating the type and location of the error, you may need to replace the RAM. If it shows a message indicating that the test was completed successfully, that means there is no error.
Fix 4: Perform a System Restore
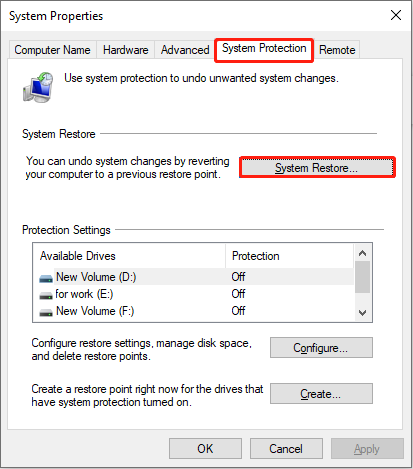
You can restore the state of your PC to a previous point in time by performing a system restore. This is particularly useful when troubleshooting problems caused by recent changes, such as software installations, driver updates, or modifications to system settings. Here is a way.
Step 1: Press the Win + R keys to open the Run dialog.
Step 2: Type SystemPropertiesProtection in the Open box and hit Enter.
Step 3: In the System Protection tab, click on System Restore.

Step 4: In the new window, click on Next. Choose a restore point and click on Next > Finish.
Fix 5: Install Windows Updates
An outdated Windows system can lead to this driver issue ucx01000.sys. To fix it, you need to update your Windows according to the operations below.
Step 1: Open the Settings app and click on Update & Security > Windows Update.
Step 2: Click on Check for updates to detect if there is an available update.
If there is one, click on Download & Install to get it.
Conclusion
This post displays several methods about how to fix ucx01000.sys BSOD. You can use one of them according to your preference to get rid of that annoying issue.


