About Davinci Resolve Not Opening Issue
DaVinci Resolve, previously known as da Vinci Resolve, is a color correction and non-linear video editing application available on macOS, Windows, and Linux.
It provides 2 versions for different users. One is a free edition simply named as DaVinci Resolve. The other is a paid edition named DaVinci Resolve Studio which provides everything in the free version and some more advanced features including DaVinci Neural Engine, stereoscopic 3D tools, and so on.
For past few months, some users reported that DaVinci Resolve keeps crashing on launch or won’t open. And some other users experience the crashing issue when they are trying to edit their videos after launching the software. The reasons for this frustrating problem could be various, but there’s no need to worry.
A number of users have posted their experiences on solving the problem of Davinci Resolve not opening or crashing on the forum. Some solutions that are proven to be effective are listed below, and you can try them one by one.
How to Fix DaVinci Resolve Not Opening
- Launch DaVinci Resolve in compatibility mode
- Use a dedicated GPU and disable integrated GPU
- Enable IGPU Multi-Monitor
- Move the source video files to another place
- Convert the video files to the MOV format
- Increase the virtual memory
- Clean install DaVinci Resolve
- Upgrade to Windows 10
Fix 1: Launch DaVinci Resolve in Compatibility Mode
If you can’t launch Davinci Resolve in a normal way, perhaps it conflicts with your current system and you can try opening it in the compatibility mode to solve the problem.
Step 1: Right-click the desktop shortcut or the executable file in the installation folder of DaVinci Resolve and choose Properties.
Step 2: Click the Compatibility tab and check Run this program in compatibility mode for option.
Step 3: Choose Windows 8 from the drop-down list and click Apply and OK button to save the change.
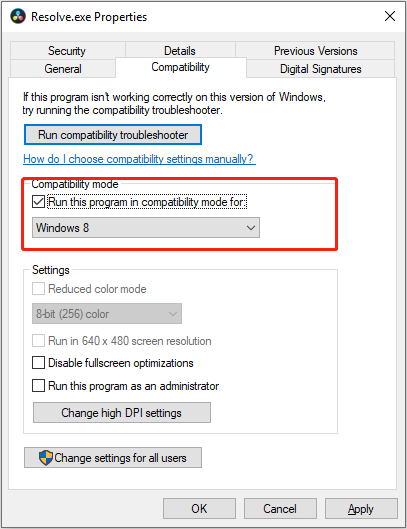
After that, check if you can launch and use the program properly.
Fix 2: Use A Dedicated GPU and Disable Integrated GPU
With the system requirements met, the GPU is probably the single most important component for DaVinci Resolve. If you are using an integrated GPU and DaVinci Resolve won’t open, it’s time to go for a dedicated GPU that commonly provides better graphics performance, like GeForce 1070, 1060, or AMD equivalents.
If your computer includes both integrated and dedicated graphics cards at the same time, you have to make sure that your DaVinci Resolve always uses the dedicated GPU. To achieve that, you can go to disable the integrated GPU. Here’s what you should do.
Step 1: Right-click the Start button and choose Device Manager to open it.
Step 2: Double-click the Display adapters to expand the category.
Step 3: Right-click your integrated GPU and choose Disable device option. Then, click OK button to confirm the operation.
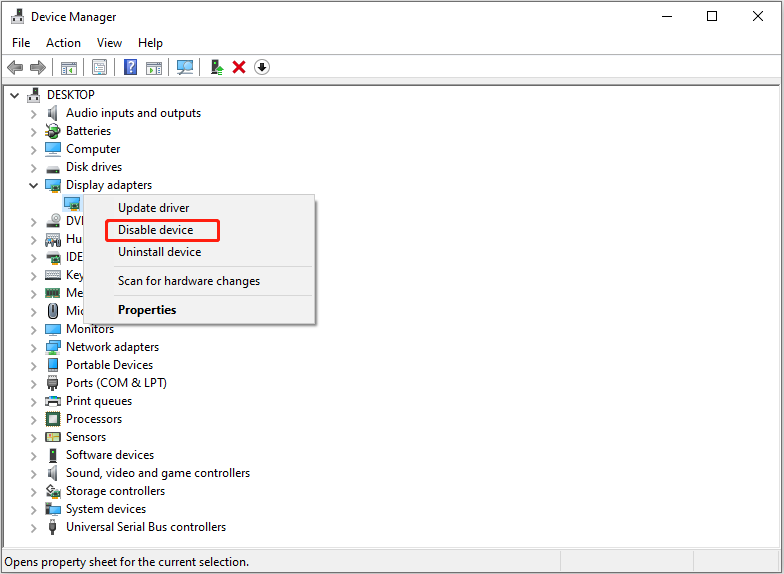
Restart your computer and check if DaVinci Resolve not opening or crashing issue is resolved. If you still can’t launch DaVinci Resolve, just continue with the next solution.
Fix 3: Enable IGPU Multi-Monitor
It’s reported that DaVinci Resolve crashing or not opening issue might have something to do with the IGPU Multi-Monitor feature. Some users have resolved the problem effectively by enabling the feature in BIOS settings, and you can also have a try.
Step 1: Restart your computer and keep pressing the setup key as soon as you see the manufacturer’s logo on the screen to enter the BIOS settings.
Step 2: Go to the Advanced settings and find the IGPU Multi-Monitor feature. Then, change its status to Enabled. Commonly, you can find the feature under the System Agent (SA) Configuration or Graphics Configuration.
Step 3: Save the changes you’ve made and exit the BIOS.
Then, your computer will restart automatically. If you still encounter DaVinci Resolve crashing or not opening issue, move down to the next solution below.
Fix 4: Move the Source Video Files to Another Place
According to the reports from some users, DaVinci Resolve keeps crashing only when it’s processing video files in a specific folder. If this is applicable to your case, chances are that you’re dealing with the permission issue of the involved folder. That is to say, the program doesn’t have the full permission of the folder and it cannot access or modify its content properly.
In this case, you can simply move your source video files to another location different from the original folder. Then, import them into your DaVinci Resolve and start your edition again.
Fix 5: Convert the Video Files to the MOV Format
What’s more, the format of the source video files could also lead to DaVinci Resolve crashing issue. In some cases, the issue occurs when users are trying to import MP4 files to edit them with the program, especially on their laptops. Luckily, some users found that the DaVinci Resolve works properly again with these files after they convert them into the MOV format.
So, if you are dealing with MP4 files and encounter crash issue in the program unfortunately, you can try converting them into MOV format using a reliable converter. Then, import these MOV files to your DaVinci Resolve to check if the issue has been resolved.
Fix 6: Increase the Virtual Memory
Another effective method to fix DaVinci Resolve not opening or crashing issue is to increase the virtual memory (paging file). Here’s a simple guide on how to change the size of virtual memory.
Step 1: Press Windows + S, input control panel in the Search bar, and click the result to open it.
Step 2: Navigate to System and Security > System and click Advanced system settings in the left pane to open the System Properties window.
Step 3: Switch to the Advanced tab and click the Settings button under the Performance section.
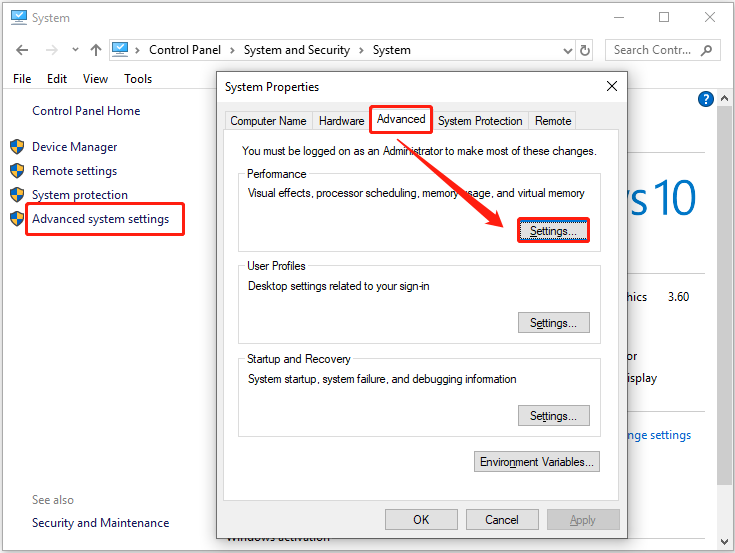
Step 4: When you get the Performance Options window, go to the Advanced tab and click the Change button under the Virtual memory section. In the pop-up window, uncheck the Automatically manage paging file size for all drives option.
Step 5: Select your system drive (commonly C: drive) in the list and check Custom size option. Then, set the Initial size to 3500 MB and the Maximum size to 7000 MB, and click Set button.
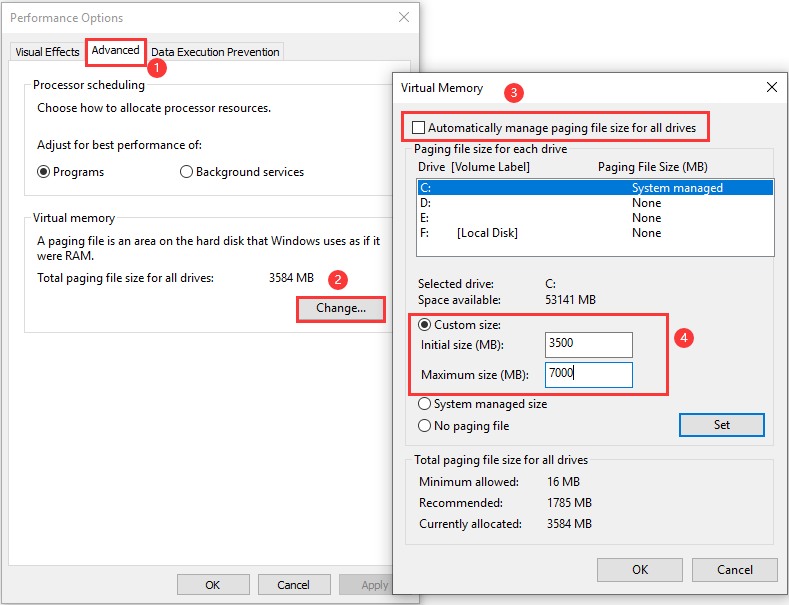
Step 6: Click OK to confirm the change and go back to the Performance Options window. Click Apply and OK.
Once it’s done, restart your computer for the changes to take effect.
Fix 7: Clean Install DaVinci Resolve
Sometimes, DaVinci Resolve won’t open because of certain problems with its installation data. According to the suggestions from some affected users, you might need to clean install the program with a fresh copy.
To clean install the program, you need to:
Step 1: Open Control Panel and navigate to Programs > Programs and Features.
Step 2: Right-click DaVinci Resolve and choose Uninstall. Or, you can click Uninstall button after selecting the program.
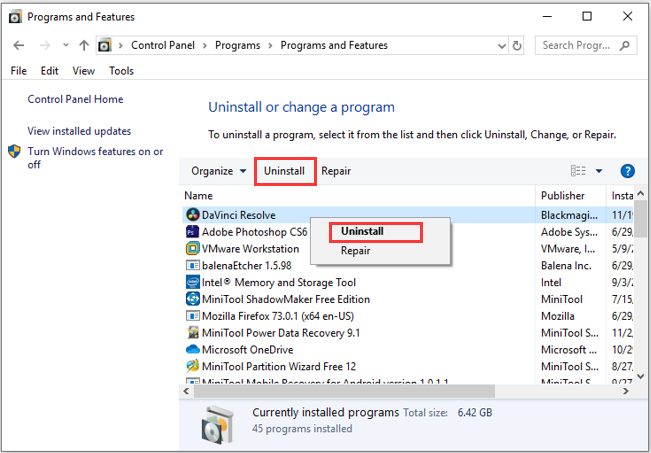
Step 3: Press Windows + E to open File Explorer. Go to the installation folder of the program (The default path is C:\Program Files\Blackmagic Design\DaVinci Resolve) and delete the DaVinci Resolve folder.
Step 4: After completely uninstalling the application, visit the official website to download the version you need and install it properly according to the given instructions.
After that, restart your system and launch the fresh program. Now, DaVinci Resolve not opening issue should have been resolved.
Fix 8: Upgrade to Windows 10
Typically, DaVinci Resolve can work properly on Windows 10/8.1 and other older Windows versions. However, the latest versions of the application can only support Windows 10, and you may encounter crashing issue when you are trying to launch the latest version on older Windows like Windows 7.
This is a last resort. If you insist on using the current version of DaVinci Resolve and all the above methods don’t work for you, perhaps you need to upgrade your OS to Windows 10.
Before upgrading the system, you are highly recommended to back up the original system disk in advance to avoid any data loss. By the way, you can also use the backup to rollback Windows 10 to your original version. To back up your disk, MiniTool Partition Wizard is recommended for you. You can click the following button to get this professional utility to have a try.
MiniTool Partition Wizard DemoClick to Download100%Clean & Safe
Step 1: Prepare an external hard drive that doesn’t have important data saved on it and is large enough to hold all the data on your system disk. Connect the drive to your computer.
Step 2: Launch MiniTool Partition Wizard to get the main interface.
Step 3: Right-click the system disk and choose Copy. You can also select Copy Disk feature from the left action panel after selecting your system drive.
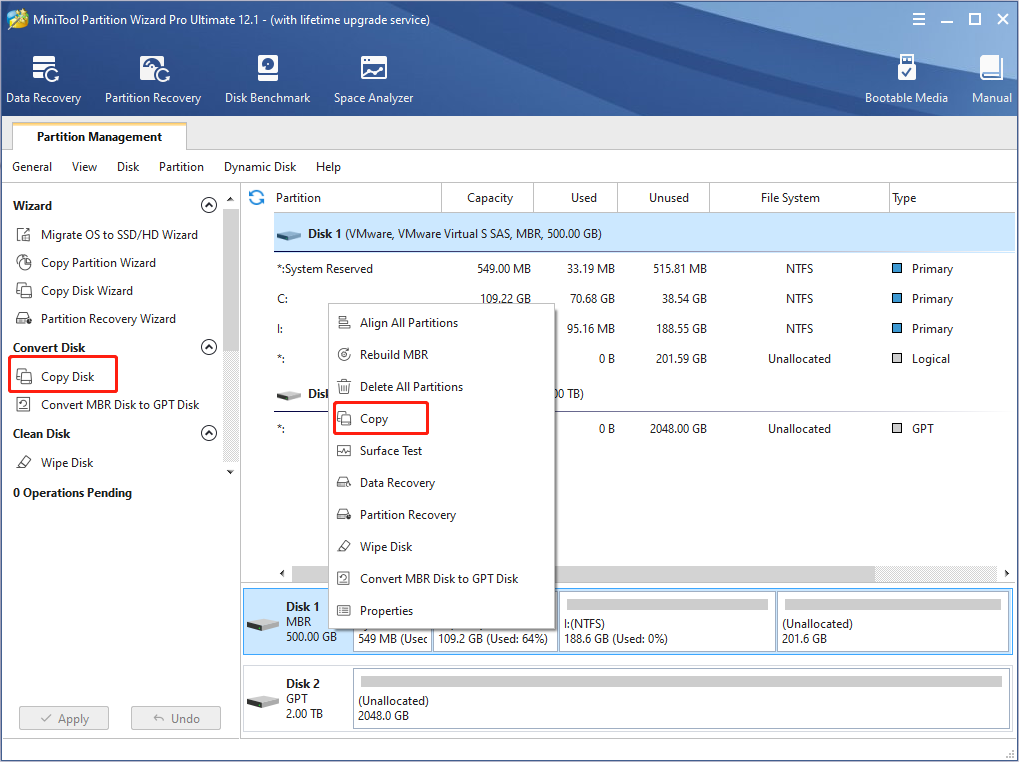
Step 4: Choose the external hard drive as the target disk and click Next button.
Step 5: Choose copy options and adjust the size and location of partitions on the target disk according to your needs. Click Next button to continue.
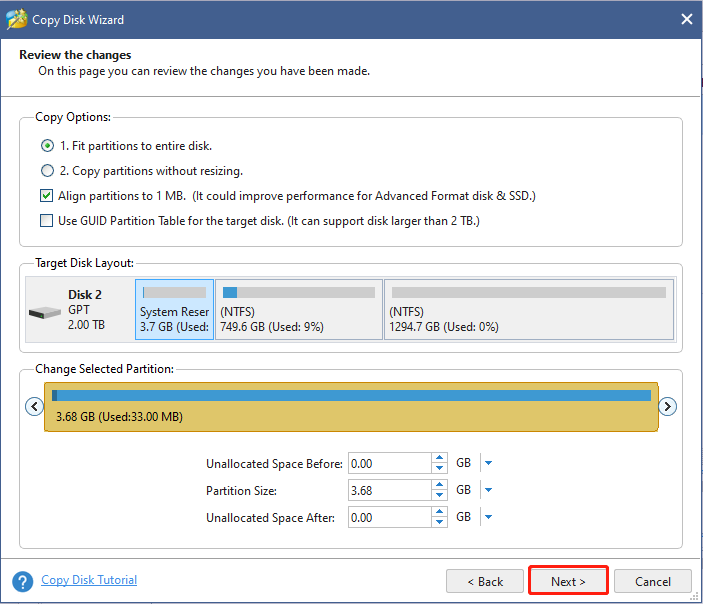
Step 6: Read the note on how to boot from the new disk and click Finish button. When you go back to the main interface, click Apply button to execute all the pending operations.
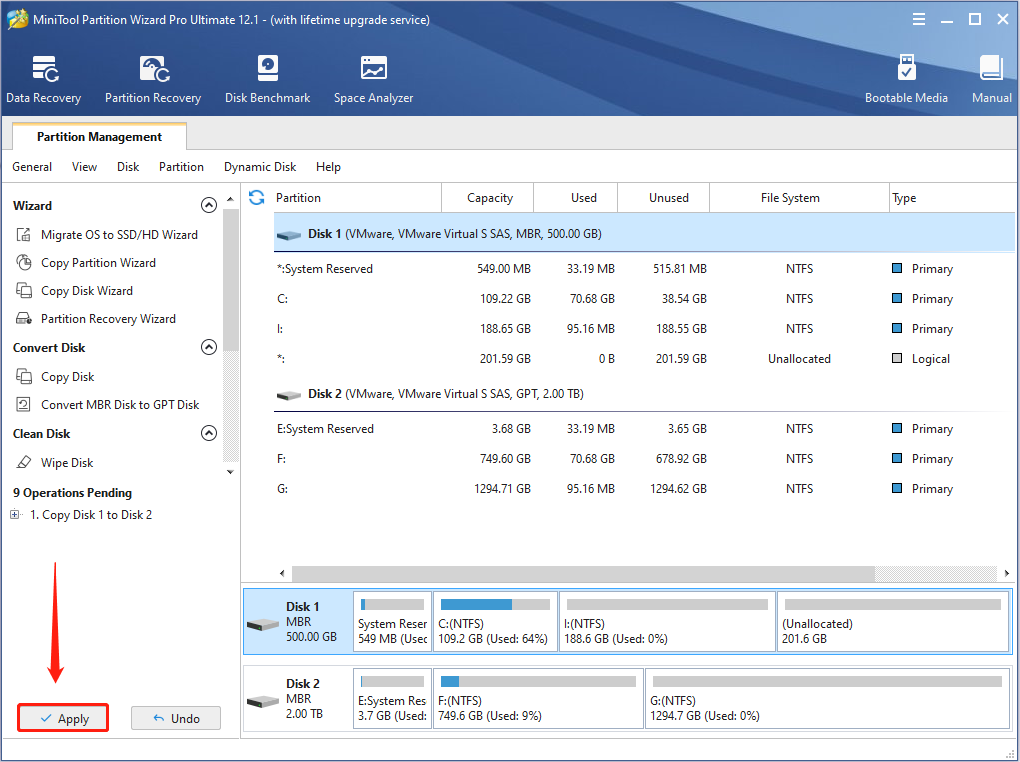
With all the data having been backed up, you can install Windows 10 on your computer without any worries. Now, you should be able to use DaVinci Resolve to edit your videos properly on Windows 10.
Final Words
This article has displayed 8 possible methods to fix DaVinci Resolve not opening or crashing issue. Are these solutions helpful for you? You can share your experience and ideas with us in the comment zone below. If you have any problems using MiniTool software, you can feel free to contact us via [email protected].
DaVinci Resolve Not Opening FAQ
Minimum requirements:
- CPU: Intel Core i7 or AMD Ryzen 7
- RAM: 167GB
- GPU: 4GB VRAM
- Media Storage: SSD or RAID
Recommended requirements:
- CPU: Intel Core i9 or AMD Ryzen 9
- RAM: 32GB+
- GPU: 8GB+ VRAM
- Media Storage: SSD, Direct Attached RAID or NAS RAID (10GbE)
- Upgrade graphics card
- Remove effects
- Change optimized media and render cache settings
- Enable proxies
- Lower debayer
To update DaVici Resolve, you just need to follow the steps below:
- Open the program and click DaVinci Resolve from the upper ribbon bar.
- Choose Check for Updates from the drop-down menu.
- Download any available updates.
- Double-click the downloaded file to install the updates according to the onscreen instructions.