Compact discs like CD drives and DVD drives may be out of date. However, many users still depend on CDs and DVDs. For instance:
- Some people like to collect their favorite music on the CD drive.
- A CD drive or DVD drive is still necessary when installing a system or program on your PC.
What Happens When Windows 10 Won’t Recognize CD Drive
If you find your CD drive not showing in File Explorer, you may find the drive marked with a yellow exclamation point in Device Manager. When you open the Properties dialog box, you may see one of the following errors displayed in the Device status area.
- Windows cannot start this hardware device because its configuration information (in the registry) is incomplete or damaged. (Code 19)
- The device is not working properly because Windows cannot load the drivers required for this device. (Code 31)
- A driver (service) for this device has been disabled. An alternate driver may be providing this functionality. (Code 32)
- Windows cannot load the device driver for this hardware. The driver may be corrupted or missing. (Code 39)
- Windows successfully loaded the device driver for this hardware but cannot find the hardware device. (Code 41)
This issue may appear when you upgrade the Windows operating system, install or uninstall CD or DVD recording programs, etc.
How to Fix: Windows 10 won’t Recognize DVD or CD Drive
To resolve the problem that Windows 10 won’t recognize DVD drive (CD drive), plenty of utilized solutions are summarized here. Please try these methods to find one works on your computer.
Method 1: Show Hidden CD/DVD Drives
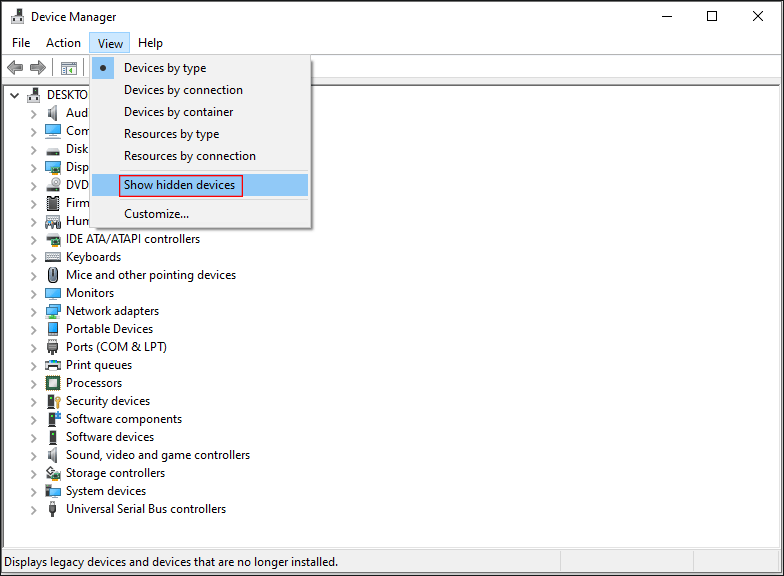
When you can’t find CD/DVD drives, they may be hidden by your computer. You can try this method to unhide them.
Step 1: Press Win + X and select Device Manager in the menu.
Step 2: Select View from the menu bar.
Step 3: Click Show hidden devices.
Method 2: Reinstall Driver
Step 1: Press Win + X and select Device Manager.
Step 2: Find DVD/CD-ROM drives and expand it.
Step 3: Right-click on each DVD or CD drive listed here.
Step 4: Choose Uninstall device.
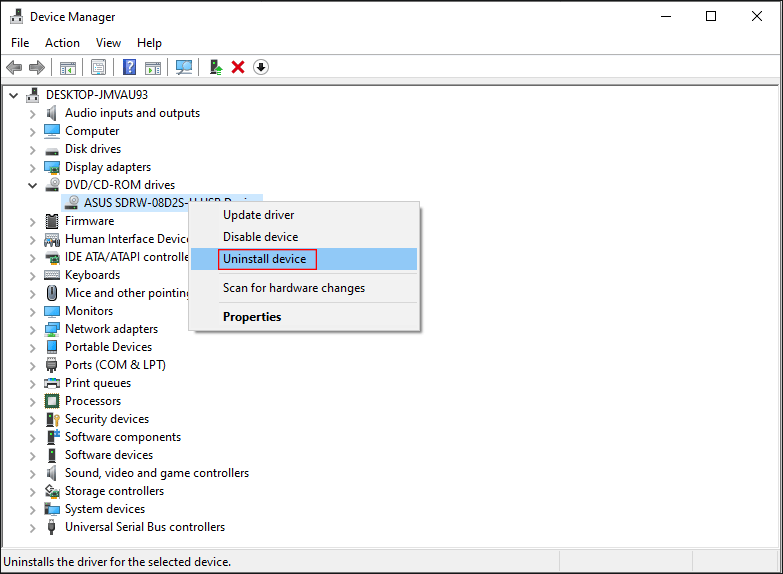
Step 5: Click Uninstall again in the pop-up window.
Step 6: Restart your PC. The computer will reinstall the driver automatically after startup.
In addition, you can also choose to roll back or update CD or DVD drivers with the following steps.
Step 1: Press Win + X and select Device Manager.
Step 2: Find DVD/CD-ROM drives and expand it.
Step 3: Right-click on each DVD or CD drive listed here.
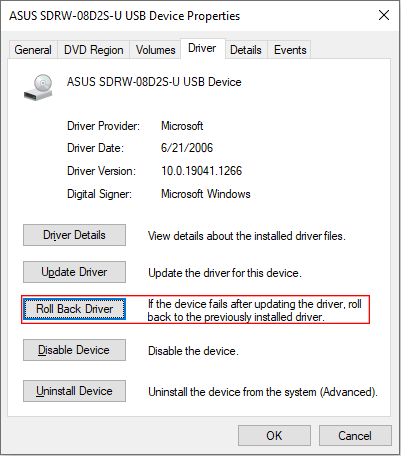
Step 4: Select Properties and turn to the Driver tab.
You can select Uninstall Device or Roll Back Driver in this window.
Method 3: Remove and Reinstall IDE/ATAPI Drivers
Another choice is to remove and reinstall IDE/ATAPI drivers. Many users find this method works.
Step 1: Press Win + X and choose Device Manager.
Step 2: Switch to the View tab and choose Show hidden devices.
Step 3: Select IDE ATA/ATAPI controllers.
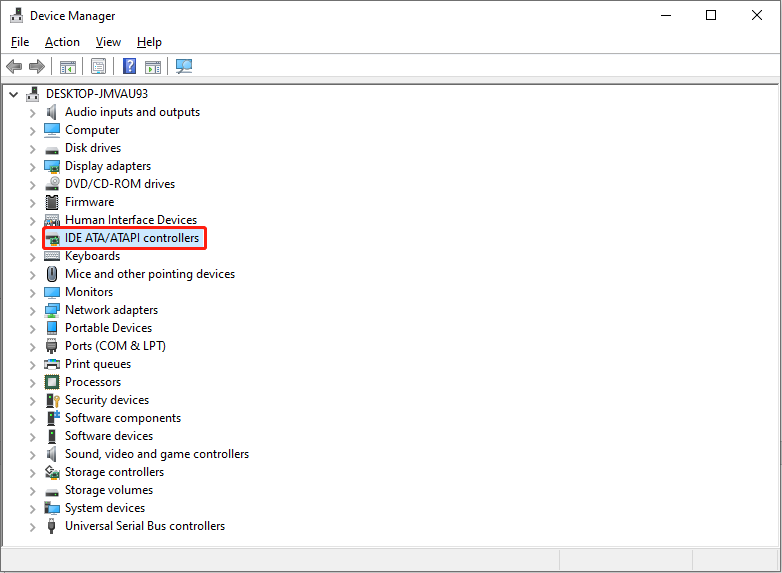
Step 4: Select and right-click on the ATA Channel 0, and then click Uninstall device.
Step 5: Repeat the step 4 until all the entries are uninstalled.
Step 6: Reboot the computer. The driver will be reinstalled automatically.
Method 4: Run Hardware and Devices Troubleshooter
For Windows 7/8/10
Step 1: Open Control Panel by typing and selecting it via Windows Search.
Step 2: View by Large icons and select Troubleshooting.
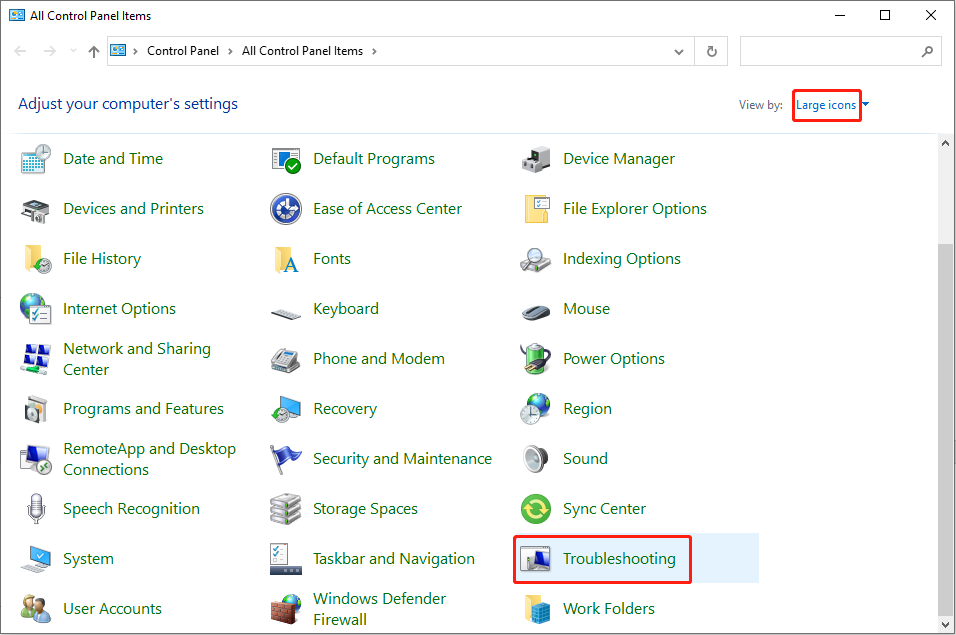
Step 3: Click the Hardware and Sound link and select Configure a device.
Step 4: Follow the on-screen instructions to complete.
For Windows 11
Step 1: Open Settings in the start menu.
Step 2: Click Update & Security and select Troubleshooting.
Step 3: Click Hardware & devices and go to Run the troubleshooter.
Step 4: Follow the instructions to complete.
Method 5: Delete Corrupted Registry Keys
Registry keys are very important for your system. You may find some hardware problems are caused by corrupted entries. When you can’t find CD/DVD drive, you can check if there is any corrupted registry key. But any problem occurred in the process of editing the registry will lead to serious problems. Thus, you’d better back up the registry key and your system before starting the next steps.
Back Up Registry and System
- Back Up Registry:
- Press Win + R and type regedit in the Run dialog window.
- Press Enter to start Registry Editor.
- Click on the File menu and select Export.
- The Export Registry File window will appear.
- You should choose a location to store the backup, give the file a name, and click Save.
- Back Up System:
- Press Windows + S.
- Type create a restore point.
- Click Create and follow the instructions to continue.
Also, you can back up the system by using a third-party tool like MiniTool ShadowMaker, a safe and functional backup software. You can use it to back up systems, disks, folders, and files. Besides, it contains other powerful features like differential and incremental backup, files and folders sync, system restore to dissimilar hardware, etc. You can try the trial edition and use it for 30 days for free.
MiniTool ShadowMaker TrialClick to Download100%Clean & Safe
Delete Corrupted Registry Keys
Step 1: Press Win + R to open the Run window.
Step 2: Type regedit in it and hit Enter.
Step 3: Navigate to HKEY_LOCAL_MACHINE > SYSTEM > CurrentControlSet > Control > Class.
Step 4: Select {4d36e965-e325-11ce-bfc1-08002be10318}.
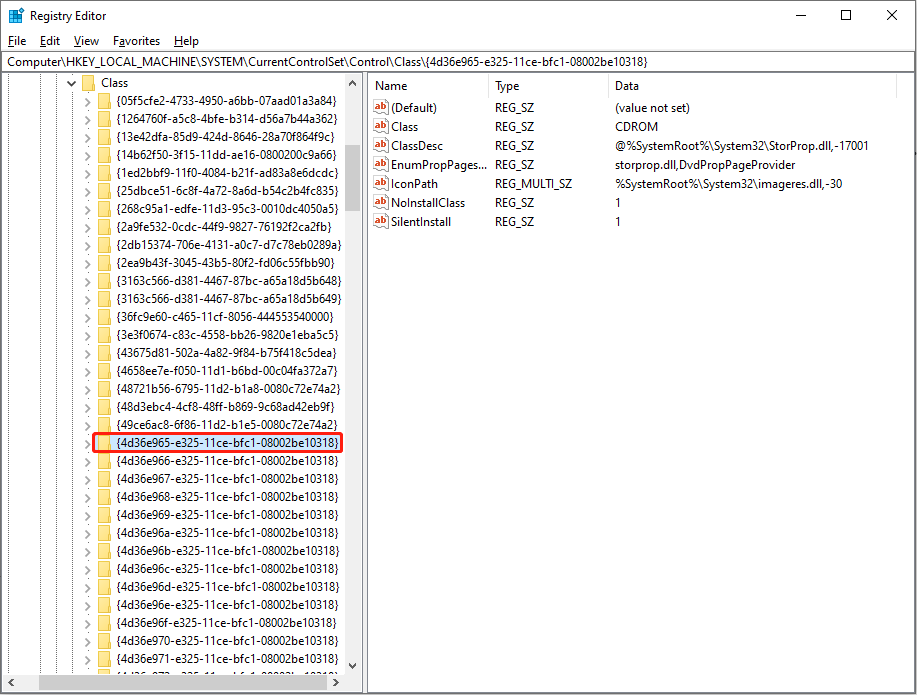
Step 5: Look for UpperFilters and LowerFilters in the right panel.
Step 6: Right-click on then and choose Delete.
Step 7: Close the Registry Editor and restart your PC.
Method 6: Create New Registry Subkey
If you can’t find the UpperFilters or LowerFilters value in the right panel in Method 5, you can try this way.
You can also try to fix the problem by creating a new Registry Subkey.
Step 1: Press Win + R to open the Run window.
Step 2: Input regedit and click Enter to open the Registry Editor.
Step 3: Navigate to HKEY_LOCAL_MACHINE > SYSTEM > CurrentControlSet > Services.
Step 4: Select and right-click on atapi.
Step 5: Select New > Key in the context menu.
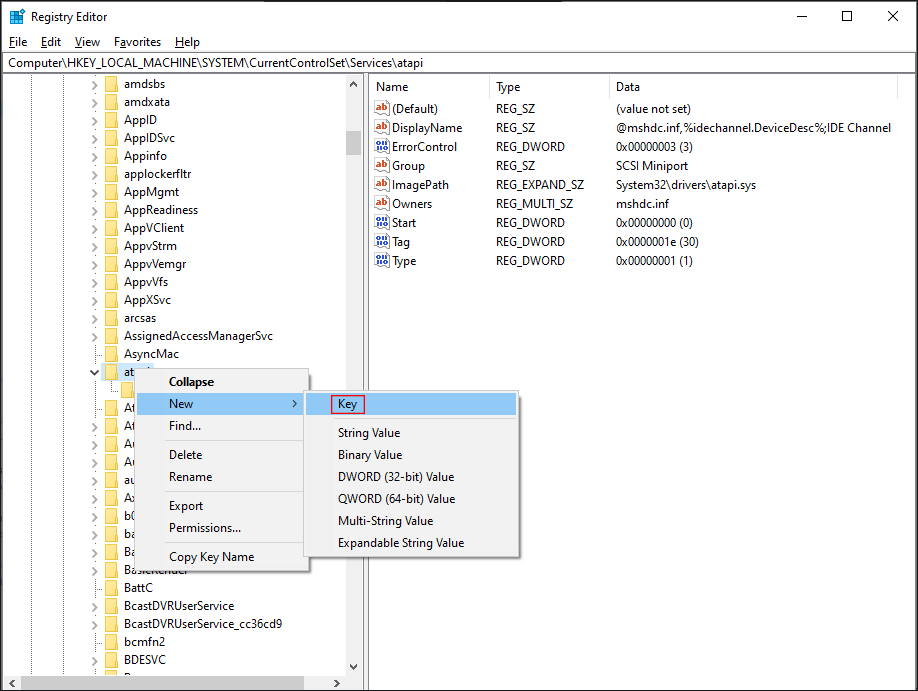
Step 6: Rename it as Controller0.
Step 7: Right-click on the new Controller0 key.
Step 8: Choose New > DWORD (32-bit) Value from the menu.
Step 9: Rename it as EnumDevice1.
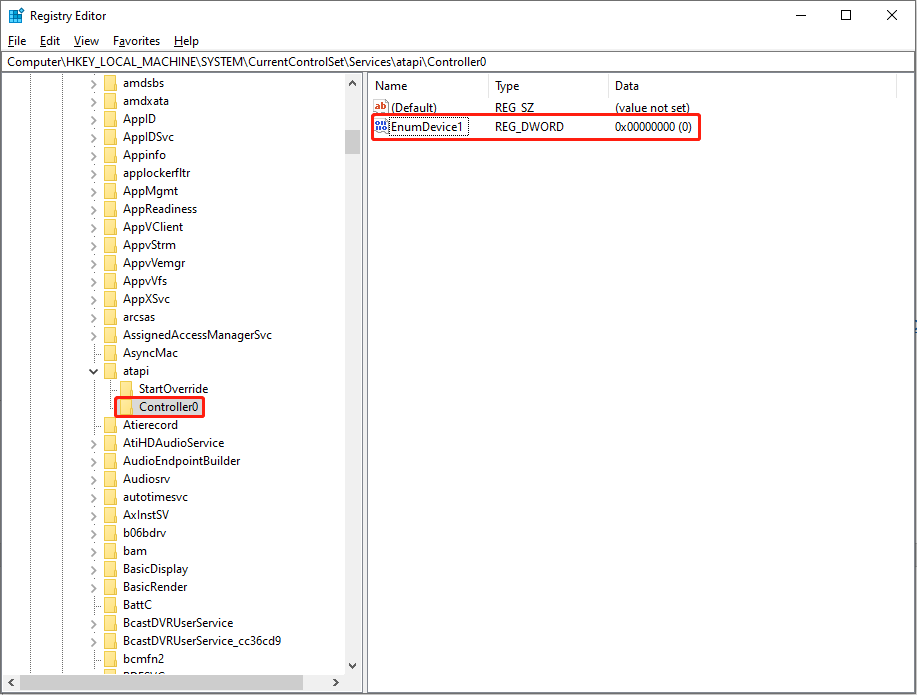
Step 10: Right-click on EnumDevice1 and select Modify.
Step 11: Type 1 into the Value data box and click OK to save changes.
Step 12: Close the Registry Editor and restart your PC.
Method 7: Use Command Prompt
Command Prompt is a portable tool for fixing many issues. You can use it to restore the DVD-ROM function.
Step 1: Press Win + R to open the Run window.
Step 2: Type cmd and press Shift + Ctrl + Enter to run as administrator.
Step 3: Copy this command and paste it into the Command Prompt window:
reg.exe add “HKLM\System\CurrentControlSet\Services\atapi\Controller0” /f /v EnumDevice1 /t REG_DWORD /d 0x00000001.
Please pay attention to the space in this command.
Step 5: Press Enter on the keyboard and wait a second.
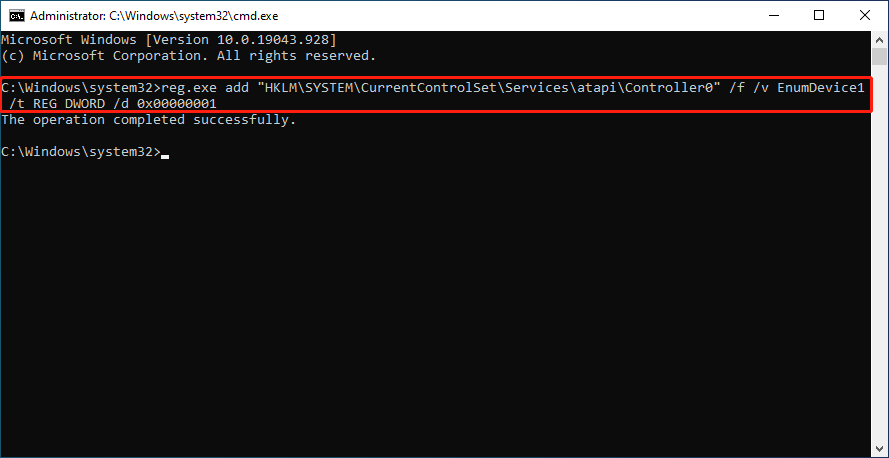
You can go back to check whether the CD/DVD icon is back.
How to Recover Lost Data from CD Drive
After you try the above methods to fix the problem, we advise you to scan data on your CD/DVD. The process of resolving this issue may cause your data lost. If finding your data lost on the disc, it’s better to rescue them right now to avoid overwriting.
MiniTool Power Data Recovery, the best free data recovery software, is capable of restoring data from various data storage devices, such as external and internal hard drives, CD/DVD drives, memory cards, and so on. Besides, it allows you to scan different locations. For instance, you can scan the desktop, Recycle Bin, or the selected folder to save the scan time; or scan a whole drive to get all your files at once.
MiniTool Power Data Recovery free edition can help you scan and check whether the device contains your wanted files. Additionally, it can restore no more than 1 GB of files. It is a good choice to try the free edition first.
You can follow the next steps to recover data from a CD/DVD drive.
Step 1: Download and install MiniTool Power Data Recovery.
MiniTool Power Data Recovery FreeClick to Download100%Clean & Safe
Step 2: Put your CD/DVD into the driver and launch the software.
Step 3: Switch to the Devices tab and select the CD/DVD drive to scan.
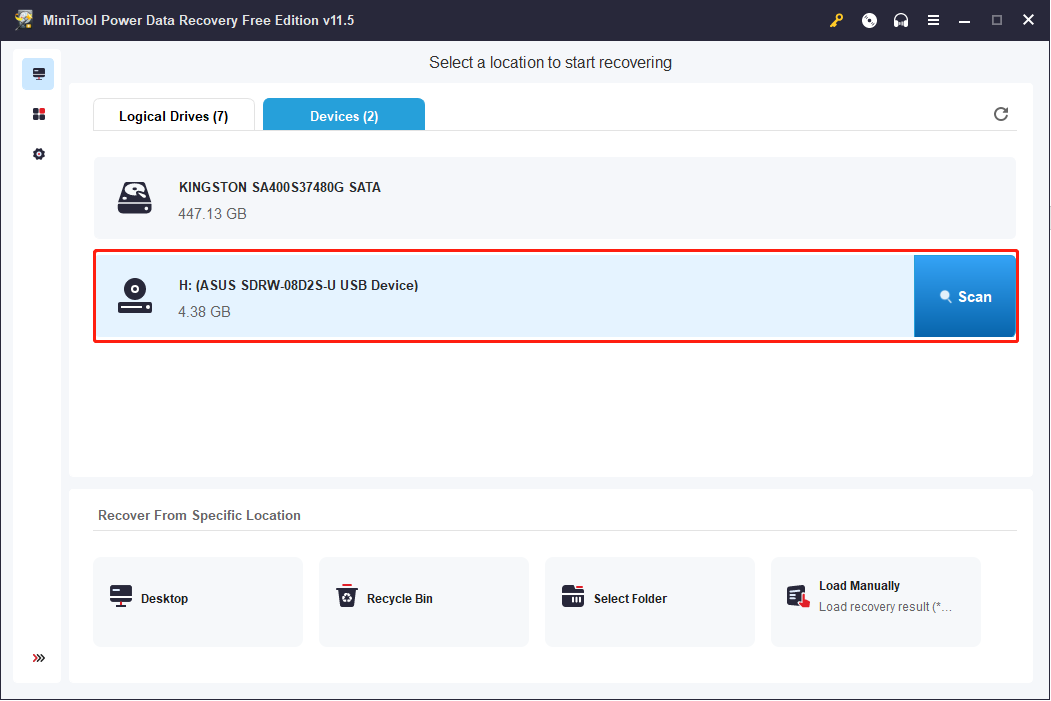
Step 4: The software will start scanning the select the CD/DVD drive and list all the found files.
Step 5: Scroll down the file list to find your desired files.
- Filter function can set conditions in File Type, Date Modified, File Size, and File Category four aspects.
- Type function can filter files of the same type, such as documents, pictures, archives, and so on.
- Preview function helps in checking whether you find the correct files.
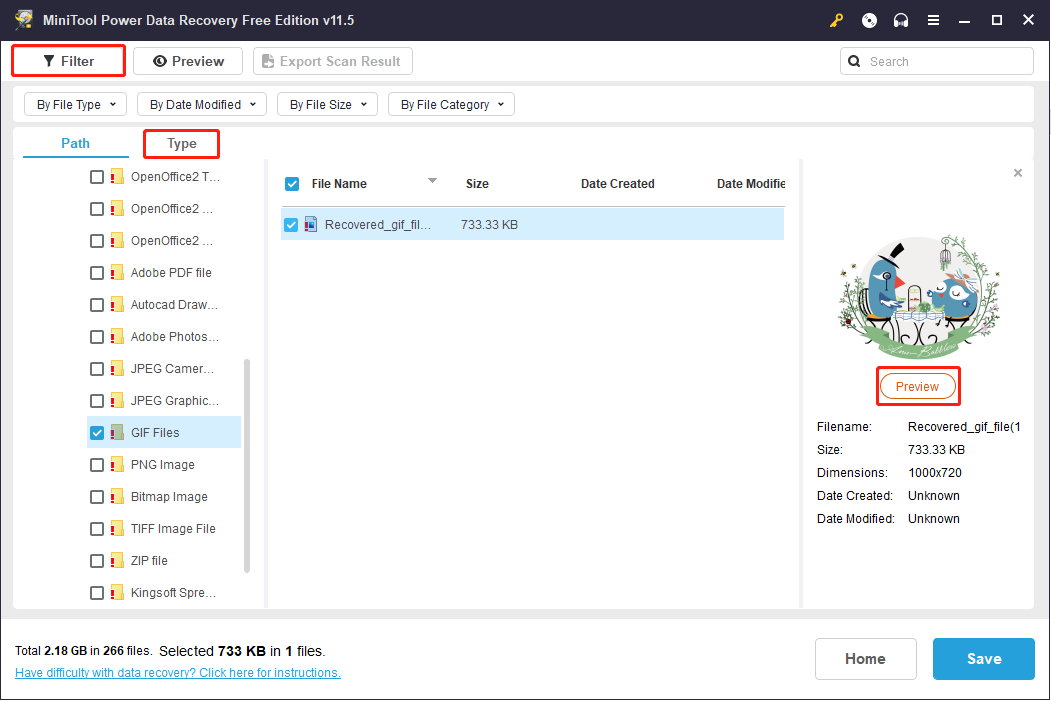
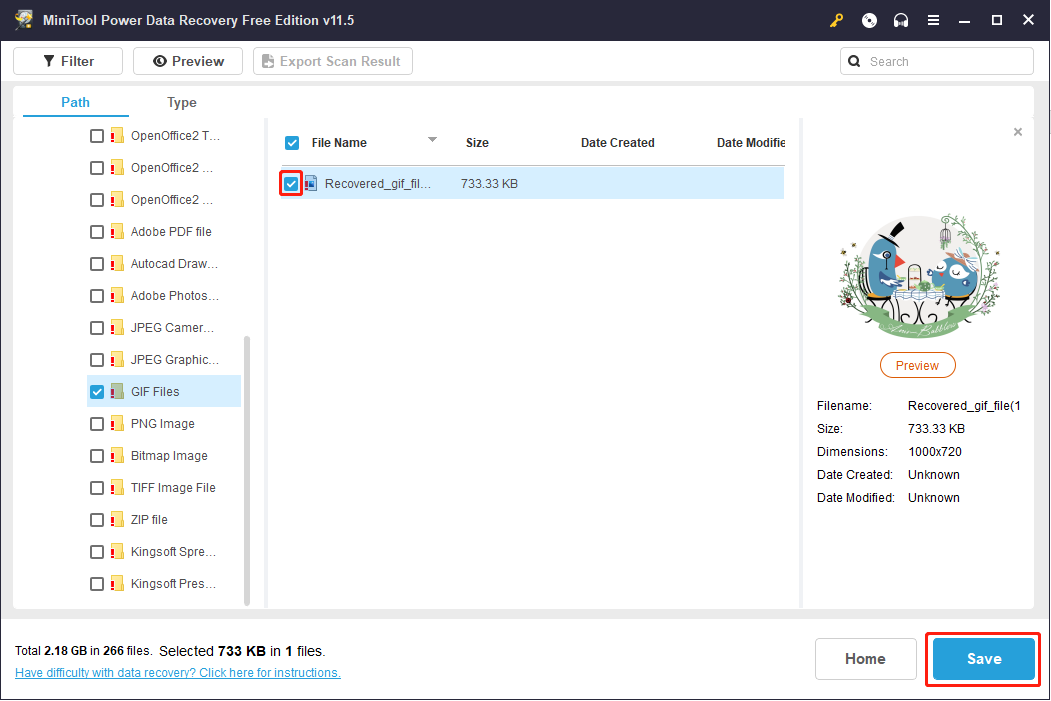
Step 6: Check your wanted files and click the Save button.
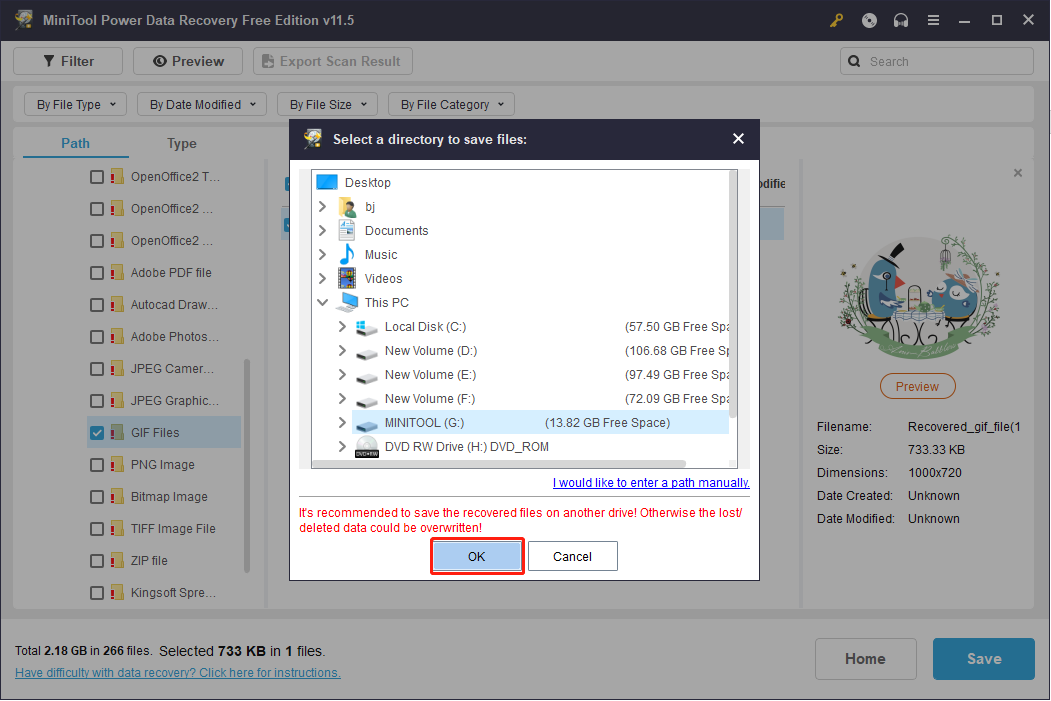
Step 7: Choose an appropriate path to restore your files and click OK.
Do not save your data to the original drive, which may overwrite other deleted data, then result in data unrecoverable.
If finding the data to be recovered is more than 1GB, we recommend you upgrade MiniTool Power Data Recovery to an advanced edition. With it, you can retrieve data with an unlimited data recovery capacity and rescue data from dead devices with a snap-in WinPE Bootable Builder. If you are a personal user, the Personal Ultimate edition is the best deal.
Final Words
When you realize Windows 10 doesn’t recognize CD drives, you can follow the steps mentioned above to make the CD drive appear on your PC. Additionally, you can also use MiniTool Power Data Recovery to rescue your lost data if necessary. You can let us know all your puzzles about this data recovery software via [email protected].
