Part 1: Windows 10 Show Hidden Files Not Working
In Windows 10, if you want to hide a file or folder, you can right-click on the target item, choose Properties from the popup menu to enter the General interface directly. After that, check Hidden and OK.
Thus, sometimes, when you can’t find your needed files on the data storage device, you can firstly try showing hidden files. If this way doesn’t work, you can then use a piece of free file recovery software to recover your missing files.
MiniTool Power Data Recovery TrialClick to Download100%Clean & Safe
How to see hidden files then?
In Windows Explorer, check Hidden items under View option. After that, the hidden files or folder will appear.
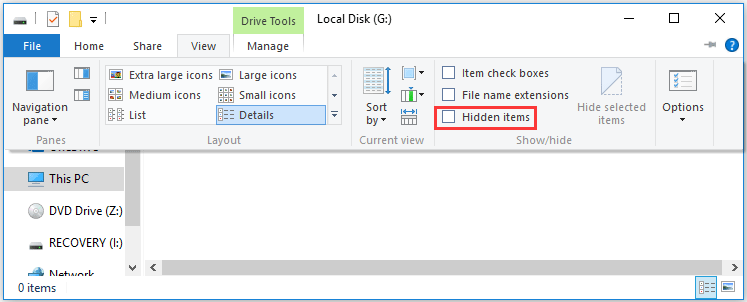
However, Windows 10 show hidden files not working issue may happen when you want to unhidden hidden files, just like the following situation from Reddit:

On the above case, the user also tried going View -> Options -> Change folder or search settings -> View and selecting “Show hidden files, folders, and drives” and unchecking “Hide protected operating system files” method to show the hidden files, but failed.
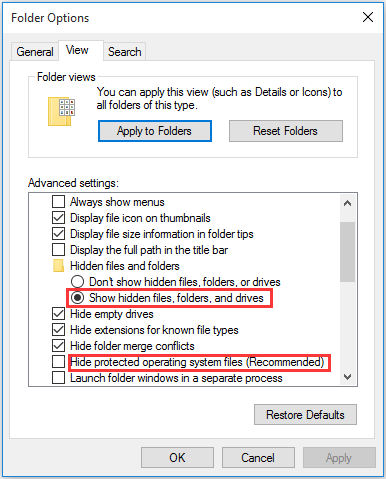
This is a typical show hidden files and folders not working issue. In this situation, do you know how to get rid of this issue? In the following part, we will show you some available solutions.
Part 2: How to Fix Show Hidden Files and Folders Not Working
Solution 1: Use CMD to Get Rid of This Issue
It is not difficult to handle the Windows 10 folder options show hidden files not working issue by using this solution. Besides, it can work on the computer internal hard drive, external hard drive, USB flash drive, memory card, and so forth.
Provided that drive G: on your computer internal hard drive is the target which contains the hidden files you want to unhide:
Step 1: Type cmd in search box and press Enter.
Step 2: After entering the Command Prompt interface, please type G: and press Enter. Then, you can note that the blinking line will go down and display G.
Step 3: Please type attrib –s –h –r /s /d and press Enter. After that, the blinking line will go down again with drive letter G:.
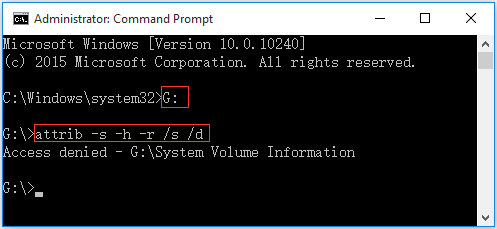
Here, you may see a message like this: Access denied – G:\System Volume Information. Don’t worry when seeing this. It appears because this folder stores Windows System Restore points. You can leave it alone, and then enter the target drive to check whether you can see the hidden files.
Solution 2: Modify the Registry Key
If solution 1 doesn’t work for you, we think you can try to modify the Registry Key.
Step 1: Press Windows and R keys on the keyboard at the same time. Then, type regedit and press Enter to continue.
Step 2: Navigate to:
HKEY_LOCAL_MACHINE\SOFTWARE\Microsoft\Windows\CurrentVersion\Explorer\Advanced\Folder\Hidden\SHOWALL
Step 3: Then, find CheckedValue and make sure that its data is 1. If not, you need to click on CheckedValue and edit it to be 1 manually.
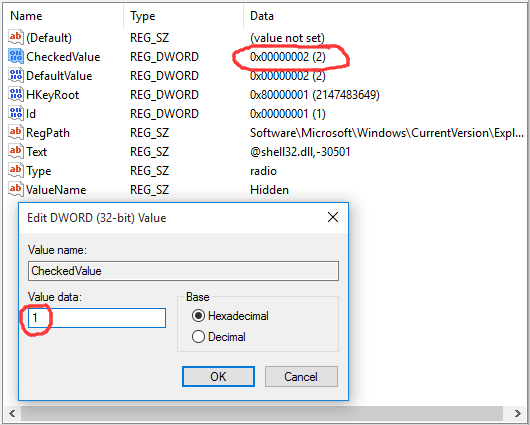
After editing the registry, you need to reboot your machine to make the change effective.
Then, open the target drive to check whether the hidden files are showing up finally.
Solution 3: Uninstall the Antivirus Software
Sometimes, Windows 10 show hidden files not working issue is just caused by antivirus software you installed.
Firstly, let’s see a real-life case as follows:
Hi, Since yesterday I’ve been unable to toggle hidden files from the View tab of the ribbons. It’s unchecked and when I click on it the check mark appears for a second and disappears again. Only change I’ve done recently is installed an antivirus (Bitdefender 2016), could that be the cause?tenforums.com
There was a newly installed antivirus software – Bitdefender 2016, and the users tried many methods to fix Windows 10 folder options show hidden files not working issue, but they all failed finally. But after disabling this antivirus software, this issue disappears.
Usually, the Intrusion Detection module of Bitdefender can change the critical files and registry entries, and it is the exact cause of this show hidden files and folders not working issue.
If you happen to install this software, you should disable this antivirus software to check whether you can get rid of this issue successfully.
Solution 4: Run System File Checker and DISM Tools
If all of the above three solutions can’t solve this Windows 10 show hidden files not working issue, there might be some system file corruptions on your system. In this situation, you can run the System File Checker and DISM tools to scan your PC for any corruptions and then correct them.
This article from ZigZag3143 (MS -MVP) introduces the detailed steps to do this job: System file check (SFC) Scan and Repair System Files & DISM to fix things SFC cannot.
In case that all of the above solutions can’t unhide hidden files for you successfully, we will introduce a data recovery tool which can be used to find your hidden files in the next part.
Part 3: How to Recover Hidden Files with MiniTool Data Recovery Tool
Windows 10 show hidden files not working? MiniTool Power Data Recovery can assist you to recover hidden files.
This program is specially designed to recover your different kinds of files from various kinds of data storage drives, like computer hard drive, external hard drive, USB flash drive, memory card, and more.
With this tool, you can find both existing files and deleted files which are not overwritten by new data.
It has four recovery modules: This PC, Removable Disk Drive, Hard Disk Drive, and CD/DVD Drive.
Among these four recovery modules, This PC is the suitable one for you to restore hidden files from computer internal hard drive and external hard drive in case that Windows 10 folder options show hidden files not working.
Additionally, if you need to recover hidden files from removable drives, please try Removable Disk Drive module.
Now, you can download and install MiniTool Power Data Recovery Trial Edition on your computer to see whether it can find your wanted hidden files.
MiniTool Power Data Recovery TrialClick to Download100%Clean & Safe
We still take the computer internal hard drive G: as an example here.
Step 1: Open the software and you will enter This PC interface directly. Then, you need to choose the drive which contains the files you want to recover.
Here, if you only need to recover some specific types of files, you can click Settings on the interface, and uncheck the file’s types you don’t want to recover. Then, press OK to go back to This PC interface.
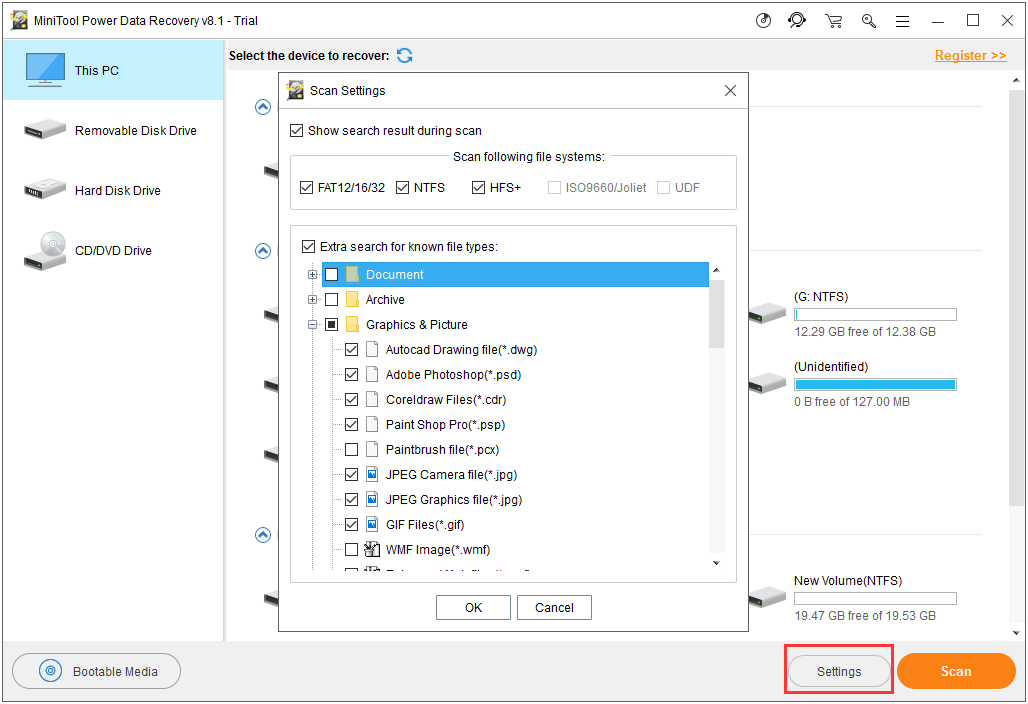
Then click on the Scan button to start the scanning process.
Step 2: When the scanning process ends, you can see the scan result. By default, the scanned files are listed by path. You can unfold each folder from the left list to look for the files you want to recover.
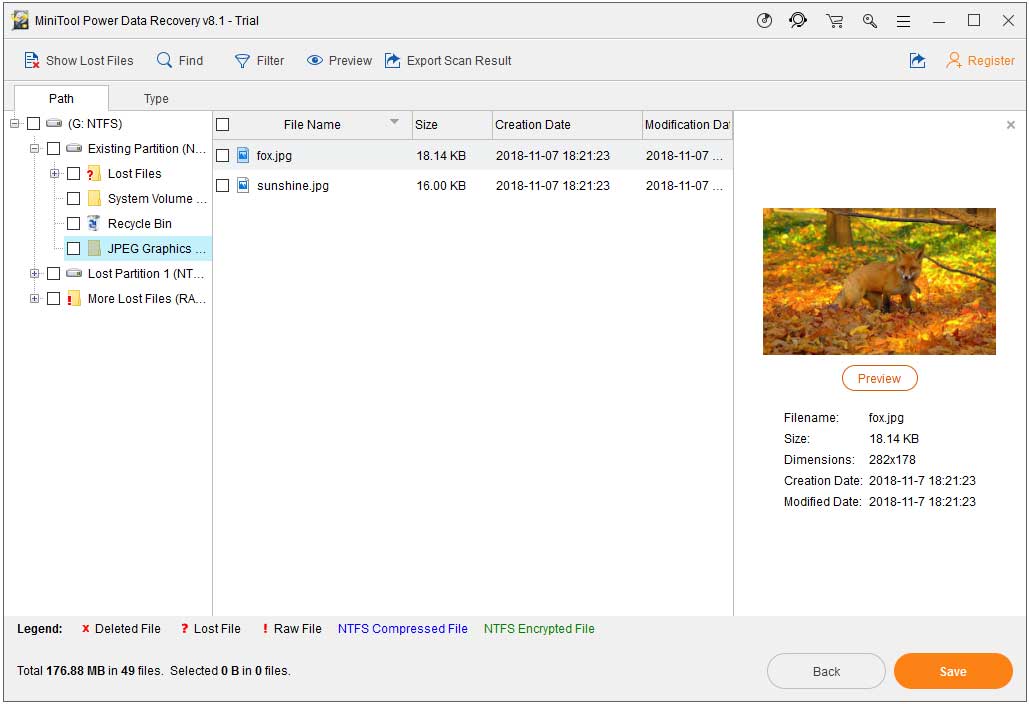
However, there are some simple ways for you to find your needed files easily:
Use Type option
Click on Type and this software will show you files by type, and then you can find your needed files easily.
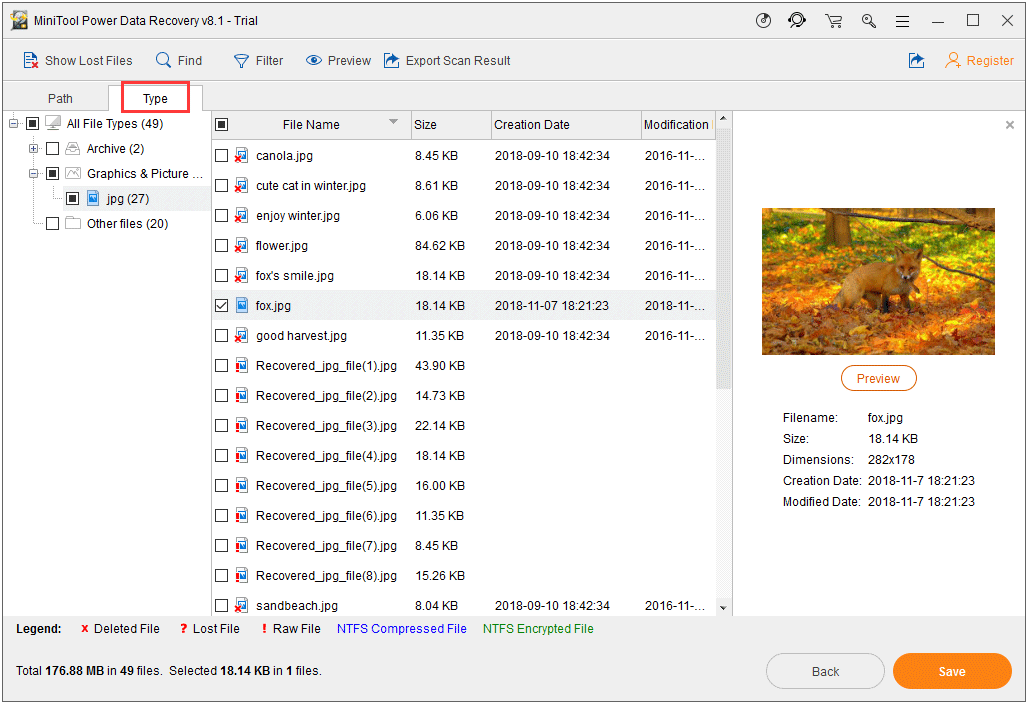
Use Find option
If you still remember the name of the file you want to recover, you can click on Find feature and enter its name to locate it quickly.
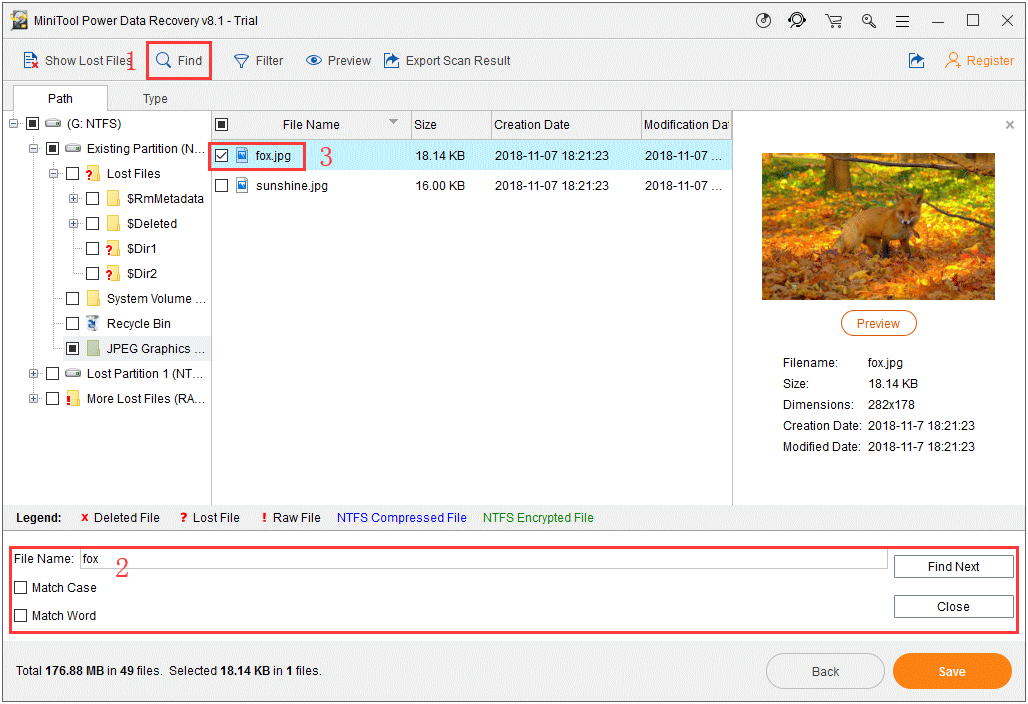
Besides, you can preview pictures and text files which are not larger than 20MB.
Since you are using the trial edition of this software, you are not allowed to save the found files. However, you can update this software to an advanced edition to recover all of them without limitation.
How to see hidden files? How to recover hidden files? MiniTool can tell you!Click to tweet
In addition, this software has two other useful functions: load the last scan result and load recovery result manually.
How to understand and use these two functions?
- This software can keep the last scan result automatically for you. So, you can click on the first option under Recovery Result section to load the last scan result.
- When you enter the scan result interface, you can press Export Scan Result option to save the scan result on your computer. Next time, you will not need to scan this drive again because you can just click on Load Manually option to load the exported scan result directly.

Both of these two functions can save a lot of time for you if you need to scan the drive for the second time.
Here, please note that they are available even in the trial edition of this software.
To recover hidden data from the removable drives, like USB flash drives, memory cards, pen drives, SD cards, and more, you need to connect the drive with your computer, and then choose Removable Disk Drive module to do the job.
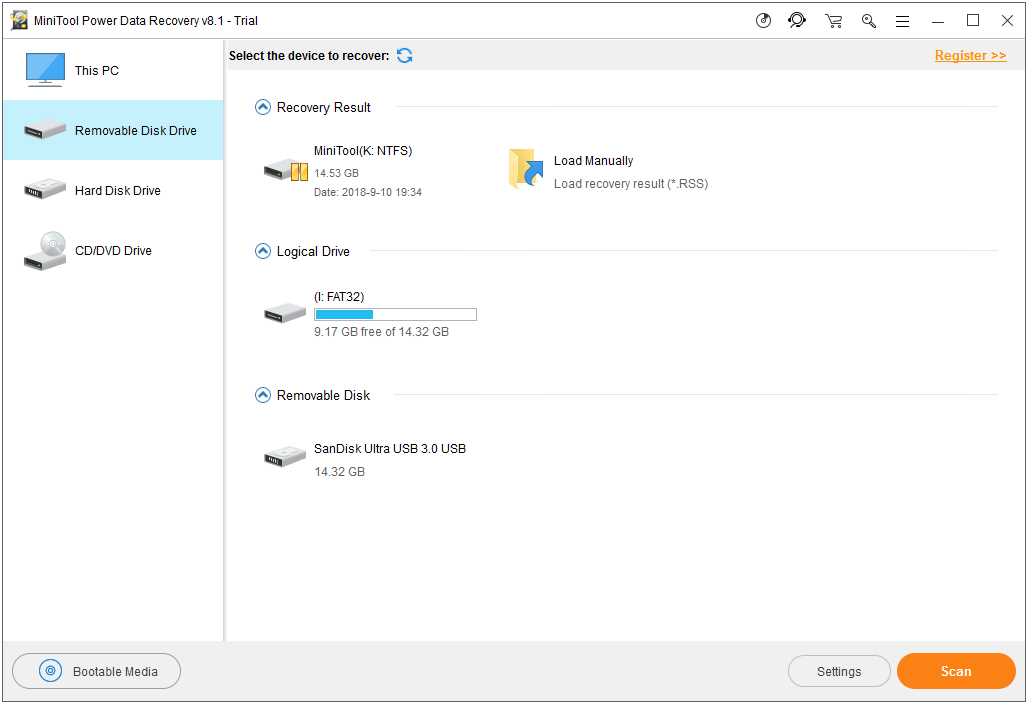
This recovery module is also very easy to use, and we will not repeat it here.
Part 4: How to Show Hidden on Windows 7/8.1
If you are using Windows 7/8.1, to show hidden files, you need to take some different operations:
On Windows 8.1
Step 1: Press the Windows + S keys to open the Search box.
Step 2: Then, you need to type folder into the Search box. After that, select Folder Options from the list of search results to open Folder Options window.
Step 3: Select the View tab. And then under Advanced Settings, you need to choose Show hidden files, folders, and drives. After that, click on Apply, and then click on OK.
On Windows 7
Step 1: Press the Start button and choose Control Panel. Then, choose Appearance and Personalization.
Step 2: Press Folder Options, and then select the View Tab. Under Advanced settings, select Show hidden files, folders, and drives, and then select OK.
Also, if the above steps can’t unhide hidden files on Windows 7/8.1, you can also try the 4 solutions mentioned in part 2 to solve show hidden files and folders not working Windows 7/8.1 issue. Besides, MiniTool Power Data Recovery is available for you to retrieve hidden files when the 4 solutions don’t work.
Part 5: Verdict
After reading this article, you must know how to handle Windows 10 show hidden files not working issue. Just try these solutions mentioned in this post to find the hidden files.
Should you have any ideas and solutions when you are using MiniTool software, please contact us via [email protected], or you can let us know in the comments.
![[SOLVED] USB Drive Not Showing Files and Folders + 4 Methods](https://mt-test.minitool.com/images/uploads/2018/08/usb-drive-not-showing-files-and-folders-thumbnail.jpg)
