Is Windows not saving screenshots to the Screenshots folder? In this post from MiniTool, we will walk you through how to find or recover disappeared screenshots. Besides, we will tell you what should you do when the screenshots are not saved in the Screenshots folder.
Windows Not Saving Screenshots to the Screenshots Folder
By default, if you take a screenshot by pressing Windows + Print Screen key combination, Windows will save your screenshot to the Screenshots folder automatically. The specific location is C:\Users\username\Pictures\Screenshots.
However, recently many Windows 11/10 users reported that their screenshots are not saved in the Screenshots folder. Here is a true example.
Windows 10 not saving screenshots in the Screenshots folder. I've already looked through at least a dozen forums on this. They aren't saving to my OneDrive or anywhere else. I can't find my screenshots on Windows 10.answers.microsoft.com
In today’s article, we will show you how to find the screenshots and how to recover screenshots if they cannot be found.
How to Find the Screenshots
Way 1. Check the Clipboard
Not every screenshot taken by a shortcut will be saved in the Screenshots folder. For example, if you take a screenshot by pressing Windows + Shift + S key combination, the screenshot will be stored in the clipboard temporarily. And you need to click the screenshot and save it to a desired location.
So, facing the matter of “Windows not saving screenshots to the Screenshots folder”, you can access the clipboard and check if the screenshots are located there.
Way 2. Check Recent Files From Quick Access
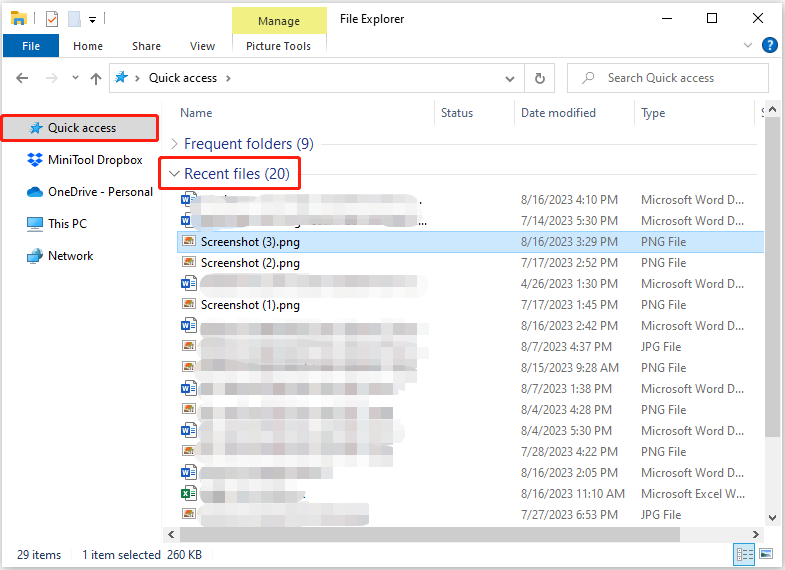
Apart from the clipboard, you can check if you can see the screenshots from Windows Quick Access.
Just press Windows + E key combination to open File Explorer.
Move on to the Quick access section, and then expand Recent files to check whether your screenshots are located here.
Way 3. Recover Lost/Deleted Screenshots
If you cannot find your screenshots from the Screenshots folder, the clipboard, or the Quick Access section, the screenshots may have been deleted or lost permanently. In this case, if you cannot take the same screenshot again, you need to turn to a piece of free data recovery software.
As the best data recovery software, MiniTool Power Data Recovery is strongly recommended. It is designed to recover not showing up downloads, Word documents, Excel files, pictures, videos, audio, and so on.
Besides, MiniTool Power Data Recovery is effective in various data loss situations, such as files copied to a USB drive disappearing, data loss after a Windows update, files getting lost after an MBR to GPT conversion, and so on.
Now, download and install MiniTool Power Data Recovery to recover screenshots.
MiniTool Power Data Recovery FreeClick to Download100%Clean & Safe
Step 1. Select the target drive to scan.
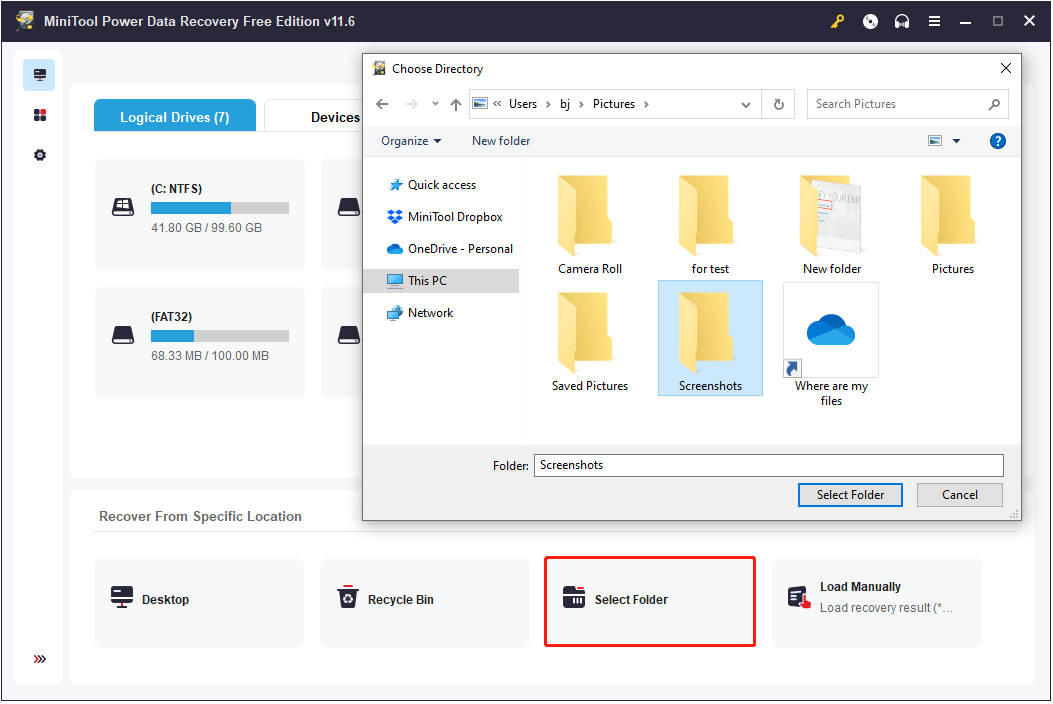
Launch MiniTool Power Data Recovery to get its main interface. On its home page, select the target drive where the deleted or lost screenshots should exist. Since the Screenshots folder location is C:\Users\username\Pictures\Screenshots, here we select the C drive to scan.
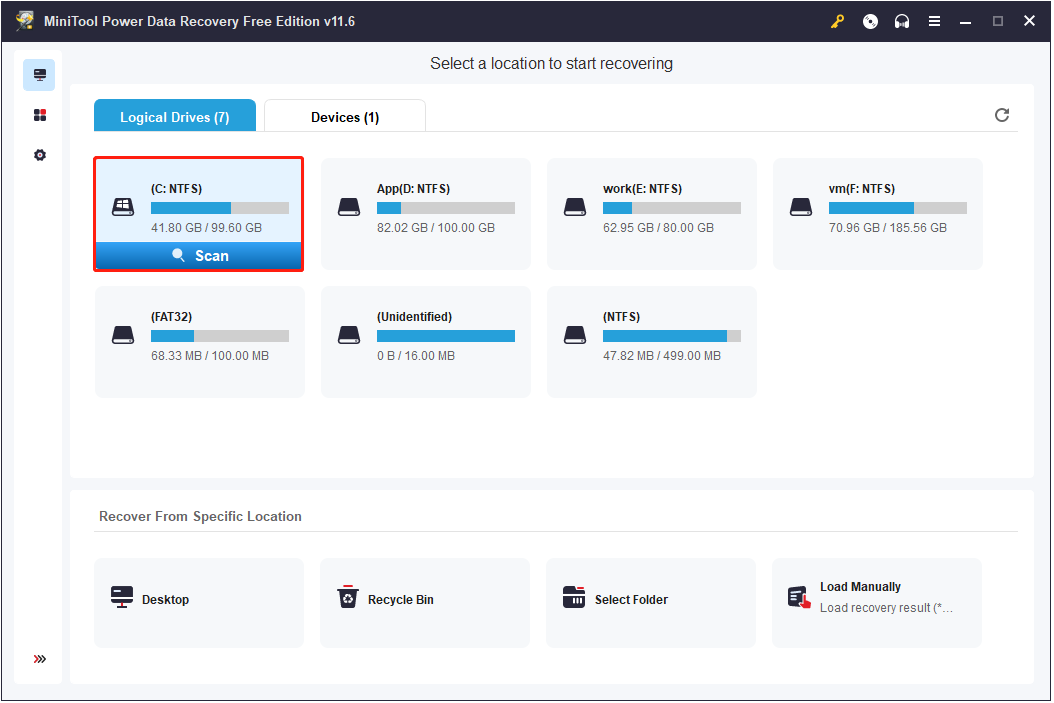
Or, if the screenshots are deleted from the Screenshots folder, you can click Select Folder and choose to scan the Screenshots folder individually.
Step 2. Preview the found screenshots.
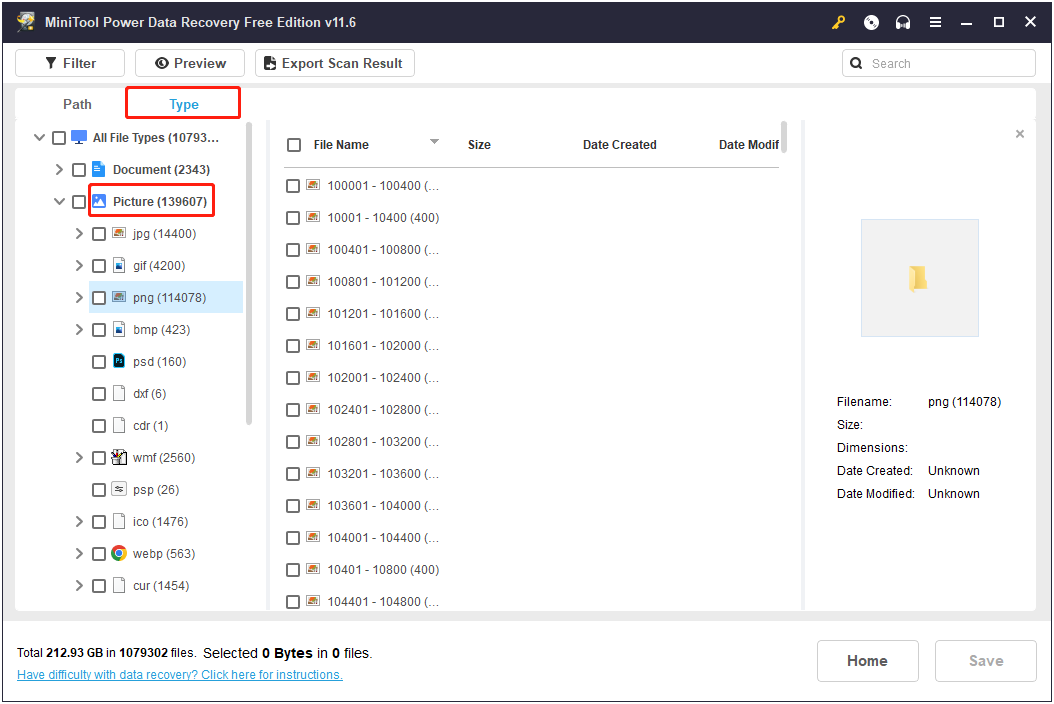
Wait for the scanning process to complete. Then you will see all the found files are listed by file path in the scan results window. To locate the screenshots faster, you can move on to the Type category list to view pictures only and specify the needed image formats, such as JPG or PNG.
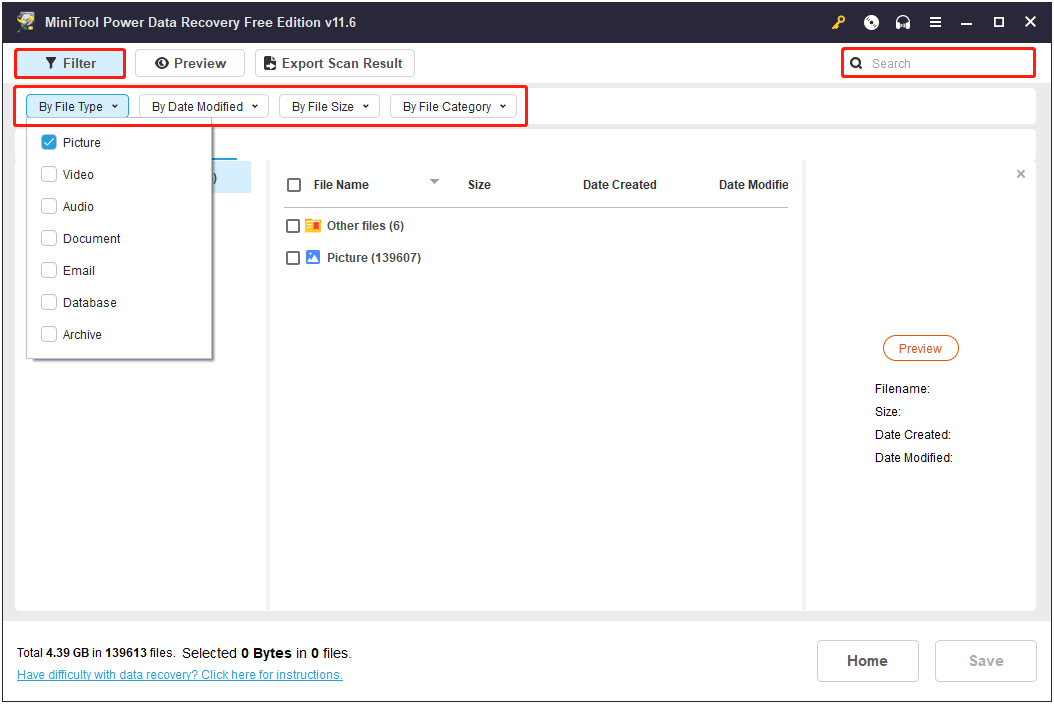
In addition, the Filter and Search features are also helpful for quickly locating desired files.
- Filter: You can filter all listed files by file type, file modification date, file size, and file category.
- Search: You can search for a specific file or folder by using its file/folder name. For example, you can type “screenshot” into the search box and press Enter to display all screenshots that have not been renamed.
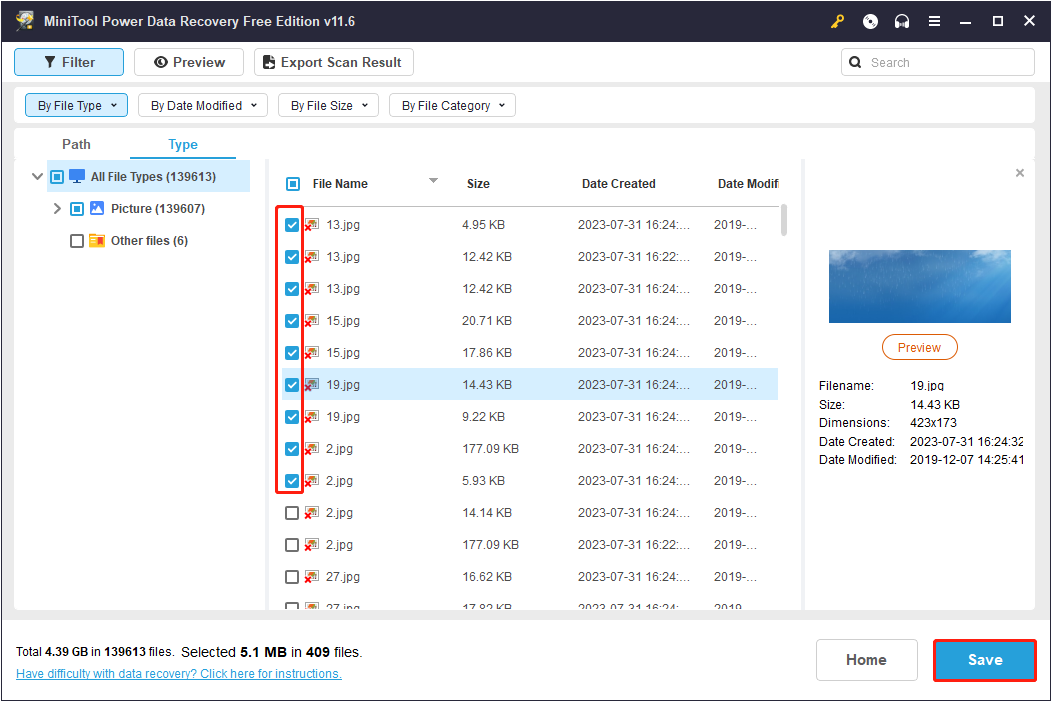
To make sure the found items are required, you can double-click the screenshots one by one to preview them. Supported image formats to preview include JPEG, JPG, JPE, BMP, TIFF, TIF, GIF, PNG, EMF, WMF, and WEBP.
Step 3. Select and save all required screenshots.
Check all needed screenshots and click the Save button to choose a location to store the selected items. It is suggested to store the recovered screenshots to another drive to prevent data from being overwritten.
How to Fix Windows Not Saving Screenshots to the Screenshots Folder
After finding or recovering your screenshots, it is vital to prevent the problem from happening again. Listed below are several feasible solutions to help you get rid of the “screenshots are not saved in the Screenshots folder” issue.
Fix 1. Prevent OneDrive From Saving Screenshots
“Screenshots not showing up in the Screenshots folder” may be because you set to save screenshots to OneDrive. So, to fix this issue, you need to stop saving screenshots to OneDrive.
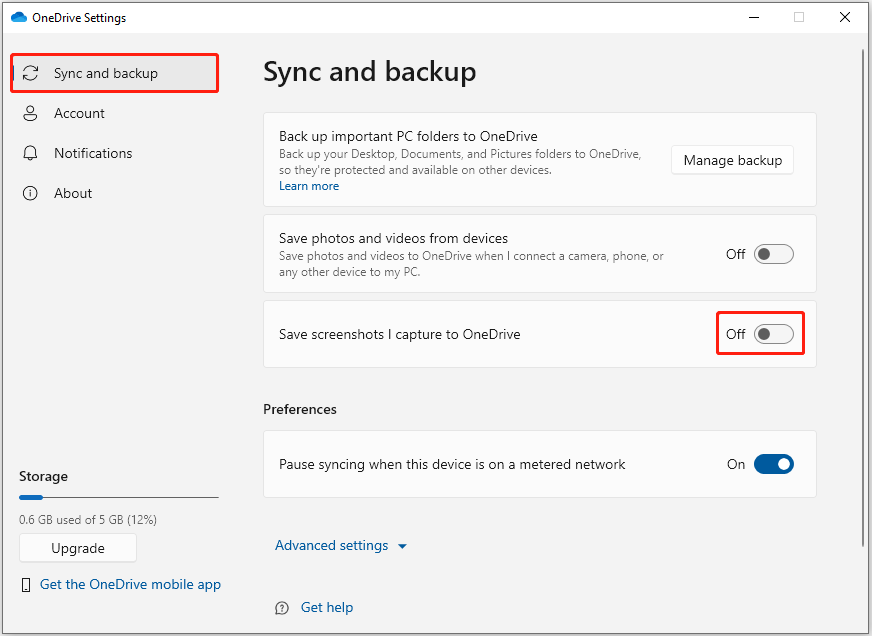
Step 1. Click the OneDrive icon in the taskbar and click the gear icon located in the upper right corner to select Settings.
Step 2. In the Sync and backup section, make sure the Save screenshots I capture to OneDrive option is turned off.
Fix 2. Change the Permission of the Screenshots Folder
If the Screenshots folder does not have write permissions, the matter of “Windows not saving screenshots to the Screenshots folder” may occur. To gain permission, follow the steps below.
Step 1. In File Explorer, navigate to C:\Users\username\Pictures.
Step 2. Right-click the Screenshots folder to select Properties.
Step 3. In the new window, move on to the Security tab and check if your user account has the Full control permission of the Screenshots folder.
If not, click the Edit button, then make sure your user account has the Full control permission.
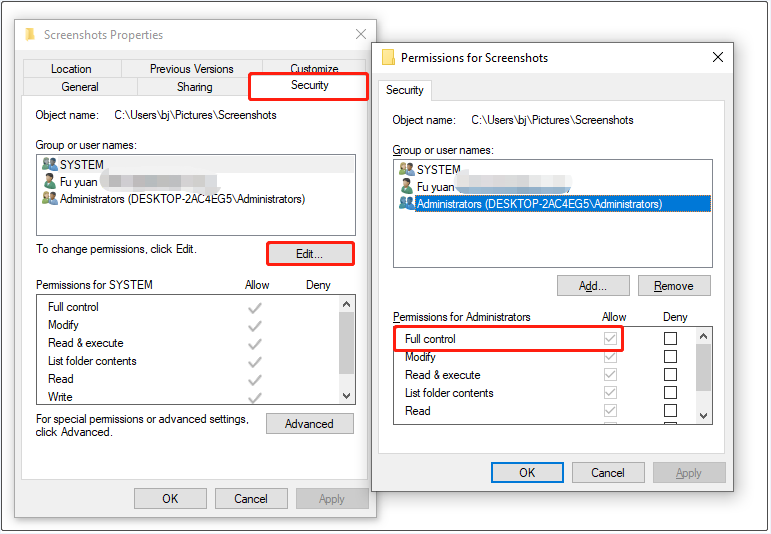
Step 4. Click Apply and OK sequentially to make this change take effect.
Now you can try to press the Windows + Print Screen keyboard shortcut and check if the screenshot is stored to the Screenshots folder automatically.
Fix 3. Tweak Windows Registry
The last way to solve the “Windows not saving screenshots to the Screenshots folder” issue is to tweak the Windows registry entries.
MiniTool ShadowMaker TrialClick to Download100%Clean & Safe
Step 1. Press Windows + R key combination to open the Run window.
Step 2. In the input box, type regedit and press Enter.
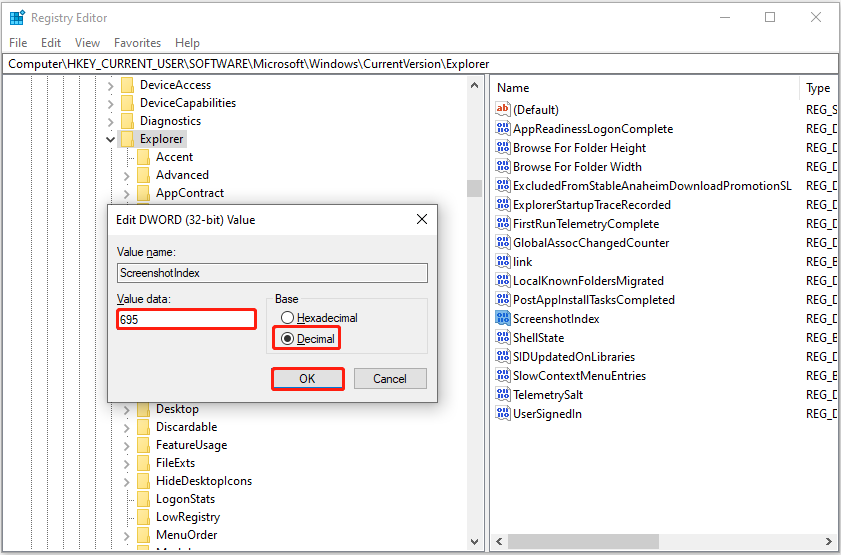
Step 3. In Registry Editor, navigate to the following location:
Computer\HKEY_CURRENT_USER\SOFTWARE\Microsoft\Windows\CurrentVersion\Explorer
Step 4. In the right panel, double-click ScreenshotIndex. Then select the option of Decimal and set up the value data to 695. Finally, click OK.
Step 5. Next, navigate to:
Computer\HKEY_CURRENT_USER\SOFTWARE\Microsoft\Windows\CurrentVersion\Explorer\User Shell Folders
Step 6. In the right panel, double-click {B7BEDE81-DF94-4682-A7D8-57A52620B86F} and set its value data to %USERPROFILE%\Pictures\Screenshots.
Step 7. Restart your computer and check if your newly taken screenshots are showing up in the Screenshots folder.
Wrapping Things Up
This post shows you how to find and recover screenshots when Windows not saving screenshots to the Screenshots folder. Besides, you can fix the issue by stopping saving screenshots to OneDrive, changing the Screenshots folder permission, and modifying the registry.
If you have found any other good solutions to this topic, welcome to contact us via [email protected].

